

10 o'clock oil temps - oil cooler fan/thermostat (fixed)
 04-23-2010, 03:23 PM
#31
Nordschleife Master
Hang in there, dude.
Do comprehensive searches of thermostat repairs from this forum.
Gather tidbits from a bunch that speak to you.
Oh - Simple Green the snot out of the thermostat area on your way in. Simple Green, left soaking for 5-10 minutes, does a remarkable job cutting through road grime and undercoating varnish.
(Clean vs. dusty: whether I'm swearing or enjoying the battle, my attitude is made better by a clean area. I don't know why. YMMV.)
OH! Is there any way of precluding that it's pinched lines? I'm thinking of feeling the two lines going forward after the car's warmed up.
Both lines cold? It's likely thermostat stuck.
One line warm? Thermostat is likely working. (And you've a pinched line?)
Anyway, shout out if there's peculiarities encountered along the way. Folks, here, seem to have seen it all!
And remember, on this Dirty Dozen mission, it pays to be ugly, determined, and succeed - like Charlie Bronson - not handsome, heroic... and shot down by some crummy little **** - like Jim Brown.
wwwDOTyoutubeDOTcom/watch?v=HkSkhjv6bPs&feature=related
Good luck.
 04-26-2010, 10:26 AM
#32
Rennlist Member
Thread Starter

Robb B - ...my understanding is that part 964.207.047.08 (thermostat) - also includes 964.207.349.02 (valve/thermostate insert)
snasrulla- ...if time permits at somepoint, do you mind providing step by step snaphots of how you got the front bumper off? My project this summer is to do a bumperette delete and I'm struggling with finding detailed pics on how to do it.
There are some threads on bumperette deletes and bumper removal but not a real step by step picture guide - I need front bumper removal for Dummies. No hurry, solve your overheating issue first! Much appreciated in advance.
There are some threads on bumperette deletes and bumper removal but not a real step by step picture guide - I need front bumper removal for Dummies. No hurry, solve your overheating issue first! Much appreciated in advance.
Here's a link to good text that would match up well with the picture
Rocket Rob,
The lines around the thermostat all look good. Thanks for the heads up. With everything off I can see things a bit better...there is one line that I've got my eye on...probably fix it during the NEXT oil change.
Lonnie,
Thanks for your help along the way (as usual)! Simple Greened everything as suggested. Added pics of the thermostat to my Picasa album. Everything looks pretty good? http://picasaweb.google.com/udoreisinger2/ThermoSil#
Last edited by 911Jetta; 04-26-2010 at 02:31 PM.
04-26-2010, 10:41 AM
#33
Rennlist Member
Thread Starter
Ok, here's where I stand.
-My thermo insert should arrive later today
-I've prepped the car - pulled the sils, cleaned the thermo area (will add more sil detail pictures after this project is done - more pictures here)
-There is oil all over the (hard) oil-line after the bend going up (the line as it's goes up at the back of the front wheel liner). There as also a weeping mess at the top of the oil cooler (front side of the wheel liner). I haven't pulled the back of the front wheel liner yet, but the flexible line is suspect! (can someone say NEXT project?!)
-looks like I'll definitely need a circlip tool...tried to fab a part to remove the clip and it almost comes out.
-the cap on the thermo insert looks different. I've ordered a new cap (and o-ring) with the thermo insert. (edit: it's the same cap design)
-some of the female (red clips), that hold the upper ridge of the sil, are very hard to remove from the body.
Getting there....
Last edited by 911Jetta; 04-28-2010 at 12:53 PM.
04-27-2010, 12:10 PM
#34
Rennlist Member
Thread Starter
Replaced the thermostat insert last night! (pictures will follow later)
Couple notes for the newbies like me:
- make sure you have a stout circlip tool. My pliers would grab it and compress it, but the c-pliers flexed a lot and made getting the circlip out of the thermostat body very difficult.
- with circlip removed, next you remove the insert cap. I would have thought the cap would pop right out of the housing (the thermo insert is spring loaded from behind), but no...the circumference of the cap almost perfectly matches the circumference of the insert hole (plus there's a o-ring from behind that is also putting pressure on the edge of the cap). So with circlip removed the cap was still on solid and no really good way to grab it and pull it out (others with more experience please chime in...)? I ended-up using a small drill bit to create a small slot in the surface of the cap so I could work it free...
-I had ordered a new cap, but if you don't mutilate it during removal like I did, you won't one.
-also ordered a new o-ring, but the old one seemed fine?
-Not a lot of oil came out with the cap removed. I was prepared for a gusher, but I would be surprised if a total of a quart came out? (and that amount is during the whole time while I left it open and I tried various methods of putting the cap back on the thermo insert)...is there a problem here?
-you need a way to put pressure on the face on the cap so that it will seat in deep enough to put the circlip back in. I didn't have a clamp that would grab the back of the thermostat housing and put enough pressure on the cap so I could seat the circlip...I ended up using a stick placed against the wall and also pressing down on the cap. That pushed the cap in enough to seat the circlip! Total MacGyver move.
-New insert installed, no oil leaking on the floor this morning.
-Sils go back on this evening, then a test drive with my fingers crossed...
 04-27-2010, 12:23 PM
#36
Rennlist Member
Thread Starter
Thanks Rob for looking at the mess.
I haven't pulled the back-half of the front fender liner to see where the leak is coming from?
I'm hoping the flexible oil line going over the front wheel is loose, causing the leak?
There was also a similar amount of weeping oil mess on the top of the oil cooler from the other end of the flexible line. I'm hoping that the flexible oil line is loose at both ends?
I'll clean up the area and tighten the line and check back in a week to see if it's weeping...
If not and I need a new line, is it an easy remove/install?
04-27-2010, 01:09 PM
#37
IHI KING!
Rennlist Member
Rennlist Member
Join Date: Aug 2001
Location: Nashua, New Hampshire, USA
Posts: 13,387
Received 223 Likes
on
177 Posts
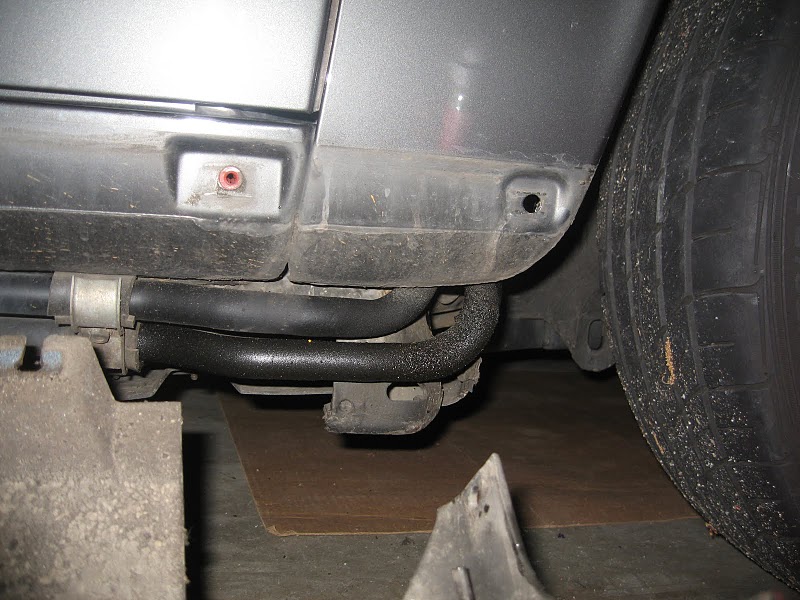
The fender well interior panel is easy to remove. I would definitely check this before you reinstall your rocker panel covers. I suspect that your one of your oil lines is leaking at the crimped (swage) between the flex and hard line portion (see below). I had a similar leak in the rear fender well. But I hope your wetness is caused something simple and doesn't require full replacement of the oil line.
Sorry, I can't comment on how difficult it is to replace the line, since I haven't done it.

Sorry, I can't comment on how difficult it is to replace the line, since I haven't done it.
04-27-2010, 01:35 PM
#38
Does it leak onto the ground? If not, I would leave it alone. There are horror and costly stories of trying to get the oil line nuts off. As for me, I've had some hard oil line connection continue to leak/weep no matter what I do.
Thanks Rob for looking at the mess.
I haven't pulled the back-half of the front fender liner to see where the leak is coming from?
I'm hoping the flexible oil line going over the front wheel is loose, causing the leak?
There was also a similar amount of weeping oil mess on the top of the oil cooler from the other end of the flexible line. I'm hoping that the flexible oil line is loose at both ends?
I'll clean up the area and tighten the line and check back in a week to see if it's weeping...
If not and I need a new line, is it an easy remove/install?
I haven't pulled the back-half of the front fender liner to see where the leak is coming from?
I'm hoping the flexible oil line going over the front wheel is loose, causing the leak?
There was also a similar amount of weeping oil mess on the top of the oil cooler from the other end of the flexible line. I'm hoping that the flexible oil line is loose at both ends?
I'll clean up the area and tighten the line and check back in a week to see if it's weeping...
If not and I need a new line, is it an easy remove/install?
04-27-2010, 01:56 PM
#39
Rennlist Member
Thread Starter
Thanks for the advice. Since I'm dealing with a 20 year old car and all this is my first time...I need to know when to say when, but at the same time not ignore something critical. Your comments help.
No leaking on the ground or severe oil on the inside of the sil.
I'll pull the rest of the wheel housing liner and inspect the oil line since it's so easy at this point, maybe I'll put a wrench on the connection and see if I can tighten it just a bit...
04-27-2010, 02:05 PM
#40
In my experience with these aluminum compression fitting oil lines, tighten it just a bit didn't do anything. In the worse case, it made it leak even more.
That is what happened on my old 964 oil console oil line and oil return oil line.
That is what happened on my old 964 oil console oil line and oil return oil line.
04-28-2010, 10:28 AM
#41
Rennlist Member
Thread Starter
Fixed!!!!
Went for a quick drive (left the sill cover off just in case...), nervously anticipating that "subtle" drop in oil temp on the gauge...7+ o'clock, 8+ o' clock...plunk, temperature dropped!
Then red-line through a couple gears to check...didn't go past 8! Yes.
Sill covers back on.
Thanks to everyone who provided help, suggestions, and comfort along the way (and the almighty search function!). As is often said, I couldn't have done it without Rennlist!
Now time to work on that sunroof...
NOTE: I was expecting to lose 6 quarts of oil when I took the thermostat cap off, but only lost a quart? To check the exact amount that I lost, I poured it into a liter bottle. After an hour I walked past the bottle and noticed the oil/water separation. Some water fell into the oil collection container as I was cleaning the area, but I think the majority of water came from within the oil system???!!! I read about this somewhere on RL - water in the system rests here, possibly shorting the thermostat's life... (changed oil less than 500 miles ago)
 05-10-2011, 11:57 AM
#44
Rennlist Member
Much thanks for all of the info. I replaced my ballast resistor last week, using this and other threads here on RL. I would add that I removed the lower bumper cover and the two bolts that hold the oil cool bracket in place. That allowed the cooler to drop down and made it MUCH easier to reach the ballast resistor, that I could previously just barely see with the cooler in place.
05-10-2011, 01:09 PM
#45
Drifting
Hey Craig,
Just wondering if you attempted to get at the resistor from the wheel well, why am I the only one to go this route?
By the way Jetta, excellent thread.
Just wondering if you attempted to get at the resistor from the wheel well, why am I the only one to go this route?
By the way Jetta, excellent thread.