

A flywheel bolt question.
 02-10-2010 | 01:38 AM
#1
Thread Starter
Instructor
Joined: Mar 2009
Posts: 133
Likes: 0
From: Brunei
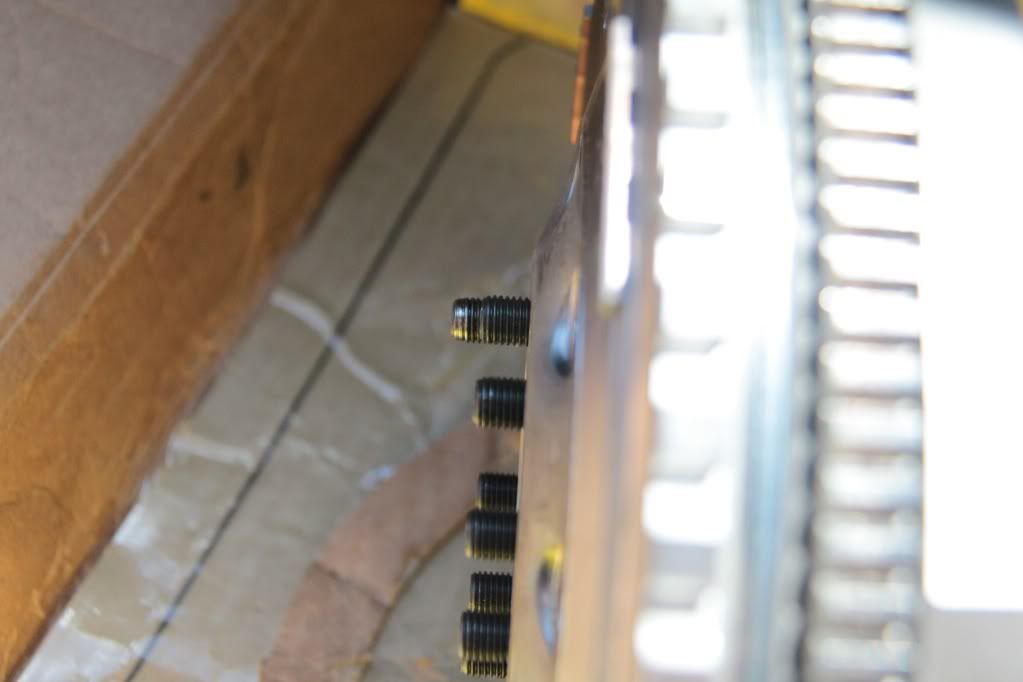
We were JUST about to put in the new flywheel and clutch then noticed that the bolts that came with the new flywheel are...... well....... considerably shorter than my older bolts......
Can anyone identify which would be the correct length?
Also there are 2 washers, do both go behind the flywheel? (Just checking)

Can anyone identify which would be the correct length?
Also there are 2 washers, do both go behind the flywheel? (Just checking)
02-10-2010 | 07:44 AM
#2
Addict
Rennlist Member
Rennlist Member
Joined: Jul 2003
Posts: 2,576
Likes: 50
From: Atlanta
That is a question for Porsche engineering, but I can comment: a pretty reliable rule of thumb is that if you engage threads up to the full diameter of the bolt, the bolt will break before the threads strip. The projection of the threads out of the flywheel looks about right, but how much of that projection is fully engaged in the crankshaft threads? It looks like your old bolts are too long, and the thready at the tip are damaged by traveling past the tapped threads in the flywheel.
High-strength bolts work best with a single hardenen washer between the bolt head and clamped surface. Are the two washers a different outside diameter? If one is a split washer, it is wrong. Split washer are for sheet metal work, and never used in a properly-engineered high-strength application.
Hardened washers are installed only one way: the grade mark must face towards the bolt head. If you look at the corners of the hole, one side has a radius, and that must face towards the bolt head. The square corner could nick the radius between the shank and the bolt head, and you risk a fatigue failure.
If the washer takes an imprint as the bolt is torqued, stop and get the correct parts. Soft washers let the bolt lose clamping force, and that could lead to the bolt backing out.
Do not improvise on bolt type, installation procedure, thread-lockers or lubricants. You can over-stress the fastener. Follow the factory recommendations. New bolts are a good idea, but only if they are OEM or equivalent.
02-10-2010 | 08:38 AM
#3
Nordschleife Master
Joined: Dec 2001
Posts: 8,305
Likes: 12
From: Kingston, NY
There are NO washers installed on the flywheel period! There are two flywheel bolt lengths (actually 3 if you include the DMF bolt), a 928 part number and a 930 part number. From the picture above, it looks to me like you have one long bolt which was too long for your application as it bottomed in the crankshaft and was deformed where the threads ended. Potentially, this is why there were washers on the bolt??? You need the shorter bolts that you have.
A WORD OF CAUTION. If you use the wrong bolt, the flywheel WILL come loose. This will cause microwelding on the crankshaft requiring complete replacement of the crankshaft (take the engine apart), and if you let it go too long, it will begin to saw through the bell housing and the engine will separate from the transmission and drag on the ground.
ALWAYS use new flywheel bolts, never reuse them, they WILL come loose.
If you use loctite, it may squeeze between the flywheel and crankshaft and act as a cusion and allow the flywheel to move on the crankshaft causing microwelding. If you don't know how to properly use loctite in this situation, do not use it.
02-10-2010 | 09:56 AM
#4
Thread Starter
Instructor
Joined: Mar 2009
Posts: 133
Likes: 0
From: Brunei
The longer bolt is old and the damaged one, but the remaining one I've put on for imaging purposes are newly shipped in with the new flywheel.
So in both your point of views, the shorters bolts are correct so as no washers are attached?
I was just shocked to find that I had longer bolts than the ones I ordered, and no wonder my old flywheel was damaged. The shocker is it was put in by the local dealer.
As for the washer, this is what I have
In the image from Pelican Parts there are 2 washers, part #33 and 34, I ordered both. Is it not supposed to be that way?
Geoffery - only 1 long bolt is on there, so are the other 8 the correct length?
02-10-2010 | 11:10 AM
#5

RL Community Team
Rennlist Member
Rennlist Member
Joined: Oct 2003
Posts: 7,474
Likes: 631
Ahh, the memories of flywheel bolt lengths....
https://rennlist.com/forums/964-foru...ks-solved.html
Wolv, those "washers" appear to be pieces that are part of the entire DMF setup - the PET shows the DMF in an exploded view.
https://rennlist.com/forums/964-foru...ks-solved.html
Wolv, those "washers" appear to be pieces that are part of the entire DMF setup - the PET shows the DMF in an exploded view.
02-10-2010 | 11:40 AM
#6
Guru
Lifetime Rennlist
Member
Rennlist Small
Business Sponsor
Lifetime Rennlist
Member
Rennlist Small
Business Sponsor
Joined: Aug 2001
Posts: 15,748
Likes: 102
From: yorba linda, ca
There are NO washers installed on the flywheel period! There are two flywheel bolt lengths (actually 3 if you include the DMF bolt), a 928 part number and a 930 part number. From the picture above, it looks to me like you have one long bolt which was too long for your application as it bottomed in the crankshaft and was deformed where the threads ended. Potentially, this is why there were washers on the bolt??? You need the shorter bolts that you have.
A WORD OF CAUTION. If you use the wrong bolt, the flywheel WILL come loose. This will cause microwelding on the crankshaft requiring complete replacement of the crankshaft (take the engine apart), and if you let it go too long, it will begin to saw through the bell housing and the engine will separate from the transmission and drag on the ground.
ALWAYS use new flywheel bolts, never reuse them, they WILL come loose.
If you use loctite, it may squeeze between the flywheel and crankshaft and act as a cusion and allow the flywheel to move on the crankshaft causing microwelding. If you don't know how to properly use loctite in this situation, do not use it.
A WORD OF CAUTION. If you use the wrong bolt, the flywheel WILL come loose. This will cause microwelding on the crankshaft requiring complete replacement of the crankshaft (take the engine apart), and if you let it go too long, it will begin to saw through the bell housing and the engine will separate from the transmission and drag on the ground.
ALWAYS use new flywheel bolts, never reuse them, they WILL come loose.
If you use loctite, it may squeeze between the flywheel and crankshaft and act as a cusion and allow the flywheel to move on the crankshaft causing microwelding. If you don't know how to properly use loctite in this situation, do not use it.
using too much Loctite on a fastener into a blind hole is also bad. There have been ring gears (in racecar gearboxes) that have cracked because of this -- the thought is the Loctite expanded in the bore causing this.
Less is more!!
Trending Topics
02-10-2010 | 12:58 PM
#8
Thread Starter
Instructor
Joined: Mar 2009
Posts: 133
Likes: 0
From: Brunei
Garret - Just read the post you linked.
Thanks for that, I guess that answers the question.
That sound you had playing was exactly what I had previous to this, but the old wheel was damaged so I got the new one.
Does that mean I should be checking the crankshaft for any damage?
Thanks for that, I guess that answers the question.
That sound you had playing was exactly what I had previous to this, but the old wheel was damaged so I got the new one.
Does that mean I should be checking the crankshaft for any damage?
02-10-2010 | 06:12 PM
#9
Addict
Rennlist Member
Rennlist Member
Joined: Jul 2003
Posts: 2,576
Likes: 50
From: Atlanta
As a minimum, you need to dress the threads with the proper tap. Do not use a cheap one, as it will cause more damage. The overly-long bolts got damaged in the non-threaded part of the bore in the flywheel. When you removed the bolts, the deformed threads probably left some debris and also some thread damage as the passed the threads in the flywheel.
Also check the mating faces between the flywheel and the crank. As already stated, you need to avoid thread locker and lubricants in that area, because micro-slipping will occur. The same applies to upset metal in the flat faces. It can lead to micro-slipping, and you can get loss of clamping force from the bolts if the upset metal relaxes under the pressure.
Also check the mating faces between the flywheel and the crank. As already stated, you need to avoid thread locker and lubricants in that area, because micro-slipping will occur. The same applies to upset metal in the flat faces. It can lead to micro-slipping, and you can get loss of clamping force from the bolts if the upset metal relaxes under the pressure.
02-10-2010 | 06:24 PM
#10
Nordschleife Master
Joined: Dec 2001
Posts: 8,305
Likes: 12
From: Kingston, NY
I don't think you need to retap the crankshaft, and I'd be very careful running a thread cleaner in the crank. The crankshaft is going to be much harder than the flywheel bolt so you don't want to loosen up the thread tolerances with a tap.
Can you post a picture of the end of the crank and backside of the flywheel?
Can you post a picture of the end of the crank and backside of the flywheel?
02-10-2010 | 06:40 PM
#11
RL Community Team
Rennlist Member
Rennlist Member
Joined: Oct 2003
Posts: 7,474
Likes: 631
I'm with Geoffrey - the bolts get eaten up easily by the crankshaft threads. When that happened on one of my 964's of past (from that thread I posted), I just made sure the holes in the crank were clean of any shavings from the bolt by blowing it out with air, and hand screwed-in new bolts to test fit them and it had no issues. I don't think re-tapping would be needed - with your luck of receiving the right sized part, you could get the wrong size tap and then really have an issue!! 
02-10-2010 | 08:07 PM
#12
Thread Starter
Instructor
Joined: Mar 2009
Posts: 133
Likes: 0
From: Brunei
I'll try to get pics, my car is at a workshop and they've closed for Chinese New Year (3-days from now).
Geoffrey, the flywheel is not attached at all, do you still want to see a pic of the back?
Geoffrey, the flywheel is not attached at all, do you still want to see a pic of the back?
02-11-2010 | 12:17 AM
#13
Addict
Rennlist Member
Rennlist Member
Joined: Jul 2003
Posts: 2,576
Likes: 50
From: Atlanta
Those threads were cut with a tap, and a proper tap will not open anything larger than standard. I did warn not to use a cheap one.
I do not know the hardness of the flywheel, but I assume the bolts are property class 12.9, which makes them as hard as a Craftsman wrench. I agree if there is a "free-running fit" with the new bolt when the threads are clean, there is no need to run a tap.
It might not be a bad idea to thread the new bolts and verify they can go in two or three turns past the thickness of the flywheel with no binding.
02-11-2010 | 12:49 AM
#14

Nordschleife Master
Joined: Sep 2004
Posts: 5,061
Likes: 2
From: not in HRM
A photo of the end of the crank might be a good idea .
Chasing the threads with a bottoming tap is a good idea because you do not know what the wrong sized bolts have left behind .
An air gun repair will not do .
Chase the bolt holes with a bottoming tap .
If the person who is doing the work does not understand "bottoming tap" , find someone who does .
If you are into it , but one bottoming tap of the correct size / pitch , and run the threads yourself .
http://images.google.com/images?q=bo...N&hl=en&tab=wi
Never fear to chase a tread .