
Oil Line, Oil Filter Console to Engine - replacement question
 07-04-2009, 09:31 PM
#1
Drifting
Thread Starter
I've developed a leak. The non-drivable kind!
It's coming from the flexible to hard line connection in the oil line running from the oil filter console around the back of the engine and into the left hand side of the case.
The good news is, I arrived home from the airport and discovered drips about 5' apart in my driveway! Pressure still good. Temp still down. Dodged a bullet!
My question is, would this be best handled as an engine drop or is it possible to remove the exhaust manifold on my back with stands?
Also, I recall seeing a post, either here or at Pelican, for a fellow who sells a jig for drilling the exhaust manifold bolts. Anyone recall who that is?
If not, anyone have one of these that I can borrow? I'm pretty sure I'm going to need it.
I've got one week to get this done or cancel my scheduled DE at Lime Rock
 07-04-2009, 09:38 PM
#2
RL Community Team
Rennlist Member
Rennlist Member

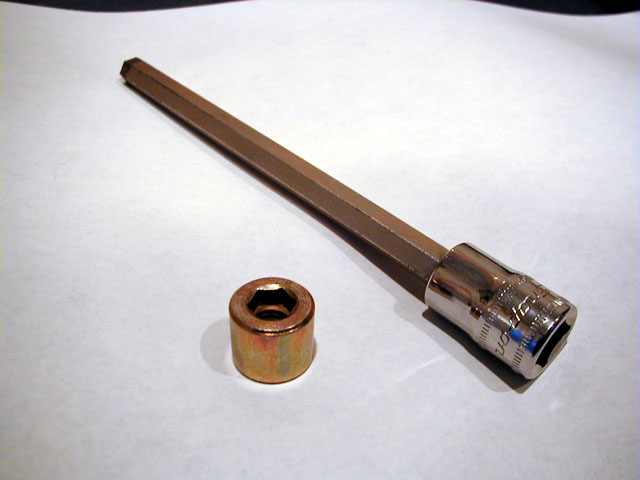
If the nuts come off the studs, you're fine. Are you worried they'll all break apart? I guess with your snow driving, it's likely! It's crucial to get the 13mm and 12mm short swivel socket to do this job correctly and not strip or off-center load the nuts. I've removed the heat exchangers laying on the ground numerous times - they are VERY heavy, though, if you take them both off at the same time. That's the only way I've done it, because I didn't want to attempt removal of the crossover tube 4 nuts which were SUPER corroded. Those were certain to break on every car I've worked on.
07-05-2009, 12:21 AM
#3
Drifting
Thread Starter
Yes, I am very concerned that these nuts and studs are going to fail. I've done my valves every year for the past four and each time one of the muffler donut bolts fails rather than give up the nut. This after lots of penetrating oil. Winter salt is a killer.
This is the price I pay for getting to enjoy my car every day, all year long! :-)
This is the price I pay for getting to enjoy my car every day, all year long! :-)
07-05-2009, 12:55 AM
#4
Drifting
Thread Starter
Here is the part list that I've formulated.
I'm uncertain on the counts as the pet, Pelican and I disagree on some of the counts.
Can anyone confirm the part list and/or the counts?
Note that I'm planning on having enough nuts, studs, etc to cover total failure rather than have to wait for additional shipments and miss my DE window.
As to the part nos. I'm a bit confused about the nuts used to attach the heat exchanges to the exhaust valves.
The PET calls for (14) locking nuts M8 (999.084.052.02) while Pelican calls out just (8) of these and I think the count should be (18). These are hex nuts.
The PET then calls out (4) barrel nuts. While Pelican says that (6) are required.
Yet, there are (3) studs per exhaust, times 6 should be (18) nuts (of some sort) to hold the heat exchangers up.
Do these get two kinds of nuts??
At any rate, here is the list I've accumulated with counts, and justifications for the counts. Any input is greatly appreciated.
Code:
    - hard oil line; filter console, across back, to engine
      $      104-01 #54 ( 1) 964.207.252.14 oil pipe
      $      103-00 # 8 (18) 999.062.091.02 stud BM 6x30
      $      202-05 # 3 ( 6) 993.111.195.00 sealing ring
      $      202-05 # 4 (18) 999.084.052.02 locking nut M8
       pet calls for just (14)
       (+4); given that # 7 is off by (4)
       pelican calls for (8); huh?
       pet calls for (14), but indicates the same part number for both the
         heatX to heatX and heatX to cat connections
         sounds like (8) to me
      $      202-05 # 5 ( 6) 999.085.001.02 socket head nut M8 (barrel nuts)
       pet calls for (4)
       (+2); pelican calls for (6)
      $      202-05 # 6 ( 1) 964.111.192.05 gasket (heatX to heatX)
      $      202-05 # 7 ( 4) 900.074.282.02 bolt (heatX-heatX; heatX-cat)
       pet calls for (8), but it calls out the same part # for the
         heatX to heatX and for heatX to cat
         must be (8)
       really should be ( 8); I think
      $      202-05 # 8 ( 1) 964.111.198.00 gasket (heatX to cat)
07-05-2009, 12:57 AM
#5
Drifting
Thread Starter
07-05-2009, 02:10 AM
#6
Technical Guru
Rennlist Member
Rennlist Member
An oxy-acetylene torch will come in real handy but if you don't have one then a little canister of MAPP and Oxygen (Benzomatic torch @ most hardware stores) will do the trick. There were a few nuts that I had to get glowing red before they would come off, propane is not hot enough.
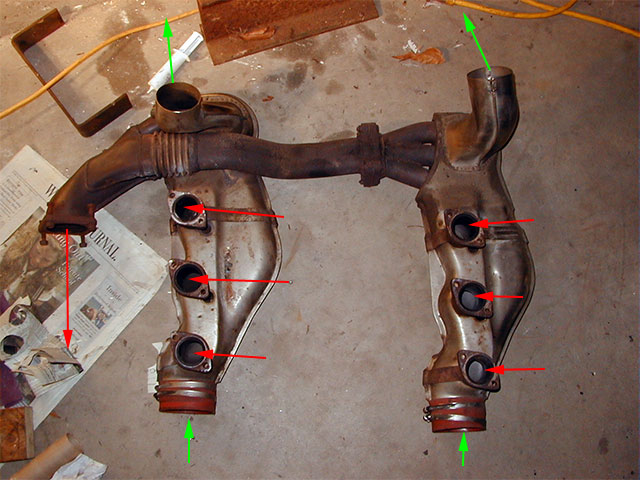
4 Barrel Nuts and 8 (possibly All Metal locking -- i forget) Hex Nuts
4 Barrel Nuts and 8 (possibly All Metal locking -- i forget) Hex Nuts
07-05-2009, 09:57 AM
#7
IHI KING!
Rennlist Member
Rennlist Member
Join Date: Aug 2001
Location: Nashua, New Hampshire, USA
Posts: 13,387
Received 223 Likes
on
177 Posts
Dave - There is no need to drop the engine. I've replaced that oil line myself. You just need to drop the driver-side heat exchanger. The rest is readily accessible from underneath while the car is up on jack stands.
Note: You will need a set of oil line wrenches. Do you have those? If I recall correctly, you will need 32mm & 36mm for this job.
Note: You will need a set of oil line wrenches. Do you have those? If I recall correctly, you will need 32mm & 36mm for this job.
Trending Topics
07-05-2009, 08:35 PM
#9
Rennlist Member
Join Date: Dec 2003
Location: Santa Rosa Beach, Florida
Posts: 251
Likes: 0
Received 2 Likes
on
2 Posts
Take a look for a post I did on nuts and bolts where there are a few suggestions on relatively cheap places to get high quality replacements. I just replaced all the studs for the heat exchangers. To remove the studs you may need to saok in pb for a day or two. The original ones do not have an allen socket at the bottom, so they can be a bit of a challenge to remove. I had good luck taking two 13 mm bolts, locking them together, then using the lower one to drive the bolt out. You only need to remove the primary and heat exchange tube.
PM me if you need me to send a parts list (but Kevin and I are still up at Watkins Glen today.... saw the indy race. Be back home mid week)
tom
PM me if you need me to send a parts list (but Kevin and I are still up at Watkins Glen today.... saw the indy race. Be back home mid week)
tom
07-11-2009, 03:51 PM
#13
Technical Guru
Rennlist Member
Rennlist Member
07-12-2009, 03:15 PM
#14
Addict
Rennlist Member
Rennlist Member
+1 on heating the nuts to cherry red. That is a magic bullet every time I have used it. Obviously replace them to get fresh chromate plating for corrosion protection. Use a copper or nickel thread paste on the new parts. Be sure to use only 70% of the dry torque specification, or the new fasteners will be too tight and can be damaged. If that worries you, do a re-torque after the first long drive.
If you have the nub of the stud to hold, you should be able to work it out without breaking it. Heating the aluminum head will help, because aluminum has double the thermal expansion of steel, and therefore the fit will be looser the higher the temperature gets. We are talking microns here, but every little bit helps. A strong hair dryer for 30 minutes is about all the practical heat you can apply.
The trick is to keep reversing direction, and use only about half the torque needed to break off the stud. Each torque reversal breaks a microscopic part of the rust bridge nearest the end of the stud. Keep up the reverse twists long enough, and you will get it all broken loose. Keep the heat and PB blaster going because as you get deeper, there will be fresh dry rust. The aluminum threads have always been usable if I got the stud out. I have always needed a thread insert when drilling was required. If you need a break from the twisting, a occasional gentle tap with a ball peen hammer on the end of the stud does no harm, and might just help break up the next part of the rust that has bridged the gap between the stud and the head.
Three keys: patience, patience, patience. Getting muscle-bound will only bring 10X the workload to drill out the stud after you finally break it off flush. You will need a lot more patience to drill it out straight, or else you risk damaging the head. Don't ask how I know this.
Good luck.
07-12-2009, 05:36 PM
#15
Drifting
Thread Starter
Thank you for the input, guys.
I'm once again in uncharted territory. This has been quite and experience for me with all of the diy work.
The saving grace in all of this is that I just acquired a backup vehicle from an old friend. He let me have his old car for a very low price and I've gotten on the road. I can now take some time to get this right. Should have done so with the first nut, but as I tried to get it free I heard a creak and felt it move ever so slightly (or so I thought) and felt that it was going to come off. Nope.