

Changing side tinware and valve covers
 05-12-2009, 08:35 PM
#1
Nordschleife Master
Thread Starter
After being asked in a pm about how easy it is to change the side engine tins when I mentioned it this weekend, I thought I'd do a little write up of how I went about it.
Background
In the UK the tinware takes a real battering from the weather due to the road salt and grime we suffer. This results in the tinware steadily rusting over time. My tinware was bad when I got the car and in particular the side tin on the cat side of the exhaust. I'd been meaning to get that one done for sometime but finally got round to the job because it could be combined with fitting some new aluminum valve covers I bought to halt the leaks from the original, and warped magnesium covers.
Hardware
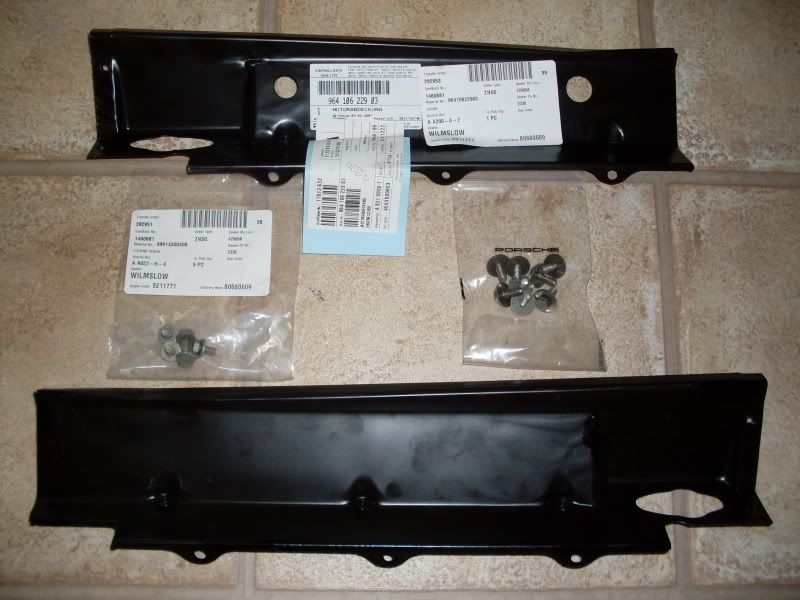
These are the new new side tins. Left (cat side) is part# 964 106 229 03 and right is 964 106 289 01. I also bought a few of the M6 bolts to be on the safe side - these are in two sizes M6 x 12 (999 143 004 08) and M6 x 16 (900 075 354 00)
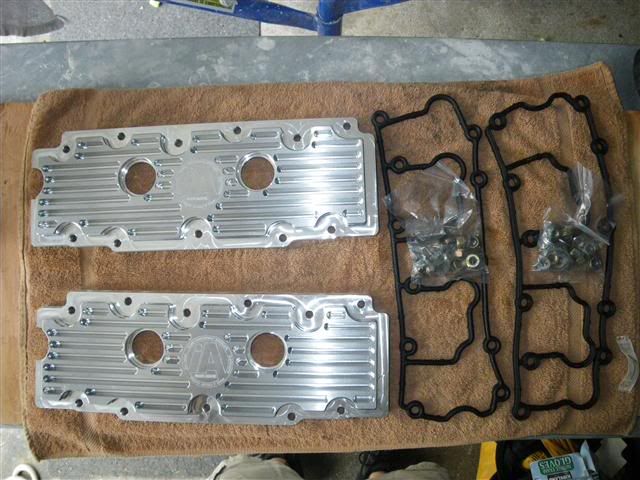
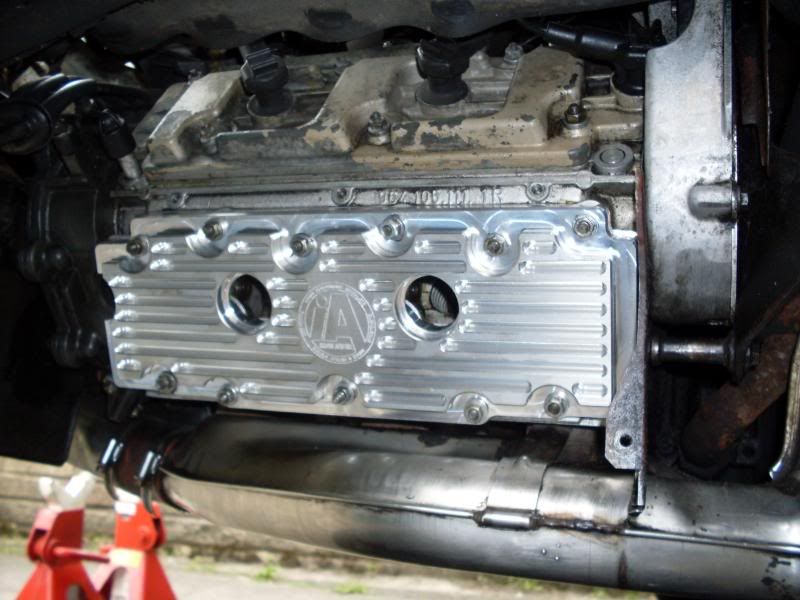
These are the new Imagine Auto valve covers that prompted me to do the job:
Procedure
I started with the right side because I knew the exhaust would be less hassle to get off.
1. Jack up the car under the rear jacking point and remove the wheel. I jacked it up high so that I could get a 'saftety jack stand' under the trailing arm. If you a have an engine cover (") ) you'll need to remove that first.
) you'll need to remove that first.
2. Remove the final silencer by undoing the clamp where it joins to the primary (cup pipe for me) and removing the two nuts where it is fixed to the front hanging bracket. I supported the weight of the silence with jack stands while I did this. If you have a G pipe this step might not be necessary. Now the engine capsule is exposed:
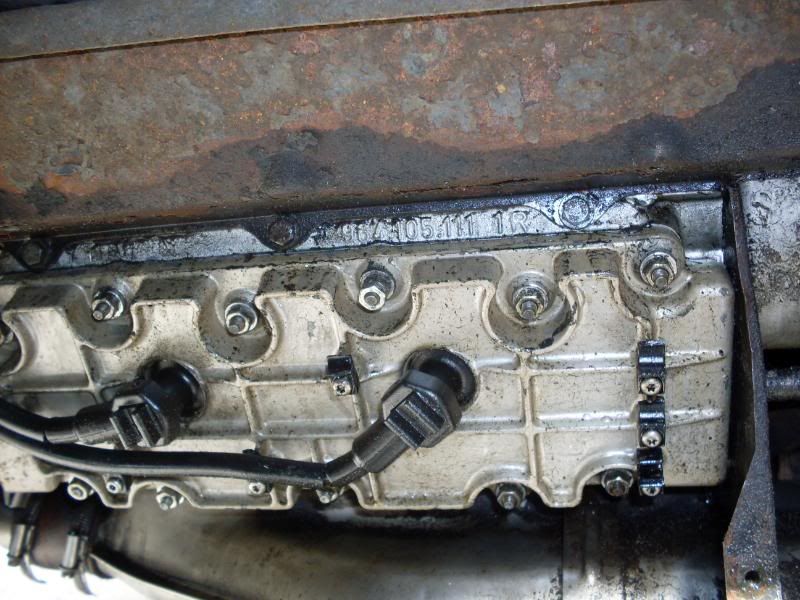
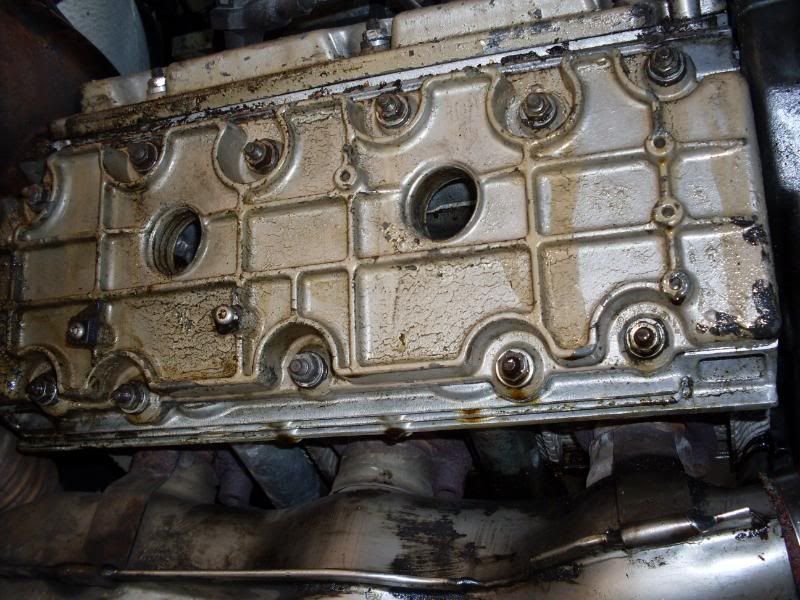
3. Remove the engine capsule which is secured by M6 bolts by using a 10 mm hex socket or spanner. Behold the oily valve cover and rusty tin:
4. Unplug the spark plug leads and remove the seven M6 bolts that attach the tin to the engine. There are two on the tranny side. Two inside the engine bay at the bumper end which can be accessed without removing anything in the bay. And three that attach the tin to the block (note these are the short 12 mm bolts and are best removed last).
5. Push the rubber grommet that supports the spark leads into the engine bay and thread each lead, one at a time, through the tin. At first they don't look like they will go but by moving other leads to the narrow gaps first, the one you want to unthread easily goes through. It now looks like this:

To be fair, although rusty, this tin was in good shape and could have been cleaned up and painted:

6. I then removed the valve cover by removing the 11 x 10 mm nuts and washers and simply pulled them off and cleaned up the gasket faces with brake cleaning fluid:

7. The new valve cover, with the rubber gaskets already in place, was fed over the studs and pressed firmly in place and fixed in position with the lock nuts. The torque spec is 7 ft lbs but I just used my small 1/4 inch socket wrench and tightened them up firmly:
8. I then took the new tin and threaded the spark plug leads through. by looking at the grommet I could see that the best way of sorting out the spagetti was to thread the leads that were at the sides of the grommet first and the middle one last. Don't worry about attaching the grommet yet.
9. I then offered up the tin to the bolt holes ensuring that the engine bay rubber skirt was engine bay side. The bumper end of the tin locates in a recess in the 'bumper tin' and will snap in place. It was best to then put one of the engine bay bolts in first before doing the three (short) middle bolts that attach the tin to the block. Once all bolts were in place it looked like this:

10. I then pushed the rubber grommet back into the tin from inside the engine bay, re-attached the piece of engine capsule and put the exhaust back on before moving to the other side.
Minor differences on the left side
The cat and its heat shields have to be removed which also means unplugging the O2 sensor. To do this I just removed the piece of tube from the blower to the heat exchanger (two hose clamps to loosen, unplug the temperature sensor and balast resistor). This is also required to gain access to the engine bay bolts that secure the tin at the bumper end. I also ensured that I had new M8 x 40 bolts and M8 lock nuts for the cat flange and a new cat gasket (964 111 198 00).
Before starting it looked like this:

This valve cover was even more leaky:
The tin was completely shot!
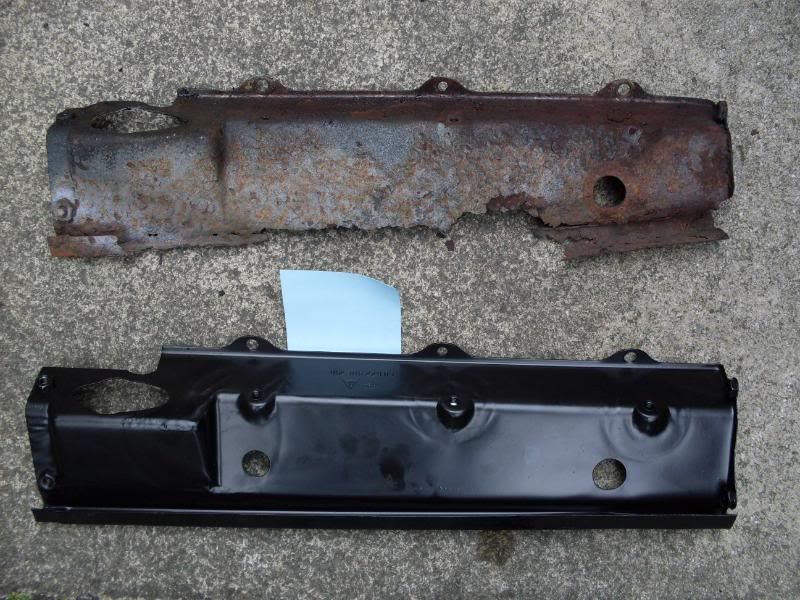
All finished it looked like this:
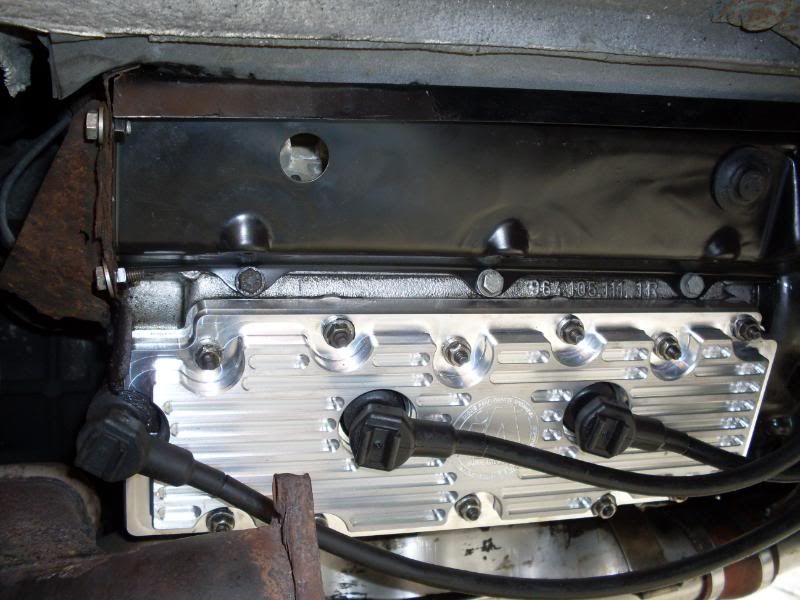
One final point to note is that the new tin on the left side had an extra hole compared to my original tin. I guess this was added later for another sensor wire (other than the O2 sensor) to pass through. Since I didn't want to leave a hole there and since I also put a new O2 sensor in the cat at the same time, I used the old O2 sensor grommet to stuff the hole (you can see it on the right side of the tin in the picture above).
Background
In the UK the tinware takes a real battering from the weather due to the road salt and grime we suffer. This results in the tinware steadily rusting over time. My tinware was bad when I got the car and in particular the side tin on the cat side of the exhaust. I'd been meaning to get that one done for sometime but finally got round to the job because it could be combined with fitting some new aluminum valve covers I bought to halt the leaks from the original, and warped magnesium covers.
Hardware
These are the new new side tins. Left (cat side) is part# 964 106 229 03 and right is 964 106 289 01. I also bought a few of the M6 bolts to be on the safe side - these are in two sizes M6 x 12 (999 143 004 08) and M6 x 16 (900 075 354 00)
These are the new Imagine Auto valve covers that prompted me to do the job:
Procedure
I started with the right side because I knew the exhaust would be less hassle to get off.
1. Jack up the car under the rear jacking point and remove the wheel. I jacked it up high so that I could get a 'saftety jack stand' under the trailing arm. If you a have an engine cover (
) you'll need to remove that first.2. Remove the final silencer by undoing the clamp where it joins to the primary (cup pipe for me) and removing the two nuts where it is fixed to the front hanging bracket. I supported the weight of the silence with jack stands while I did this. If you have a G pipe this step might not be necessary. Now the engine capsule is exposed:
3. Remove the engine capsule which is secured by M6 bolts by using a 10 mm hex socket or spanner. Behold the oily valve cover and rusty tin:
4. Unplug the spark plug leads and remove the seven M6 bolts that attach the tin to the engine. There are two on the tranny side. Two inside the engine bay at the bumper end which can be accessed without removing anything in the bay. And three that attach the tin to the block (note these are the short 12 mm bolts and are best removed last).
5. Push the rubber grommet that supports the spark leads into the engine bay and thread each lead, one at a time, through the tin. At first they don't look like they will go but by moving other leads to the narrow gaps first, the one you want to unthread easily goes through. It now looks like this:
To be fair, although rusty, this tin was in good shape and could have been cleaned up and painted:
6. I then removed the valve cover by removing the 11 x 10 mm nuts and washers and simply pulled them off and cleaned up the gasket faces with brake cleaning fluid:
7. The new valve cover, with the rubber gaskets already in place, was fed over the studs and pressed firmly in place and fixed in position with the lock nuts. The torque spec is 7 ft lbs but I just used my small 1/4 inch socket wrench and tightened them up firmly:
8. I then took the new tin and threaded the spark plug leads through. by looking at the grommet I could see that the best way of sorting out the spagetti was to thread the leads that were at the sides of the grommet first and the middle one last. Don't worry about attaching the grommet yet.
9. I then offered up the tin to the bolt holes ensuring that the engine bay rubber skirt was engine bay side. The bumper end of the tin locates in a recess in the 'bumper tin' and will snap in place. It was best to then put one of the engine bay bolts in first before doing the three (short) middle bolts that attach the tin to the block. Once all bolts were in place it looked like this:
10. I then pushed the rubber grommet back into the tin from inside the engine bay, re-attached the piece of engine capsule and put the exhaust back on before moving to the other side.
Minor differences on the left side
The cat and its heat shields have to be removed which also means unplugging the O2 sensor. To do this I just removed the piece of tube from the blower to the heat exchanger (two hose clamps to loosen, unplug the temperature sensor and balast resistor). This is also required to gain access to the engine bay bolts that secure the tin at the bumper end. I also ensured that I had new M8 x 40 bolts and M8 lock nuts for the cat flange and a new cat gasket (964 111 198 00).
Before starting it looked like this:
This valve cover was even more leaky:
The tin was completely shot!
All finished it looked like this:
One final point to note is that the new tin on the left side had an extra hole compared to my original tin. I guess this was added later for another sensor wire (other than the O2 sensor) to pass through. Since I didn't want to leave a hole there and since I also put a new O2 sensor in the cat at the same time, I used the old O2 sensor grommet to stuff the hole (you can see it on the right side of the tin in the picture above).


 05-13-2009, 06:25 AM
#5
Advanced

Join Date: Jan 2008
Location: New Jersey
Posts: 83
Likes: 0
Received 0 Likes
on
0 Posts
Beautiful job. My tinware is in a similar state and my lowers are leaking too. As a matter of interest Boxey, how much was that tinware? Also how much were those IA covers? I assume you didn't have to drain the oil first?
Sounds like you were lucky and had an easy time removing the exhausts. The last time I did some work in that area, It took me half a day just to removes the final box due to seized bolts!! I think the CAT will prove equally troublesome, when I come to replace the tinware.
Cheers,
TD
Sounds like you were lucky and had an easy time removing the exhausts. The last time I did some work in that area, It took me half a day just to removes the final box due to seized bolts!! I think the CAT will prove equally troublesome, when I come to replace the tinware.
Cheers,
TD
05-13-2009, 03:01 PM
#6
Nordschleife Master
Thread Starter
I'm glad to hear people found the write up useful.
The left tin was �69.18 + VAT and the right one �41.40 + VAT. Considering they are almost identical except that the left one has a couple of holes for sensors there's absolutely no sense in one being more expensive than the other! The valve covers were bought from a fellow Rennlister in the US who advertised them on here (Colin 90 C2). Including gaskets and shipping they came to �218. I believe the IA covers are hard to come by now but you can get similar quality covers from Hargett Precision for $285 + shipping.
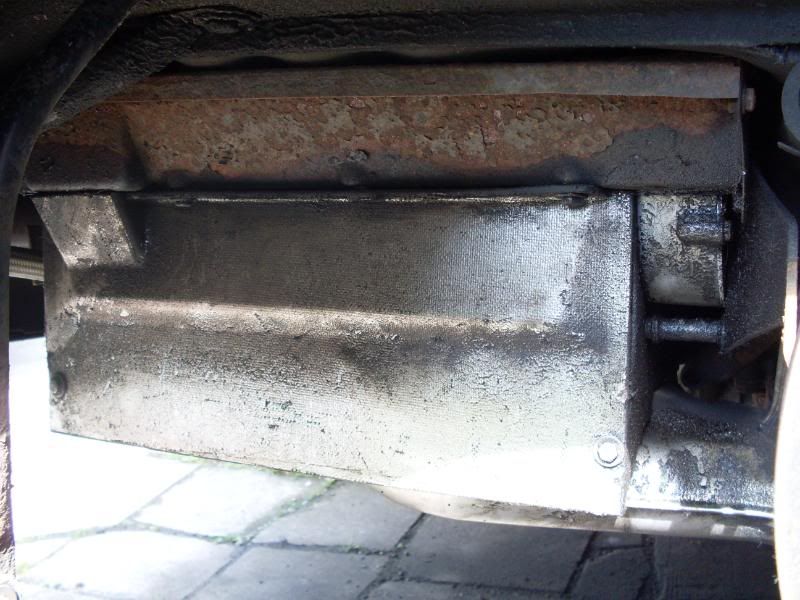
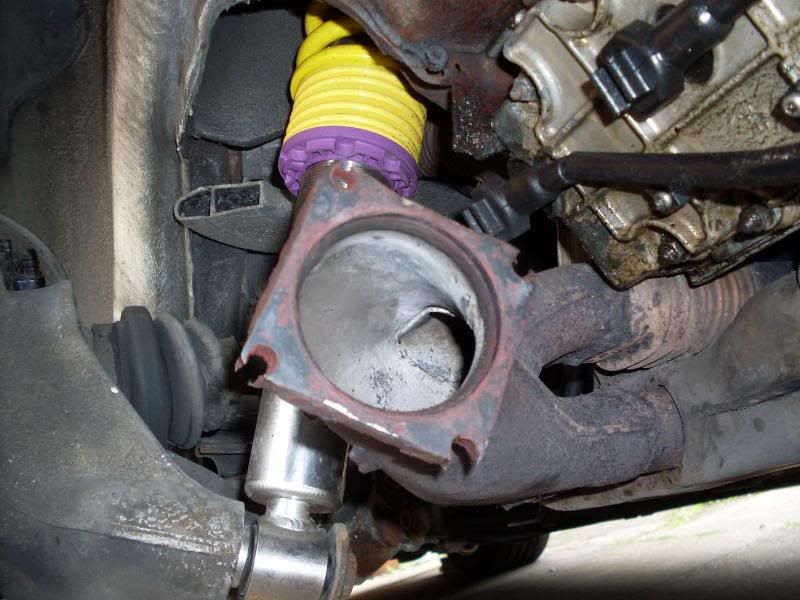
The exhausts were easy to remove but that's because they get removed from time to time for other work and I always put copper grease on the nuts/bolts to help with the next time. However, this was the first time I removed the cat and IMO it has not been removed for several years judging by the state of the bolts. I dowsed the four cat bolts with penetrating oil the night before and they came undone pretty easy. However the flange on the heat exchanger crumbled and now needs to be repaired before I can use the car in anger again. I mentioned this on another thread where Mark J had the same problem but here's another pic of the corroded flange on the heat exchanger.
The valve covers were bought from a fellow Rennlister in the US who advertised them on here (Colin 90 C2). Including gaskets and shipping they came to �218. I believe the IA covers are hard to come by now but you can get similar quality covers from Hargett Precision for $285 + shipping.
Sounds like you were lucky and had an easy time removing the exhausts. The last time I did some work in that area, It took me half a day just to removes the final box due to seized bolts!! I think the CAT will prove equally troublesome, when I come to replace the tinware.
Cheers,
TD
Cheers,
TD
05-13-2009, 06:56 PM
#7
Advanced
Join Date: Jan 2008
Location: New Jersey
Posts: 83
Likes: 0
Received 0 Likes
on
0 Posts
Yes, this will definately be the next job I do on my 964. Although I know my cat will be the problem, the bolts are so corroded. That tinware is expensive though, for what it is. So are the covers for that matter.
Cheers
TD
Cheers
TD
Trending Topics
05-13-2009, 07:46 PM
#9
Nordschleife Master
Thread Starter
 05-15-2009, 03:26 AM
#13
Nordschleife Master
Thread Starter
05-15-2009, 08:47 AM
#14
If the valves were done recently would the cat not have been removed and the bolts replaced, can this be done without removing the cat, the bolts look pretty bad in the before pic.
05-15-2009, 09:43 AM
#15
Nordschleife Master
Thread Starter
By recently I mean just over a year ago but only 3,000 miles. You are quite right about the cat bolts. The state they were in suggests that the Cat was not removed at that time and therefore the valve adjust on that side might not have been as extensive as it should have been. More of a quick fiddle! Apart from them overfilling with oil during the service, which clearly a proper air cooled specialist shouldn't do, I have no hard evidence that they didn't do a thorough service. But needless to say, I won't be using them again and will leave them to look after the water cooled models which are more their particular bag.