
Broken Head stud discovered
 03-12-2009, 01:21 AM
#1
Racer
Thread Starter
My engine is out at the moment for a top end rebuild. Primary reason being smoke on idle when warm pointing towards worn valve guides. Car is a 1990 C2 with 67k miles and no prior rebuilds.
The only obvious signs of oil leaks on inspecting the engine out of the car was a bit from cam covers and chain cover, otherwise fairly dry. I was surprised to find a broken head stud on cylinder 1
Reading around the forum, this doesn't appear to be a very common problem so my initial decision is to just replace the broken stud with a new one and re use the rest. Interested in any comments/observations/advice on this.
 03-12-2009, 04:17 AM
#3
Rennlist Member
Join Date: Oct 2005
Location: Auckland, New Zealand
Posts: 429
Likes: 0
Received 45 Likes
on
24 Posts
I was told that it is quite common for a broken stud on #1 and to replace all of them with new as they stretch. I guess if you have one new and 23 old studs the torque/stretch will be different?
03-12-2009, 06:07 AM
#4
Burning Brakes
If you are having the top end done then you should replace all of them - if another one let's go after the rebuild, you'll be kicking yourself...and all for the sake of a few hundred quid.
03-12-2009, 08:10 AM
#5
Addict
Rennlist Member
Rennlist Member
That is a classic fatigue break. Did that stud break on extraction, or did you find it lying there? The reason I ask is there is some fresh, and some aged fracture surface. The good news is the stud broke very recently, and there has not been time to damage the head and the neighboring studs.
Your photograph does not show side where the crack started, but I will bet there is a small corrosion pit that started the fatigue crack. When a bolt lets go, its neighbors have to shoulder the load, and therefore it is possible you have fatigue underway in the neighboring studs. You can avoid 100% replacement if you perform a liquid penetrant inspection. Most industrial supply houses sell the kit for about the cost of one stud. If the stud is free of rust, and the inspection finds no surface defects, you are safe to leave the studs in service. If they are proven sound, they might just be better than new studs.
Fatigue endurance limits are determined by static load which is the tension set when you torque the nut, and the cyclic loads, which come from the temperature cycles and the combustion events (billions of them). You can do much about the cyclic loads, but you do set the static load when you install the nut. It is critical that you follow the factory instructions. Well-meaning attempts to use thread locker or thread paste change the friction characteristics and thereby upset the torque vs. tension relationship. If you get the stud or bolt tension too high, the bolt fails in fatigue because it has no margin for the cyclic loads. I have not read the factory manual on this subject, but most factory torque specs are for clean, dry threads. The flat surface between the nut and the washer should also be clean and dry. If you must use thread locker or thread paste, use only 70% of the specified torque, and check the torque each time the valves are adjusted to ensure the nuts are not backing off.
03-12-2009, 09:58 AM
#6
Professor of Pending Projects
Rennlist Member
Rennlist Member
This thread brings the nightmares back...
Headbolts replacement
A week after I bought my car, while doing the first 15K service at home, I am sitting in the garage looking at the car with everything off the car. Getting ready to do my first valve adjustment, valve covers off and I hear this loud BANPUTIN! out comes something flying that hits and chips a tile.
Anyway... my suggestion is that since you are doing a top end, to replace all the headbolts with ARP (http://www.arp-bolts.com/). You don't want to have to drop the engine again for this...
I changed mine with stock units for not waiting. So far, so good and I hope I don't have to do this again.
03-12-2009, 10:45 AM
#7
Nordschleife Master
That is a classic fatigue break. Did that stud break on extraction, or did you find it lying there? The reason I ask is there is some fresh, and some aged fracture surface. The good news is the stud broke very recently, and there has not been time to damage the head and the neighboring studs.
Your photograph does not show side where the crack started, but I will bet there is a small corrosion pit that started the fatigue crack. When a bolt lets go, its neighbors have to shoulder the load, and therefore it is possible you have fatigue underway in the neighboring studs. You can avoid 100% replacement if you perform a liquid penetrant inspection. Most industrial supply houses sell the kit for about the cost of one stud. If the stud is free of rust, and the inspection finds no surface defects, you are safe to leave the studs in service. If they are proven sound, they might just be better than new studs.
Fatigue endurance limits are determined by static load which is the tension set when you torque the nut, and the cyclic loads, which come from the temperature cycles and the combustion events (billions of them). You can do much about the cyclic loads, but you do set the static load when you install the nut. It is critical that you follow the factory instructions. Well-meaning attempts to use thread locker or thread paste change the friction characteristics and thereby upset the torque vs. tension relationship. If you get the stud or bolt tension too high, the bolt fails in fatigue because it has no margin for the cyclic loads. I have not read the factory manual on this subject, but most factory torque specs are for clean, dry threads. The flat surface between the nut and the washer should also be clean and dry. If you must use thread locker or thread paste, use only 70% of the specified torque, and check the torque each time the valves are adjusted to ensure the nuts are not backing off.
Your photograph does not show side where the crack started, but I will bet there is a small corrosion pit that started the fatigue crack. When a bolt lets go, its neighbors have to shoulder the load, and therefore it is possible you have fatigue underway in the neighboring studs. You can avoid 100% replacement if you perform a liquid penetrant inspection. Most industrial supply houses sell the kit for about the cost of one stud. If the stud is free of rust, and the inspection finds no surface defects, you are safe to leave the studs in service. If they are proven sound, they might just be better than new studs.
Fatigue endurance limits are determined by static load which is the tension set when you torque the nut, and the cyclic loads, which come from the temperature cycles and the combustion events (billions of them). You can do much about the cyclic loads, but you do set the static load when you install the nut. It is critical that you follow the factory instructions. Well-meaning attempts to use thread locker or thread paste change the friction characteristics and thereby upset the torque vs. tension relationship. If you get the stud or bolt tension too high, the bolt fails in fatigue because it has no margin for the cyclic loads. I have not read the factory manual on this subject, but most factory torque specs are for clean, dry threads. The flat surface between the nut and the washer should also be clean and dry. If you must use thread locker or thread paste, use only 70% of the specified torque, and check the torque each time the valves are adjusted to ensure the nuts are not backing off.
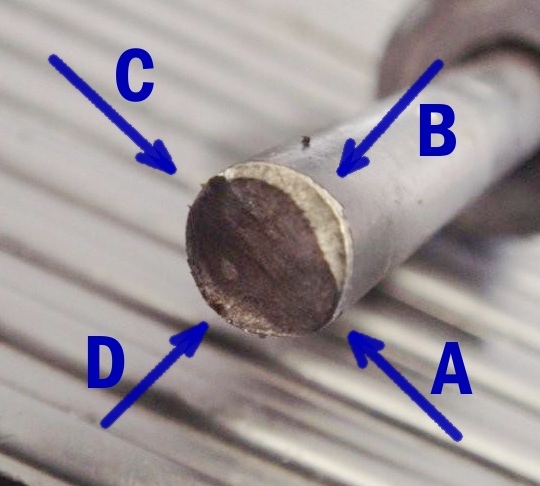
And some more, please.
(Don't know I agree with everything you said re preload being anathema to cyclic capabilities -- high preload, I thought, assisted a bolt to withstand cyclic 'external' loads... Higher is better against fatigue. Now *ultimate* overload, I'd agree completely...)
I punched up the fracture zone picture, above.
Where, in your opinion, did the fracture start? And finally finish? A, B, C, or D?
(My gut says, started, B. [where are any adjacent clam shells?] But I wouldn't be surprised with D. Or, A, or C... lol)
Trending Topics
 03-12-2009, 01:49 PM
#9
Addict
Rennlist Member
Rennlist Member
Yo, Springer -- Keep up the tech talk!
And some more, please.
(Don't know I agree with everything you said re preload being anathema to cyclic capabilities -- high preload, I thought, assisted a bolt to withstand cyclic 'external' loads... Higher is better against fatigue. Now *ultimate* overload, I'd agree completely...)
I punched up the fracture zone picture, above.
Where, in your opinion, did the fracture start? And finally finish? A, B, C, or D?
(My gut says, started, B. [where are any adjacent clam shells?] But I wouldn't be surprised with D. Or, A, or C... lol)
Attachment 343274
Do a search on the Soderberg criterion for fatigue. This is a tension-only case (minimal shear), so a very simple method is valid: Plot static load on the X-axis, and cyclic load on the Y. Obviously the highest static load you can apply is yield, and that is one end of the line that defines the criterion (coordinates are [yield, 0]).
The highest cyclic load you can apply is the endurance limit at zero static stress. That value is determined in fatigue tests, which are far easier to perform if you don't have to apply the static load. The point [0, F-limit) is the second end of the line. Above that line you can have fatigue if cycles accumulate to above the static endurance limit. Below that line you should not have fatigue.
I think the reason you do not agree with well-accepted theory is that you are thinking of pre-load so insufficient that movement and even impact loads occur. Impact generates extreme cyclic loads, will accelerate fatigue damage. My assumption is that if the bolts are installed using the factory procedures, they are tight enough to hold the design loads. With that assumption, you are much better off if you do not go above the tension established by the factory assembly instructions. Soderberg's criterion predicts that.
 03-12-2009, 07:48 PM
#11
Racer
Thread Starter
Fantastic discussion. Wish I could remember more detail from my Material Science and Metallurgy degree! Sands of time seem to have eroded my knowledge. Thanks for all the feedback.
It was found that way rattling about next to spark plugs
You're right, will post a picture in a minute which I think shows this.
Are you saying the existing studs might be better because new ones may have pre existing defects or because they have proven themselves through many cycles already?
Sorry to make you re-live those nightmares . . .
I'm leaning towards changing all studs but why the ARP in particular over the updated OEM?
So the decision I have to make Re: studs are either...
1) Just replace one broken stud �25
2) Replace the four studs on cylinder 1 in case the remaining 3 have experienced excessive load/stress �100
3) Replace all 24 studs with OEM (�500) or ARP (�???) for peace of mind
4) Undertake some NDT with liquid penetrant testing and replace studs that fail inspection (Test �?? + defective studs �??)
Think I'm going to sleep on this decision......
Sorry to make you re-live those nightmares . . .
replace all the headbolts with ARP (http://www.arp-bolts.com/).
I punched up the fracture zone picture, above.
Thanks Lonnie, I'll use your Labels in pictures posted later.
Attachment 343274
Thanks Lonnie, I'll use your Labels in pictures posted later.
Attachment 343274
1) Just replace one broken stud �25
2) Replace the four studs on cylinder 1 in case the remaining 3 have experienced excessive load/stress �100
3) Replace all 24 studs with OEM (�500) or ARP (�???) for peace of mind
4) Undertake some NDT with liquid penetrant testing and replace studs that fail inspection (Test �?? + defective studs �??)
Think I'm going to sleep on this decision......
03-12-2009, 07:54 PM
#12
Racer
Thread Starter
This picutre should help. Arrow is pointing towards direction original photo taken looking through upper cam housing towards head studs on cylinder 1. Red dot shows approximate location of broken stud. (Top left stud of cylinder 1)
 03-13-2009, 12:04 PM
#15
Racer
Thread Starter
So the decision has been made, whilst in there going to change all 24 studs and use OEM Porsche studs as per 993 TT. These are getting good press and are still dilavar and match their thermal expansion coefficient well with the 964 case.
So, just to stimulate a bit more discussion, following are a few pics of the fracture surface from the broken stud. Labelling as per Lonnie's diagram above.
The strange thing is that the only visible corrosion pit is at position A but all other evidence I think points towards crack progagation from D to B as Springer says.