
R134a Conversion steps
 07-18-2008, 05:14 PM
#1
Three Wheelin'
Thread Starter
Hi folks,
I thought that I would tackle some of the conversion myself and save a couple bucks - plus the specialist shop is somewhat geographically inconvenient.
So far, I picked up the Griffiths deluxe conversion kit -
http://www.griffiths.com/shop/index....roducts_id=188
I had a local shop evacuate/remove the R12. To do this, they first swapped out the valves to the new R134a schrader valves, then removed the R12 until there was zero pressure, then they pulled a vacuum on it for a bit.
Griffiths' instructions now say for me to remove the compressor and literally turn it upside down to dump any old oil that is in there. The AC shop said that their equipment sucks out anything that is in the system and to not worry about it. Is this step necessary?
They also instruct to pull the AC lines off the compressor to put on new seals that came in the kit.
Next comes the drier replacement. I've read on here that it is easy to get to under the left fender (front / rear?)
I've also read on here that AC oil accumulates in the condenser and to drain it "while you're in there". Is this suggested?
Thanks for any tips. I'll try and share the experience!
 07-18-2008, 05:28 PM
#2
Rennlist Member

After shop evacauted r-12, I replaced all o-rings that I coud get to, drained and refilled compressor, replaced drier, evactuated system again, charged with r-134 to specs in shop manul. good luck.
01-24-2009, 12:09 PM
#5
Just some clarifications for readers
In order to lubricate the compressor the ac system relies on refrigerant moving through the system to "carry" the oil; a constant stream of refrigerant insures the compressor is lubricated and cooled.
There are two types of oil you can use when converting to R134a:
PAG (Polyalkylene Glycol), or Ester . The previous refrigerant that was in the system, R12, uses Mineral refrigerant oil which does not mix well with the new R134a refrigerant. PAG does not mix well with Mineral oil however Ester does and when the Ester mixes with the residual Mineral oil the refrigerant can move the oil through the system.
In a perfect world you would liquid flush the system to remove any residual mineral oil, however its been proven that the procedure is not necessary when you use Ester.
Turning the compressor upside down and turning the outer hub will help remove what little oil is left in the compressor; the compressor has a few cavities which will inhibit total removal of residual oil and 'wicking' or oil cleaning to the inside surfaces inhibits removal as well. In most cases you will observe only an ounce or two of oil coming out because the oil is spread through out the entire ac system. One of the benefits of following the procedure to dump residual oil from the compressor is that you get a chance to inspect the oil for signs of contamination in the system, such as any black or grey matter or aluminum particles which would suggest you may have a compressor on its last leg, as well as a need to liquid flush the system.
This would be a "new" concept in physics if that were true. The ac refrigerant evacuation and recovery machine CANNOT remove all the oil from the system by using a vacuum. This could only happen if the components (compressor, lines, drier, evaporator, condenser, etc) were literally above the source of vacuum, meaning the car was in the air pointed upward above the evacuation machine's vacuum source, and still the condition of oil 'wicking' or clung to inside surfaces of components would inhibit total removal of the oil. What little oil that can or does come out during recovery or evacuation is limited to oil in locations that are within close proximity to the evacuation/recovery machine's service hoses (such as at the compressor ports), and a small portion of oil can vaporize as well, however you will not recover or pull out 6 ounces of oil spread through out the whole system. Most ac refrigerant evacuation and recovery machines have an oil trap or cup which will note to the technician approximately how much oil came out with the refrigerant during the process of recovery.
LH Front is the location. Driers should be replaced whenever: (a) your system has lost its refrigerant and you are unsure of its age, (b) the system is suspect to excessive moisture, (c) you are changing over to an alternate refrigerant or incompatible refrigerant oils, or (d) your compressor seized or locked up. Driers contain a drying agent called a desiccant which looks like small glass beads as you might find in those funky packets shipped with new electronic equipment. R134a uses a different desiccant than R12 refrigerant.
AC oil 'wicks' or accumulates throughout the entire system. Once again, in a perfect world you could flush out the incompatible oil prior to doing a conversion process, however if you are using Ester oil it has been proven time and time again over the years that Ester mixes well will residual Mineral oil without any complications. Griffiths has supplied R134a conversions for over 1,000 Porsche ac systems without any complications related to oil compatibility.
There are two types of oil you can use when converting to R134a:
PAG (Polyalkylene Glycol), or Ester . The previous refrigerant that was in the system, R12, uses Mineral refrigerant oil which does not mix well with the new R134a refrigerant. PAG does not mix well with Mineral oil however Ester does and when the Ester mixes with the residual Mineral oil the refrigerant can move the oil through the system.
In a perfect world you would liquid flush the system to remove any residual mineral oil, however its been proven that the procedure is not necessary when you use Ester.
Turning the compressor upside down and turning the outer hub will help remove what little oil is left in the compressor; the compressor has a few cavities which will inhibit total removal of residual oil and 'wicking' or oil cleaning to the inside surfaces inhibits removal as well. In most cases you will observe only an ounce or two of oil coming out because the oil is spread through out the entire ac system. One of the benefits of following the procedure to dump residual oil from the compressor is that you get a chance to inspect the oil for signs of contamination in the system, such as any black or grey matter or aluminum particles which would suggest you may have a compressor on its last leg, as well as a need to liquid flush the system.
AC oil 'wicks' or accumulates throughout the entire system. Once again, in a perfect world you could flush out the incompatible oil prior to doing a conversion process, however if you are using Ester oil it has been proven time and time again over the years that Ester mixes well will residual Mineral oil without any complications. Griffiths has supplied R134a conversions for over 1,000 Porsche ac systems without any complications related to oil compatibility.
01-25-2009, 02:10 AM
#6
Racer
Griffiths -- thanks for chiming in -- expert advice is always of interest.
Can I ask you to advise me on my 1990 964 system?
I live in Australia and it is HOT! (Like your Mexico)
My 964 is dark blue and has parchment interior.
I have had the car for 5 years and it's great but the air con sucks and I have been to 4 different tech's and still my neighbours 1975 Toyota Corolla with Nippondenso air is so much colder it is embarrasing -- the Corolla even blows icy air with the engine idling!
From reading your website -- yesterday -- I see the steps you advise and I plan to do as follows:
1 - Remove compressor and gravity drain
2 - Replace the flexible hoses in the engine bay
3 - Fit new receiver drier
4 - Replace all o-rings
5 - Clean the condensor
6 - rewire the condensor fan so that it runs on high whenever the compressor is running
7 - Replace the evaporator with your serpintine unit (with new TX valve)
8 - Use the correct oil
9 - find a tech who will evacuate for say 3 hours
10 - test charge 134a and leak test
11 - charge with 134a using the method you recomend -- ambient temperature and pressure related (I do not understand it but hopefully I can find a tech who does)
12 - inject a little dye.
Is there any thing else? (perhaps a second condensor in the front -- or some other modifications -- ?)
I want it cold becuse if it is not cold I am going to buy another car -- possibly a BMW or a Merc which would be a great pity because I love my Porsche but I physically cannot handle the heat and find myself not being able to concentrate and getting "short" if I am not "cool" so it has to be safety first.
If you have the time for a reply thanks a lot if not that's understood.
Regards,
Michael Gibney
01-25-2009, 10:49 AM
#7
After evacuating the system...
1) Yes.
2) A good idea if its in your budget.
3) Yes.
4) A good idea if you have the time.
5) Yes.
6) Hmmmm. Not necessary if the low/high circuit is operating correctly.
7) Yes.
8) Yes.
9) You'll find a tech that will follow the instructions we can provide.
10) Could be phrased as "evacuate, charge and test".
11) If they are a "tech" they can do this.
12) You can either add the dye to the oil or inject the dye-oil after evacuation; the techy will handle that.
13) Insure that the condenser-fan does operate at both speeds.
14) Insure that the HVAC controls and flap actuators are functioning properly, meaning you are not getting heat mixing in the vents when the ac is on and your are not pulling in outside air when you are in the 'recirculate' ac mode.
15) Before moving forward it would be helpful to know the current systems status in terms of pressures and temperatures, such a "what are the low and high side pressures at idle with the ac on and what is the outside air temperature; windows up, engine idling for 10 minutes, and what is the vent temperature; the temperature measurements should be taken with a digital probe type thermometer rather than an analog needle type or infrared. Document the readings.
16) Ditto on '15' after you do the repairs.
getting "short" is one way to blow off steam so long as its in the right direction (exhaust)
PM if you need more guidance.
Griff
Trending Topics
09-01-2015, 11:22 AM
#8
Is there a way to tell whether I already have R132a installed by looking at the valves? The sticker over my fan says R12 but I'd rather be sure before I order a retrofit conversion kit.
 09-01-2015, 11:35 AM
#9
Formerly turbotwoshoes
Rennlist Member
Rennlist Member
However, mine was this way when i bought my car and the a/c did not work. If so, an amateur probably did the short cut conversion. Look at the drier and see if you can determine the age. Also look at the evaporator connections and see if it looks to have been replaced. The age of our cars and the failure rate at this age suggest that you probably have more problems than just adding 134... but good luck. I just spent 2 days overhauling my system using Griffiths components which were all top notch and fit like a champ. I have vent temps approaching 42 degrees.... which for me is great for Arkansas temps. A pic of the high side valve would help a lot since that is what you will need to be connected to to hit the right pressures to achieve an optimal system. If it hasn't been converted, you are shooting in the dark to just add 134. .
09-01-2015, 11:45 AM
#10
Nordschleife Master

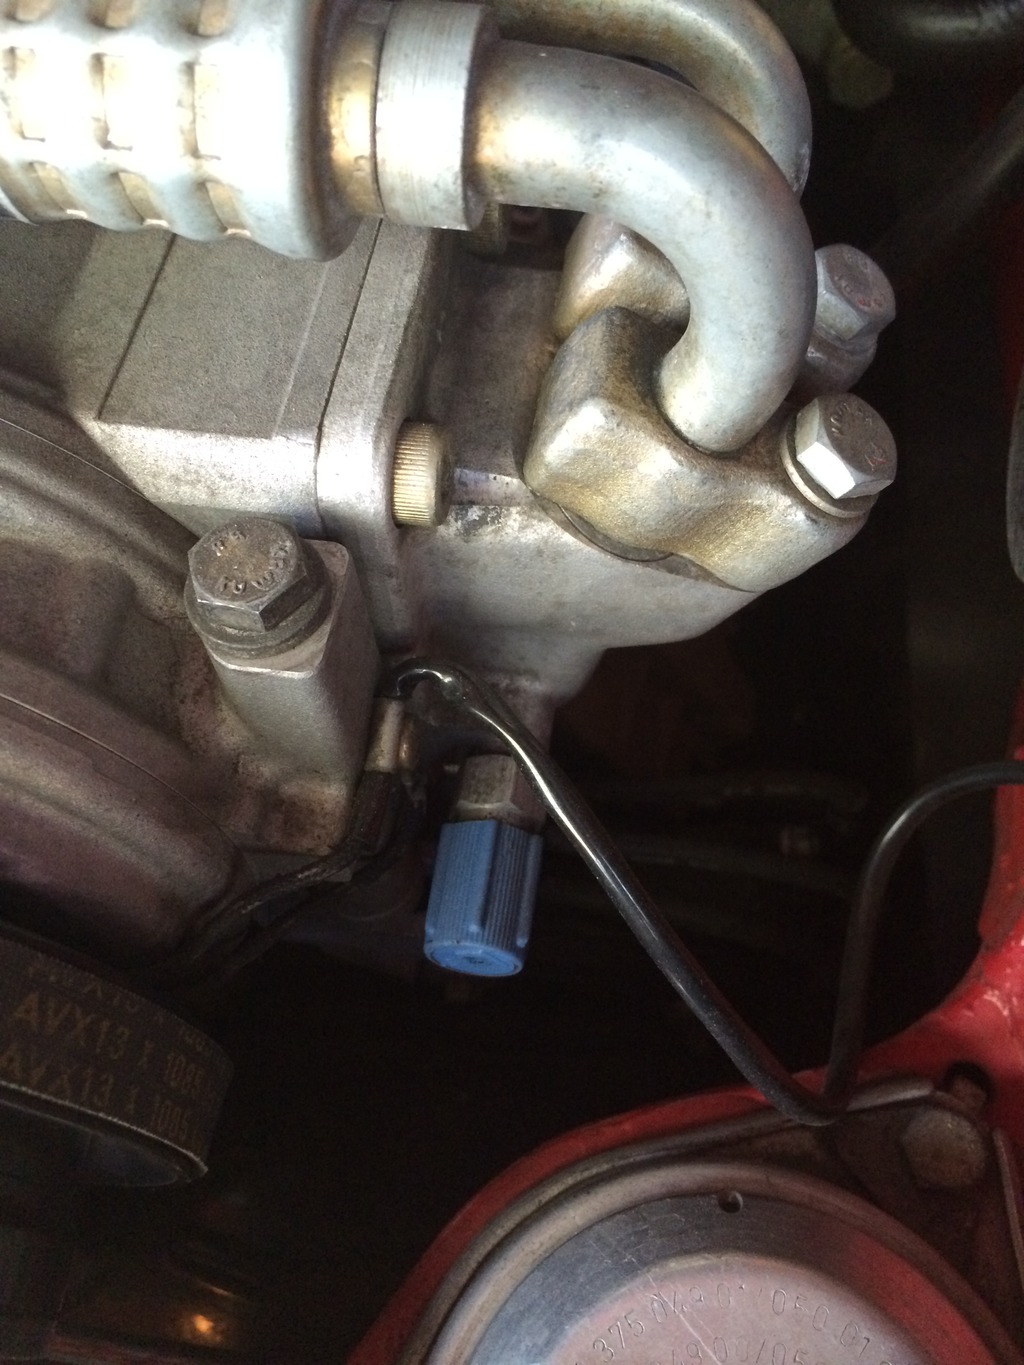
These were the R12 to R134a adapters I used on the compressor.
High side.
Low side
These are quality pieces because they have their own valve core. You have to remove the valve cores currently installed on the compressor before installing these fittings.
I actually had one of the old valve cores break and fall apart during removal, so I had to remove the compressor and dismantle the port housing to fish out the piece of the valve core that stayed inside. So just be concious and make sure the old valve cores come out complete.
09-01-2015, 11:47 AM
#11
Nordschleife Master
I replaced the drier. It's in the rear of the front left fender well. I used the drier from a Civic. This only works on older 964s that have the 90-degree drier fitting.
This drier.
This drier.
09-01-2015, 11:51 AM
#12
Nordschleife Master
Here are the o-rings I ordered for the whole system. I got them all from Pelican.
999-707-261-40-M325 $0.50 3 $1.50 A/C O-Ring (9 X 1.8 mm) Brand: Santech
999-707-251-40-M325 $0.75 5 $3.75 A/C O-Ring (14 X 2 mm) Brand: Santech
999-707-434-41-M325 $0.75 7 $5.25 A/C O-Ring (10.6 X 2 mm) Brand: Santech
999-707-247-40-M325 $0.25 6 $1.50 A/C O-Ring (7.5 X 2 mm) Brand: Santech
999-707-534-41-M325 $0.75 5 $3.75 A/C O-Ring (17 X 2 mm) Brand: Santech
I basically went through the PET diagrams and jotted down all o-rings mentioned and ordered extras just in case. I can't tell you which I used and how many, but I am pretty sure I used all sizes I ordered and was able to do the whole job. They're cheap, so having extras is not a big deal.
Nylog Blue on all o-rings, shrader valve cores, and on the back of fittings.
09-01-2015, 11:55 AM
#13
Nordschleife Master
For the condenser (my old one had a decent leak), I used the $99 Behr OE unit from PelicanParts. It is a newer design (from 993) using a serpentine layout rather than the tube/fin layout of the OE 964 unit. The design makes it thicker than the unit you're replacing. You have to bend, widen, and generally open up the channel on the frame bracket where it sits. It should fit, just take your time and be patient.
http://www.pelicanparts.com/cgi-bin/...Condenser%2520
http://www.pelicanparts.com/cgi-bin/...Condenser%2520