
Using a blowtorch


 01-10-2006, 07:26 PM
#17
Marc
A fox wedge, also called a splitting wedge, is one with a very shallow angle. I have a set of 4 and they are about 4 inches long, very sharp at the thin end and about a quarted inch at the thick end. because of the angle the resultant force when you hit one with a hammer is outwards, forcing the flanges apart without damage. I have never failed to split a flange using them. Do NOT use a screwdriver or chisel as the angle is too acute and, thus the splitting force will be less (as well as damaging the flanges)
Try one and be amazed!!!
Allen
01-10-2006, 08:58 PM
#18
Super Duper Moderator
Lifetime Rennlist
Member
Lifetime Rennlist
Member
Thread Starter
Okay guys,
I bought an oxy-acetylene torch, a propane torch, chisels for my air hammer, and blades for the Sawzal (reciprocating saw) on my way home tonight so that bugger is coming off one way or another....
Marc
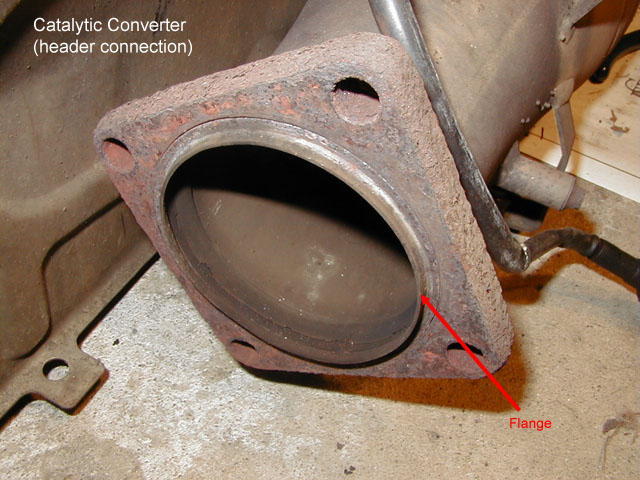
p.s. thanks for the photo Jason - I did not know there was a flange on the inner part cat. side so if I go the Sawzal route, I'll have to try to avoid it.
I bought an oxy-acetylene torch, a propane torch, chisels for my air hammer, and blades for the Sawzal (reciprocating saw) on my way home tonight so that bugger is coming off one way or another....
Marc
p.s. thanks for the photo Jason - I did not know there was a flange on the inner part cat. side so if I go the Sawzal route, I'll have to try to avoid it.
Last edited by Marc Shaw; 01-10-2006 at 09:55 PM. Reason: typo
01-10-2006, 09:55 PM
#20
Super Duper Moderator
Lifetime Rennlist
Member
Lifetime Rennlist
Member
Thread Starter
Originally Posted by JasonAndreas
You completely removed the bolts and the only things still attaching the cat to the crossover tubes are the inner flange and rust?
I re-sprayed with Liquid Wrench tonight and planned to try the air hammer to drive the bolts out tomorow - unless you've a better suggestion.
Marc
01-11-2006, 01:55 AM
#21
Technical Guru
Rennlist Member
Rennlist Member
Originally Posted by Marc Shaw
unless you've a better suggestion.
01-11-2006, 10:26 PM
#22
Super Duper Moderator
Lifetime Rennlist
Member
Lifetime Rennlist
Member
Thread Starter
Yeah, I wondered that too - I don't know how the valves were done without removing the cat... 
Anyway, I got the cat off - brute force.
I used a combination of Sawzal, prying, swearing, and an air hammer.
As you can see, the bolts are still stuck in the flange for the manifold.
I'll heat them up and whack the heck out of them tomorrow night and see if I can get them out. At least now, with the cat. out of the way, there is room to work in there.
As you can see, the flange for the manifold is a bit "scuffed" but otherwise okay. I used the angle grinder to polish up the scuffed bits a bit too.
Marc
01-12-2006, 01:04 PM
#23
Nordschleife Master

Hiya Marc
A guess , when they put the cat back on after the adjustment they used the wrong bolts and used the nuts to pull the oversized bolts into the flanges ? The oversized bolt shaft held the cat on internally ?
If you look at Jasons bolts , they could never rust to the point of seizing in the hole , way to much room.
I'd get in contact with the shop that did the work .
01-12-2006, 01:11 PM
#24
Super Duper Moderator
Lifetime Rennlist
Member
Lifetime Rennlist
Member
Thread Starter
Originally Posted by Indycam
Hiya Marc
A guess , when they put the cat back on after the adjustment they used the wrong bolts and used the nuts to pull the oversized bolts into the flanges ? The oversized bolt shaft held the cat on internally ?
If you look at Jasons bolts , they could never rust to the point of seizing in the hole , way to much room.
I'd get in contact with the shop that did the work .
A guess , when they put the cat back on after the adjustment they used the wrong bolts and used the nuts to pull the oversized bolts into the flanges ? The oversized bolt shaft held the cat on internally ?
If you look at Jasons bolts , they could never rust to the point of seizing in the hole , way to much room.
I'd get in contact with the shop that did the work .
In Jason's picture, the bolts seem to fit freely in the holes.
Looking at the cut ends of mine they fill the holes totally with absolutely no free space - I think you may be right that the bolts used were too large and the nuts were used to haul the too-large bolts into the flanges.
Marc
01-12-2006, 05:03 PM
#26
Marc
Have you checked to see if a previous owner has tapped the flange to screw in the oversize bolts? This could be the reason why they won't come out.
You certainly like a challenge!!!!!!!
Allen
Have you checked to see if a previous owner has tapped the flange to screw in the oversize bolts? This could be the reason why they won't come out.
You certainly like a challenge!!!!!!!
Allen
01-12-2006, 05:42 PM
#27
Addict
Rennlist Member
Rennlist Member
Originally Posted by Marc Shaw
Looking at the cut ends of mine they fill the holes totally with absolutely no free space - I think you may be right that the bolts used were too large and the nuts were used to haul the too-large bolts into the flanges.
Marc
Marc
01-12-2006, 07:00 PM
#28
Three Wheelin'

Join Date: Dec 2004
Location: Halifax, Nova Scotia , Canada
Posts: 1,779
Likes: 0
Received 0 Likes
on
0 Posts
Marc,
Hurray!!!!!!!!!!!!!!!!!!!!!
I knew that when you got mad it would come off. I have seen those bolts rust weld in before , b*st*rds.
The flanges dont look bad .The little spiggot thingy is just there for a bit of help with alignment.I would get two gaskets( takes up flange distortion if necessary ) and a tube of exhaust paste .
When it all goes back together try it dry, for fit and then apply some magic glue!
Well done.
Geoff
01-14-2006, 09:57 PM
#29
Super Duper Moderator
Lifetime Rennlist
Member
Lifetime Rennlist
Member
Thread Starter
Well, I "heated" and I "beated" but the bolt remnants would not move.
So I pulled out the cordless and just drilled out all the bolts, starting with a small drill bit to get dead centre and then moving up. Three of the 4 bolts I was also able to remove the bolt heads with the angle grinder (the 4th - upper/inner I could not get at so drilled out totally). I broke/destroyed a total of 6 drill bits but, overall it was a small price to pay.
Below is a shot of one of the bolts - or at least what is left of it. I am glad to say that the flange was not threaded by the po and, in the end, the bolts did not appear to be too large......just rusted solid.
Oh well, they are out now - so I can get at the heat-shield box and try to replace that darn timing belt cover.
Marc