

Reseal, clutch, injectors, and more begins (PICS - 56K warning)
 11-22-2005, 09:27 PM
#1
Pro
Thread Starter
So my engine has been dropped as seen in the pictures and many things to be done while it's down.
1. Reseal
Replace the with new parts:
1. Replace engine insulation thingy
2. MAF
3. Clutch/flywheel
4. Injectors
5. Knock sensors
6. O2 sensor
7. Plugs and wires
8. Change Cam timing
9. R&R all parts that may need to be replaced
10. New Bilstein shocks/struts
11. H&R Springs (already had)
12. SS Brake lines
13. Chip
14. Paint fan


-Puma
1. Reseal
Replace the with new parts:
1. Replace engine insulation thingy
2. MAF
3. Clutch/flywheel
4. Injectors
5. Knock sensors
6. O2 sensor
7. Plugs and wires
8. Change Cam timing
9. R&R all parts that may need to be replaced
10. New Bilstein shocks/struts
11. H&R Springs (already had)
12. SS Brake lines
13. Chip
14. Paint fan
-Puma
Last edited by puma1824; 11-23-2005 at 06:51 PM.
 11-22-2005, 11:25 PM
#2
Professor of Pending Projects
Rennlist Member
Rennlist Member
What is this?? An epidemic??!! In the last few weeks/months I have seen more 964 engines than in all my time in Rennlist... wow.
Puma, thanks for the photos!! And remember to replace the clutch fork (or at least inspect the tips of the fork to make sure those are in good shape... ) and needle bearings.
Puma, thanks for the photos!! And remember to replace the clutch fork (or at least inspect the tips of the fork to make sure those are in good shape... ) and needle bearings.
11-23-2005, 10:26 AM
#3
Burning Brakes
Join Date: Oct 2005
Posts: 828
Likes: 0
Received 0 Likes
on
0 Posts
Great pics. Your Porsche looks pretty clean as is. Why so much R&R. Did it need it or are you just doing a lot of preventative maintenance to avoid issues down the road. My car turned 59K and runs strong. Did you have some warning signs that put you into this mode.
11-23-2005, 10:54 AM
#4
Pro
Thread Starter
Originally Posted by last toy
Great pics. Your Porsche looks pretty clean as is. Why so much R&R. Did it need it or are you just doing a lot of preventative maintenance to avoid issues down the road. My car turned 59K and runs strong. Did you have some warning signs that put you into this mode.
LINK
Once the manifold was off, cracks were noticed here (see pic below). While the cracks were very small hairline cracks, it was cause for concern later down the road to eventually cracking more. If those manifold ends are replace the injector o-rings needs to be replace. If that needs to be replace they suggested (money permitting) might as well replace injectors "while we're there."

Last edited by puma1824; 11-23-2005 at 11:25 AM.
11-23-2005, 11:56 AM
#5
Burning Brakes

Join Date: Mar 2005
Posts: 909
Likes: 0
Received 0 Likes
on
0 Posts
when I pulled those plastic pieces every one of mine had a "crack" on the outside, for each bolt. I was worried until i really studied the part. The metal sleeves extend past the bottom face to keep you from compressing the rectangular shaped silicon ring (quad ring) they use for sealing to the heads too much. Ultimately I cleaned mine up thoroughly and reused them. Oh man were they dirty.
Certainly replacing them is a good option, but my cracks on the side didn't bother me as I felt they would not affect the way the parts worked (after verifying). The main concern I had is the press of the metal sleeve is no longer as tight (which is why the plastic popped in the first place I think). I measured each and they all stuck out the same with a very mild variation, so i didnt think they had moved. I then tried to press a couple, to see if they would slide and lead to reduced sealing pressure. I couldnt budge them.
We all have a comfort range and it varies from person to person from part to part.
11-23-2005, 06:49 PM
#6
Pro
Thread Starter
UPDATE: Fan painted silver

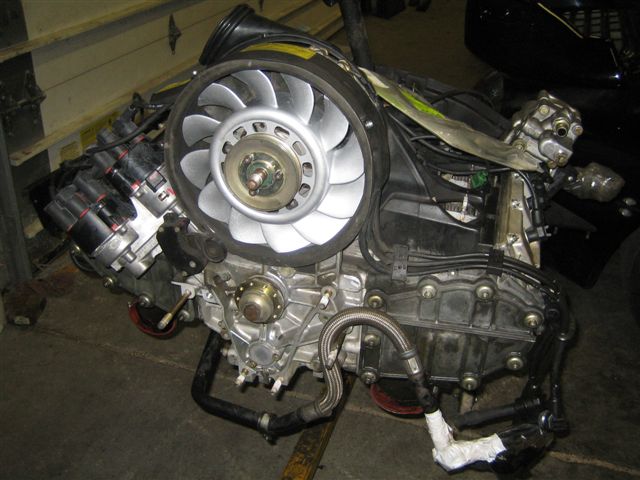
How's it look???
-Puma
Oh yeah just wanted to post the racing carnage outside the shop where I'm getting the work done. Thought it was kinda cool

How's it look???
-Puma
Oh yeah just wanted to post the racing carnage outside the shop where I'm getting the work done. Thought it was kinda cool
Trending Topics
11-23-2005, 09:34 PM
#8
Three Wheelin'
Join Date: Dec 2003
Location: Rancho Palos Verdes CA
Posts: 1,569
Likes: 0
Received 2 Likes
on
2 Posts
Your rear shocks seem to have a lot of threads showing.
On mine I have the collars all the way down as low as they will go, well one side is up a bit for corner ballance.
On mine I have the collars all the way down as low as they will go, well one side is up a bit for corner ballance.
11-23-2005, 09:39 PM
#9
Pro
Thread Starter
Originally Posted by Marc Shaw
Fan looks great - what did you/they paint it with?
Marc
Marc
Originally Posted by pete000
Your rear shocks seem to have a lot of threads showing.
On mine I have the collars all the way down as low as they will go, well one side is up a bit for corner ballance.
On mine I have the collars all the way down as low as they will go, well one side is up a bit for corner ballance.
 11-28-2005, 08:54 AM
#12
Guest
Posts: n/a
Mechanics maybe in my next life on some other planet, but immediately the new silver paint work caught my eye. Pls. excuse the obvious dummy question,... High Temperature paint not too over coated, the correct metal etching primers, if so, let�s turn the key or at least from my point of view, let�s burn!!!!! No it looks as if you got other problems, I can only wish you good luck from me, and all the best, what ever, "YOU LOOK LIKE!!" Take care, Marc
11-28-2005, 09:31 AM
#13
Instructor

Join Date: Jul 2005
Location: shropshire U.K
Posts: 232
Likes: 0
Received 0 Likes
on
0 Posts
The best way to paint the fan is to have it bead-blasted and powder coated (not the ends of the blades though)
This is a popular mod/cosmetic upgrade! on the old 3.2 carrera it looks cool and the finish makes it easy to keep clean.
This is a popular mod/cosmetic upgrade! on the old 3.2 carrera it looks cool and the finish makes it easy to keep clean.
12-01-2005, 08:07 AM
#14
Pro
Thread Starter
UPDATE: So even MORE work is being done. Looks like I'm having an entire upper end rebuild  or depending on how you see it. I'll post pics as soon as I get back over to the shop.
NEW UPDATE: Story continues (with pics) here: LINK
or depending on how you see it. I'll post pics as soon as I get back over to the shop.NEW UPDATE: Story continues (with pics) here: LINK
Last edited by puma1824; 12-09-2005 at 12:53 PM.