When you click on links to various merchants on this site and make a purchase, this can result in this site earning a commission. Affiliate programs and affiliations include, but are not limited to, the eBay Partner Network.
Sorry - blonde moment (no offence to anyone ) - I looked in PET for the part numbers and the diagram and never thought to look at the "Quantity" column!
You don't actually have to remove #1 and #2 in the diagram. Just pop the clips along the top edge (you can use a flat-head screwdriver wrapped in cloth) and push them back into place (with your hands) as you stick the rubber molding in place. I wouldn't even bother replacing #5 and #6, not for $100. Pull the moldings out and clean them with peanut butter and then soap and water and stick them back in. There should be extra rubber hidden behind the body panels (there was on mine).
I like Jason's idea. Mine were off anyway to be repainted, but if they don't have to come off, don't bother. Appears I need a PET. Not sure why the part numbers are different. Odd.
I like Jason's idea. Mine were off anyway to be repainted, but if they don't have to come off, don't bother. Appears I need a PET. Not sure why the part numbers are different. Odd.
You can buy a PDF version of PET for like US$20.00 from the Porsche Parts Department. Or try some illegal copy that I cannot talk about here
Usually part numbers differences are related to replacement/upgraded parts... but, usually, only the last numbers change...
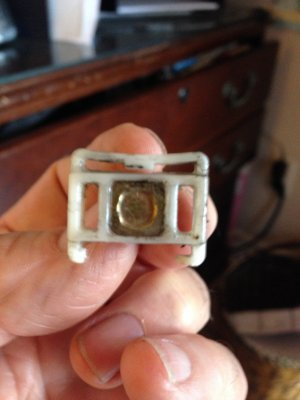
I know this is a very old thread, but I found out a couple of things that might help others. First pay extreme attention to DarrylH's note (repeated here) "There are a couple of the "clips" that are threaded on each piece, with ?10mm nuts holding them on. The trickiest is behind a little access panel behind the front wheels. Once you've seen the system, it's quite sensible, but it's easy to break both the clips and the little loop-like things on the panels themselves. Ask how I know. If you're careful to pull right next to the snap fasteners, they pop out without breaking. But the threaded fasteners - make sure you find all of them or you'll become an epoxy expert." Well, sure enough, I didn't read very well and broke the loop off of the clip in the front, the threaded one that is closest to the front wheel. Turns out there is hope for clutzes like me! this particular clip is symmetrical, meaning that there is a loop on both sides (see pic), so no JB Weld for me on this one (there is a nub for the bottom of this clip on the sill, but oh well...). Also, I pulled out the rubber strip first and discovered that you can easily see where the tabs are. In another thread, it was suggested that using something plastic (I used a plastic putty knife) in conjunction with judiciously using a padded screwdriver, you can pry the sill back slightly. Doing this allowed me to get the screwdriver in front of the clip (the part with the nipple on it), and it was easy to pop these guys out w/o worrying about cracking them. Hope this helps the next poor soul trying to do this.
Update: boy am I embarrassed. Turns out there is supposed to be a second tab on the sill and I just didn't see it - it was broken off! JB weld to the rescue.
Last edited by ricks93-964; 10-01-2019 at 03:40 PM.
Reason: incorrect info
I know this is a very old thread, but I found out a couple of things that might help others. First pay extreme attention to DarrylH's note (repeated here) "There are a couple of the "clips" that are threaded on each piece, with ?10mm nuts holding them on. The trickiest is behind a little access panel behind the front wheels. Once you've seen the system, it's quite sensible, but it's easy to break both the clips and the little loop-like things on the panels themselves. Ask how I know. If you're careful to pull right next to the snap fasteners, they pop out without breaking. But the threaded fasteners - make sure you find all of them or you'll become an epoxy expert."
Hi Do you have to replace the little red things …. Is it a must I ordered everything else besides those red things - are they always assumed to be Brocken when removing these parts ? Thank you
I just did this on mine and I would replace ALL of the clips and red receivers. Everything gets brittle with time and having new parts will make reassembly much easier. Good luck with the last two clips on the longer trim near the shark fin, I had a hell of a time getting mine to seat.
I just did this on mine and I would replace ALL of the clips and red receivers. Everything gets brittle with time and having new parts will make reassembly much easier. Good luck with the last two clips on the longer trim near the shark fin, I had a hell of a time getting mine to seat.
That’s a brilliant approach to the issue, I wish I had seen that sooner. I was convinced my sheet metal was slightly bowed so I called up my PDR guy to come out and take a look. He set up his mirrors and said it was perfectly straight but he could see that the metal was flexing with every attempt to push the last clip in. His solution, take one of the tools he uses to push out a dent and hold the metal in place while I pressed the last clip in. I hope I never have to pull them off again anytime soon!
Last edited by Spyder_2011; 03-14-2024 at 09:06 AM.
That�s a brilliant approach to the issue, I wish I had seen that sooner. I was convinced my sheet metal was slightly bowed so I called up my PDR guy to come out and take a look. He set up his mirrors and said it was perfectly straight but he could see that the metal was flexing with every attempt to push the last clip in. His solution, take one of the tools he uses to push out a dent and hold the metal in place while I pressed the last clip in. I hope I never have to pull them off again anytime soon!
Just for the fun of it and curiosity , I received a quote to just professionally spray the bottom part of the skirt black again for � rejuvenated look� - just the back part not the actual color part and they quoted me near 1400$ ; does that sound right ? I thought that was allot for a part that I don�t even see mostly � and that thought was put to sleep very quickly
Just for the fun of it and curiosity , I received a quote to just professionally spray the bottom part of the skirt black again for � rejuvenated look� - just the back part not the actual color part and they quoted me near 1400$ ; does that sound right ? I thought that was allot for a part that I don�t even see mostly � and that thought was put to sleep very quickly
Its always difficult to know what is reasonable as each country has different labour rates. That said, when I had mine done, it was mentioned that the paint type and masking required extra cost. I did the bumper as well.


 03-30-2005, 07:51 PM
 ) - I looked in PET for the part numbers and the diagram and never thought to look at the "Quantity" column!

 Turns out there is supposed to be a second tab on the sill and I just didn't see it - it was broken off! JB weld to the rescue.


 Do you have to replace the little red things …. Is it a must I ordered everything else besides those red things - are they always assumed to be Brocken when removing these parts ? Thank you
