

CV joint disassembly tips please!
 06-10-2013 | 08:50 PM
#61
Basic Sponsor
Rennlist
Site Sponsor
Rennlist
Site Sponsor
Joined: May 2001
Posts: 4,027
Likes: 36
Great pics!
__________________
Your Trusted Source For DIY and Parts
FREE SHIPPING over $99 click here
Porsche Parts | DIY Tech Articles | Facebook | Twitter | Instagram | YouTube | Promos
888.280.7799 | 6am - 5pm PST

FREE SHIPPING over $99 click here
Porsche Parts | DIY Tech Articles | Facebook | Twitter | Instagram | YouTube | Promos
888.280.7799 | 6am - 5pm PST
03-18-2021 | 10:15 PM
#63

Addict
Rennlist Member
Rennlist Member
Joined: May 2001
Posts: 1,093
Likes: 13
From: So Cal
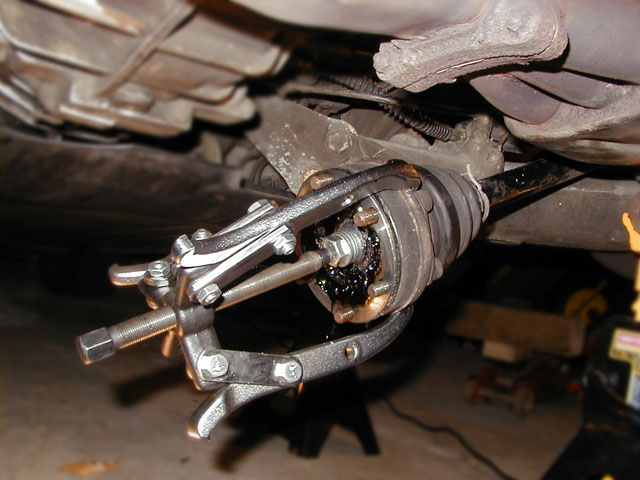
Autozone rents a 5-ton puller (the arms on the 2-ton are too short) for a $40USD (fully refundable) deposit. On a lot of driveshafts the joint won't just pop off the shaft so the alternative is wacking it with a hammer which can damage the outer bearing cage. The Autozone band-it jr. clamp strap compressor is useless so you might need new clamps in addition to the boots ($4USD at EBSRacing, part #POR052856) and 16oz of grease (Swepco - $9USD, Optimoly NR - $16USD, Krytox GPL-217 - $200USD).
If you completely disassemble the CV joint (not necessary) for cleaning
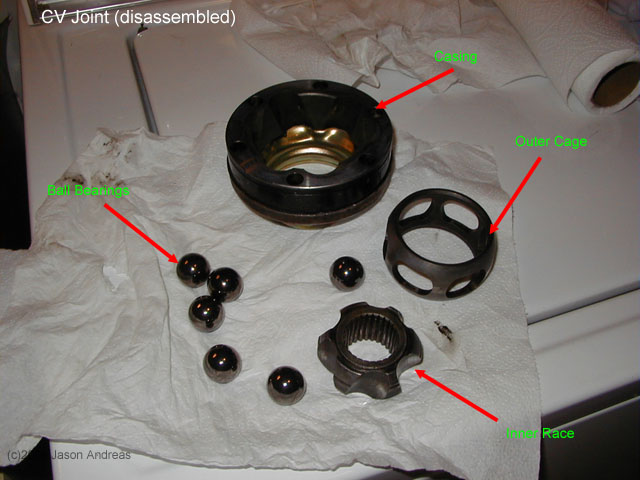
than there are two ways to put it back together. The easy way:
and the slightly more difficult way:

And when it comes to reassembly (before you put the inner race back onto the driveshaft) you must lube the driveshaft spline with Optimoly HT (copper grease). The threaded portion of the CV joint bolts should also be lubed but don't get anything on the flange cover. The torque spec for the driveshaft panhead screws of size (M8) are 42 Nm (31 ft.lb) or for (M10) 80 Nm (59 ft.lb).
If you completely disassemble the CV joint (not necessary) for cleaning
than there are two ways to put it back together. The easy way:
and the slightly more difficult way:
And when it comes to reassembly (before you put the inner race back onto the driveshaft) you must lube the driveshaft spline with Optimoly HT (copper grease). The threaded portion of the CV joint bolts should also be lubed but don't get anything on the flange cover. The torque spec for the driveshaft panhead screws of size (M8) are 42 Nm (31 ft.lb) or for (M10) 80 Nm (59 ft.lb).
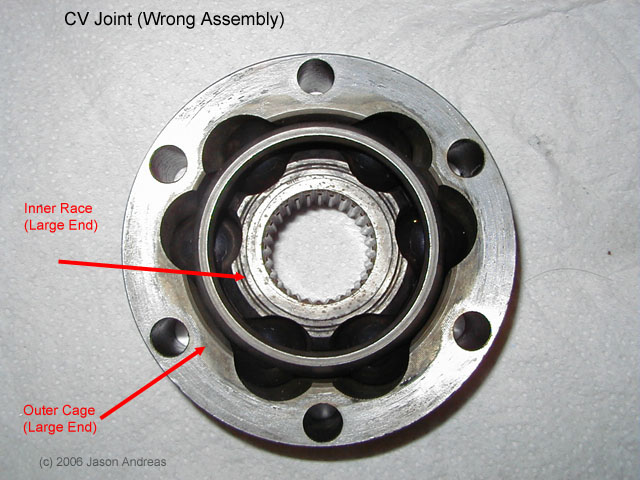
Someone please explain. I have it put back in the “wrong assembly” method but too afraid to put it back in the car. The whole thing is not as wobbly as before.
why was it easy to disassemble but so difficult to put back. The inner racer and the outer cage aren’t flexible as before. Do I need to remove the other cover, too.
thx
Last edited by hn; 03-19-2021 at 12:09 AM. Reason: Correction
03-19-2021 | 12:29 PM
#64
Burning Brakes
Joined: Mar 2010
Posts: 1,244
Likes: 359
From: Chicago suburbs
I'm not sure I'm answering your question here but I recently did my axles and assembling the bearings the "right" way (as pictured above) was tricky but necessary. One hint I can give that is hard to explain: you need to use a soft hand approach to assemble it. What I mean is you use both hands but not allot of pressure or force. It's almost like massaging the bearings back into place. They will not want to stay in or will pop out on one side as you put them in on the other side. You can get the first few bearings in place but for the last one or two you almost have to float the entire assembly in your hands so that all the bearings are just about to come out, gently adjust slightly in one direction or the other to find the spot where they just kinda fall in with just a little bit of pressure. There's a narrow window where everything lines up and the whole thing will go back together but you have to be gentle enough that it almost falls into place. If you use lots of pressure the assembly binds up and won't fit back together. Sometimes during this process you'll go too far one way and the whole assembly will come apart or a bearing or two will pop back out. Be patient and gentle and try again. One last point - it will go together easily the wrong way so don't let that fool you. Check it to make sure the small ends line up with the large ends as shown above.
Last edited by jpoint; 03-19-2021 at 12:40 PM.
03-19-2021 | 01:47 PM
#65
Addict
Rennlist Member
Rennlist Member
Joined: May 2001
Posts: 1,093
Likes: 13
From: So Cal
Yup, seeing how you describe the way you put it back is exactly my experience. It’s like it has its own mind, sometimes it seems so easy other times it seems impossible. Yesterday after giving up, I tried to remove the second cover (that holds the boot) thinking maybe it has to be removed. After an hour without success I decided to try it again and this time all the ***** just roll into the tunnels easily. I just had to use my left hand holding the casing up sideway while using the finger pushing the inner racer and the cage floating forward and use my right hand pull each slot out one by one. Other things, funny how people made it sound so easy to remove the cap by tapping it with a screw driver. It was not possible for me for the second cap as there is nothing can hold the casing firmly enough. May be it would be much easy if I try it while the assembly was still attached to the shaft. But in the end I didn’t need remove it.
oh, so I misunderstood Jason’s pic then. I though he meant it’s ok to do the easy way with the “wrong assembly”.
oh, so I misunderstood Jason’s pic then. I though he meant it’s ok to do the easy way with the “wrong assembly”.
Last edited by hn; 03-19-2021 at 02:20 PM.
