
Changing Spark Plug Cables
 02-21-2004, 11:52 PM
#16
Professor of Pending Projects
Rennlist Member
Rennlist Member
Thread Starter
Well... I worked on the car last night and finished around 2:45am today. Took the car at that time for a test drive and I am not sure if it was the time, the empty roads, whatever it was it felt smoother and faster.
Here are some photos of last night. I started by finishing the right side (filter housing, A/C compressor, etc):

Then I started to work on the driver side. Changed cables and replaced the spark plus for the Beru I bought. Pretty much usual maintenance...
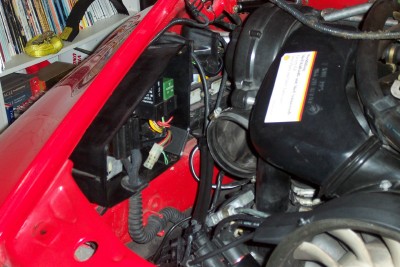
Then came time to take the coils (I had purchased these as a preventive measure, good thing I did). To have better access to that area I removed the plastic housing/box that hold the fuses and relays...
As you can tell one of the coils did not look good at all:

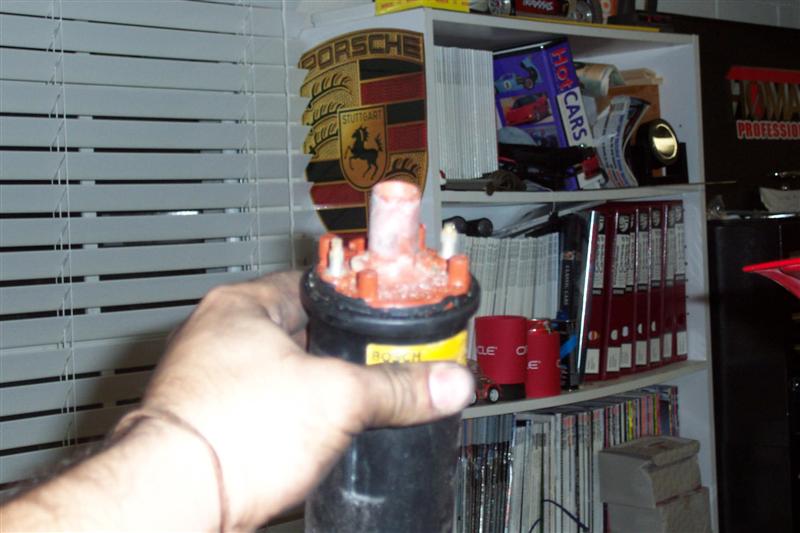
I had to remove the heat sink to get to the second coil...

Here are some photos of last night. I started by finishing the right side (filter housing, A/C compressor, etc):
Then I started to work on the driver side. Changed cables and replaced the spark plus for the Beru I bought. Pretty much usual maintenance...
Then came time to take the coils (I had purchased these as a preventive measure, good thing I did). To have better access to that area I removed the plastic housing/box that hold the fuses and relays...
As you can tell one of the coils did not look good at all:
I had to remove the heat sink to get to the second coil...
Last edited by Wachuko; 07-20-2008 at 09:34 PM.
 02-22-2004, 12:02 AM
#17
Professor of Pending Projects
Rennlist Member
Rennlist Member
Thread Starter
Here are the two coils in place and with the covers:

I installed the fuse box... make sure the rubber grommets are correctly installed. I had to undo the metal plate twice because of this...
All done:
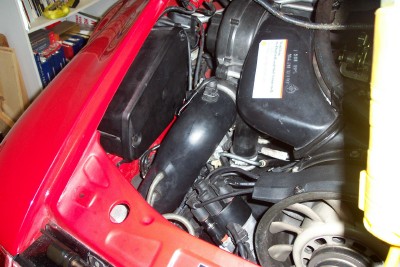
I went over the whole thing making sure the oxygen sensor, the resistor cables, the breather hose for the distributor were connected... just making sure all plugs had their mate.
Reconnected the battery, and voila! no more gremlins. Took the car for a spin to heat up the oil and make sure all was in order. Turned on all electronic devices, high beams, etc, to increase the load and to check that indeed the Xmas effect was eradicated. Well, even the light that the top was open did not come on. Sweet!!!
So, I can safely say that this project is over. On to the next one. Change the A/C from R12 to R134a and replace the evaporator (old one is leaking) and expansion valve. Since the gas tank has to come out (although I read somewhere here that it can be done without removing the tank...) I will tackle the gas smell as well (I ordered the gas cap gasket to validate is not a US$4.00 problem and avoid having to change the fuel filler neck without the need... did you know that they change the part number for the filler neck 5 times!!!).
I installed the fuse box... make sure the rubber grommets are correctly installed. I had to undo the metal plate twice because of this...
All done:
I went over the whole thing making sure the oxygen sensor, the resistor cables, the breather hose for the distributor were connected... just making sure all plugs had their mate.
Reconnected the battery, and voila! no more gremlins. Took the car for a spin to heat up the oil and make sure all was in order. Turned on all electronic devices, high beams, etc, to increase the load and to check that indeed the Xmas effect was eradicated. Well, even the light that the top was open did not come on. Sweet!!!
So, I can safely say that this project is over. On to the next one. Change the A/C from R12 to R134a and replace the evaporator (old one is leaking) and expansion valve. Since the gas tank has to come out (although I read somewhere here that it can be done without removing the tank...) I will tackle the gas smell as well (I ordered the gas cap gasket to validate is not a US$4.00 problem and avoid having to change the fuel filler neck without the need... did you know that they change the part number for the filler neck 5 times!!!).
Last edited by Wachuko; 07-20-2008 at 08:57 PM.
02-22-2004, 12:08 AM
#18
Professor of Pending Projects
Rennlist Member
Rennlist Member
Thread Starter
All in all not a difficult job. Only time consuming since a lot of stuff has to be removed to get to the bolts that hold the ignition cables in place and if you have an A/C the compressor needs to be moved to route the cables since they run right behind/underneath the A/C bracket.
Good night!!
Good night!!
 07-19-2008, 01:00 PM
#20
Nordschleife Master
I'm updating Jaime's DIY on sparkplug wires because the pictures are all gone (and I get flustered with the yellow 'distributor connections' decal's "I/II -- upper/lower".  Dyslexia (or density) is probably accounts for that.
Would someone fact-check/confirm this sketch for me? Thanks.
(I'll be using it tonight when I rip the old wires out and replace.)
Attachment 291914
Dyslexia (or density) is probably accounts for that.Would someone fact-check/confirm this sketch for me? Thanks.
(I'll be using it tonight when I rip the old wires out and replace.)
Attachment 291914
07-20-2008, 07:36 PM
#21
Nordschleife Master
OK.
Changing sparkplug wires, and Jaime's DIY pics aren't yet available.
I'm at the lower right side, now.
With the A/C out of the way, how do I:
1) Disconnect that little 3-wire sparkplug cable clamp right below the A/C? It seems magically attached to the engine. (And I don't like magical connections...)
2) Install that pass-through? There's some Rube Goldberg strain relief dohickey in the way, just beside the pass through, attached to the motor via two 10mm nuts.
07-20-2008, 08:51 PM
#22
Professor of Pending Projects
Rennlist Member
Rennlist Member
Thread Starter
Each clamp has bolts in the middle holding it in place...
Sorry about the missing photos... those were gone during a system crash in Rennlist... I don't think I have then anymore... but let me check...
Sorry about the missing photos... those were gone during a system crash in Rennlist... I don't think I have then anymore... but let me check...
07-20-2008, 10:32 PM
#24
Nordschleife Master
Maybe on your cab, but that's not the case, here.
[upper red circle] I 'cracked open' the 3-wire clamp and there ain't nuthin' holding it there that I can see. But it ain't budging! -- Damned magic bolts!
Edit- Thanks for reposting your pictures!
While packing away everything for the night, I got the answer. This clamp isn't like the rest -- it's held in place by two little studs that protrude out its belly to engage two blind holes in the A/C support bracketry.
A little judicious prying upward with a big screwdriver popped it out of those holes.
Upper red circle mystery solved.
[lower red circle] What's the deal down here? What is this MouseTrap contraption? Two 10mm nuts came off, but nothing seems to have loosened.
Edit- Then again, looking at your pics, it stays in place during the wire routing process. Two 10mm nuts just went back on.") Could this be some electric/mechanical standoff?
Could this be some electric/mechanical standoff?
(This whole corner's teeing me off -- like some weird engineering from Mars!) Time to pack it in for the night and take a chill pill.

[upper red circle] I 'cracked open' the 3-wire clamp and there ain't nuthin' holding it there that I can see. But it ain't budging! -- Damned magic bolts!
Edit- Thanks for reposting your pictures!
While packing away everything for the night, I got the answer. This clamp isn't like the rest -- it's held in place by two little studs that protrude out its belly to engage two blind holes in the A/C support bracketry.
A little judicious prying upward with a big screwdriver popped it out of those holes.
Upper red circle mystery solved.
[lower red circle] What's the deal down here? What is this MouseTrap contraption? Two 10mm nuts came off, but nothing seems to have loosened.
Edit- Then again, looking at your pics, it stays in place during the wire routing process. Two 10mm nuts just went back on.
Could this be some electric/mechanical standoff?(This whole corner's teeing me off -- like some weird engineering from Mars!)
Time to pack it in for the night and take a chill pill.
Last edited by elbeee964; 07-20-2008 at 11:37 PM.
07-20-2008, 11:48 PM
#25
Racer
Join Date: May 2006
Location: Altamonte Springs, Florida
Posts: 423
Likes: 0
Received 0 Likes
on
0 Posts
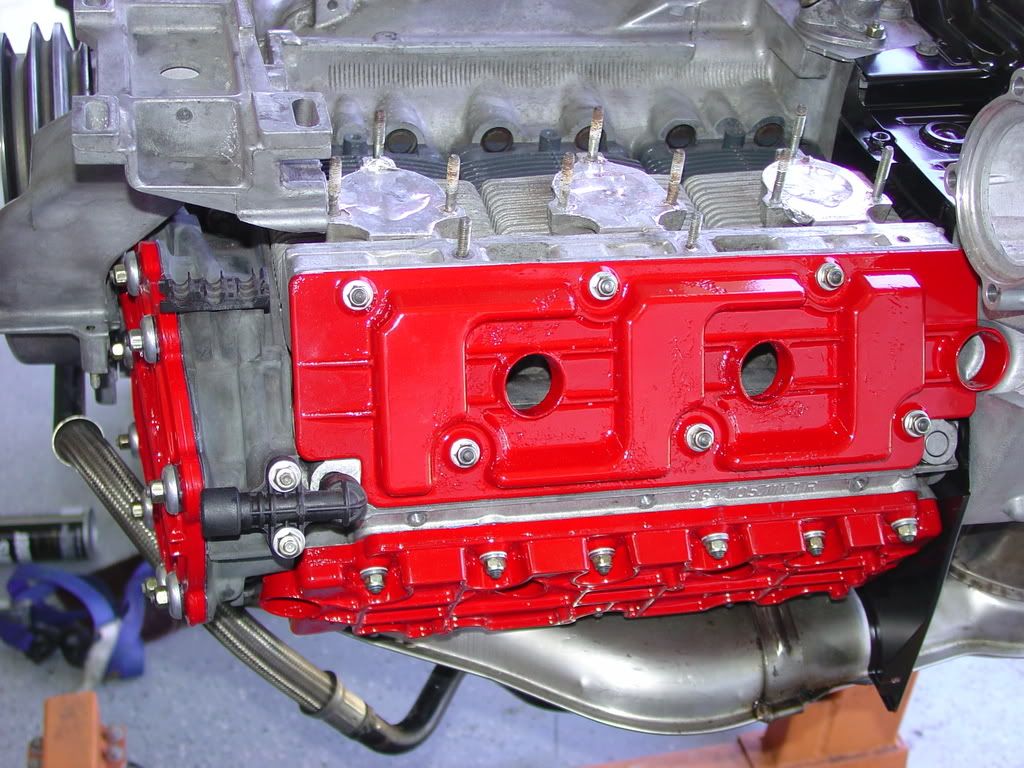
Lonnie, this mousetrap is the oil passage bridge for the timing cover. It stays in place for the plug wire change. There is no need to remove the three wire clamp either. The rubber grommet that the three wires go through can be pulled out of the engine tin to make routing the wires easier. I lubricated them with silicone grease to pull them through the grommet. The grommet is cheap if it gets damaged. Here's a picture of the oil bridge on the timing cover with the wires and tin out of the way.
07-21-2008, 09:22 AM
#26
Nordschleife Master
Thanks, Fred!
The old oil passage bridge trick... I'll buy that. (Now hope there isn't some Goldilocks torque that's critical for its two nuts re-installment. )
)
I'm still reading your wire routing suggestions. No big hurry, I'm waiting on the oil pressure xsducer O-ring to come in. It's always the $2 items that hold up the show.
I am sooo wanting to make that seal replacement and have a dry engine top side!
Killed a roll of paper towels yesterday wiping the top/cooling cover and all the surrounding (dirty, oiled down) plumbing. Nice and clean-like, now. Very satisfying.
Silicone grease to make 3-wire grommet rubber easier to install? Yup, makes sense to me.
I'll probably just use a little motor oil, seeing how that rubber's no doubt motor oil capable -- and I don't have the silly-cone stuff at home.
Note to self: must buy small in-lb torque wrench for upcoming valve job. (look at all those little valve cover nuts!) Also, buy some of that dielectric grease.
The old oil passage bridge trick... I'll buy that. (Now hope there isn't some Goldilocks torque that's critical for its two nuts re-installment.
)I'm still reading your wire routing suggestions. No big hurry, I'm waiting on the oil pressure xsducer O-ring to come in. It's always the $2 items that hold up the show.
I am sooo wanting to make that seal replacement and have a dry engine top side!
Killed a roll of paper towels yesterday wiping the top/cooling cover and all the surrounding (dirty, oiled down) plumbing. Nice and clean-like, now. Very satisfying.
Silicone grease to make 3-wire grommet rubber easier to install? Yup, makes sense to me.
I'll probably just use a little motor oil, seeing how that rubber's no doubt motor oil capable -- and I don't have the silly-cone stuff at home.
Note to self: must buy small in-lb torque wrench for upcoming valve job. (look at all those little valve cover nuts!) Also, buy some of that dielectric grease.
Last edited by elbeee964; 07-21-2008 at 09:41 AM.
 07-21-2008, 12:47 PM
#28
Super Duper Moderator
Lifetime Rennlist
Member
Lifetime Rennlist
Member
I removed this thread from the DIY section as the pictures are gone from there. I also copied Lonnies post with that great diagram to this thread.
Once all the additions and updates are done, I'll copy it to the DIY section so the pictures won't be lost (again!).
Marc
Once all the additions and updates are done, I'll copy it to the DIY section so the pictures won't be lost (again!).
Marc
07-21-2008, 12:51 PM
#29
Nordschleife Master
Stock(?) plug wires made by Beru. Appears to be real-deal stuff. Wire labeling, plug orientations, clamp placements, all mimic the ones I'm taking off, now. I'm satisfied.
Bought them through one of our Canadian rennies when they were going for $225-250 through his north of the border source. Knew at the time that'd be a price I'd regret not taking advantage of... Now hear of them going for $500+. No regrets.
Bought them through one of our Canadian rennies when they were going for $225-250 through his north of the border source. Knew at the time that'd be a price I'd regret not taking advantage of... Now hear of them going for $500+. No regrets.
Last edited by elbeee964; 07-21-2008 at 03:43 PM.
07-21-2008, 02:34 PM
#30
Professor of Pending Projects
Rennlist Member
Rennlist Member
Thread Starter
I got all my stuff for this project from Vertex Auto...
Marc, I uploaded the photos to this thread last night. Let me know what else I can help with.
Marc, I uploaded the photos to this thread last night. Let me know what else I can help with.