When you click on links to various merchants on this site and make a purchase, this can result in this site earning a commission. Affiliate programs and affiliations include, but are not limited to, the eBay Partner Network.
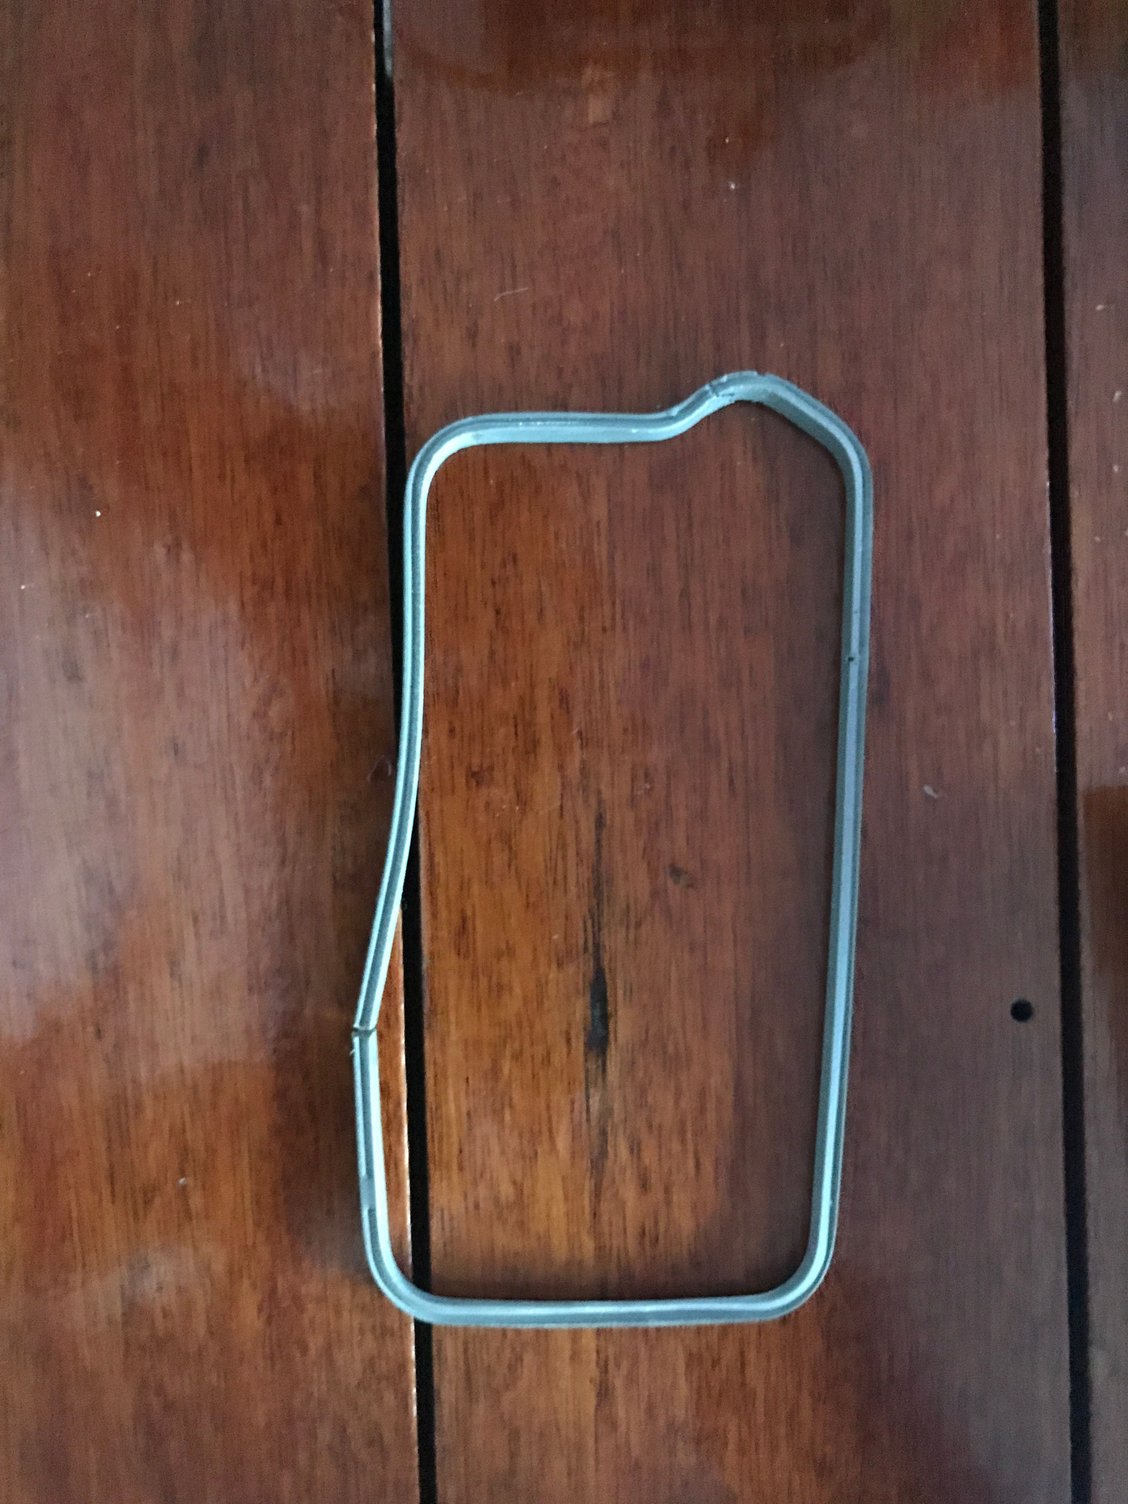
Anyone know the PET part # for the gasket that joins the front half of the gray plastic, with the back half? It's a "U" shaped gasket that sits in the channel of the back side socket.
I found the two pages of PET that show these parts, but it does not show the two halves split, so I don't see a part number. Odd since there are plenty of other "gaskets" that have part #'s.
Also odd that the diagram shows #'s 1-7, 9-11, 14-18, ... and yet the right side listing starts at # 19. And the next page stops at # 46, yet the diagram goes up to #52.
So the gaskets (left & right) I'm looking for is in between Part # 42 ... 964.631.203.00 and 964.631.204.00
Am I missing something on how to read the PET?
Thanks,
=Steve
Last edited by bweSteve; 02-14-2018 at 10:38 AM.
Reason: improved pg 2 listing of part #'s 41 - 46
The US/Canada PET doesn’t remark on the H4 headlights or RS non-foglight covers. Inversely the RoW PET skips the US/Canada H5 headlights.
For the gasket, I made new ones from butyl. Perhaps not the greatest method but I’d imagine it would seal out the elements (haven’t exposed them to weather yet).
You need to split them to change the bulbs. Unfortunately the gasket is not sold separately. I was thinking maybe you can find a large thin O ring and cut it to fit.
I have some but they aren't as tall as the factory seal. You can use something like this and possibly build it up from behind to make a tight seal or you can try two in the groove.
I can send you a couple if you want to give it a try.
BTW the seal is split at the bottom. Your other option is to buy a new or used fog light
Yes, I was thinking the O-Ring direction too,... if I could not find anything grooved (or at least more square to fit down in the slot).
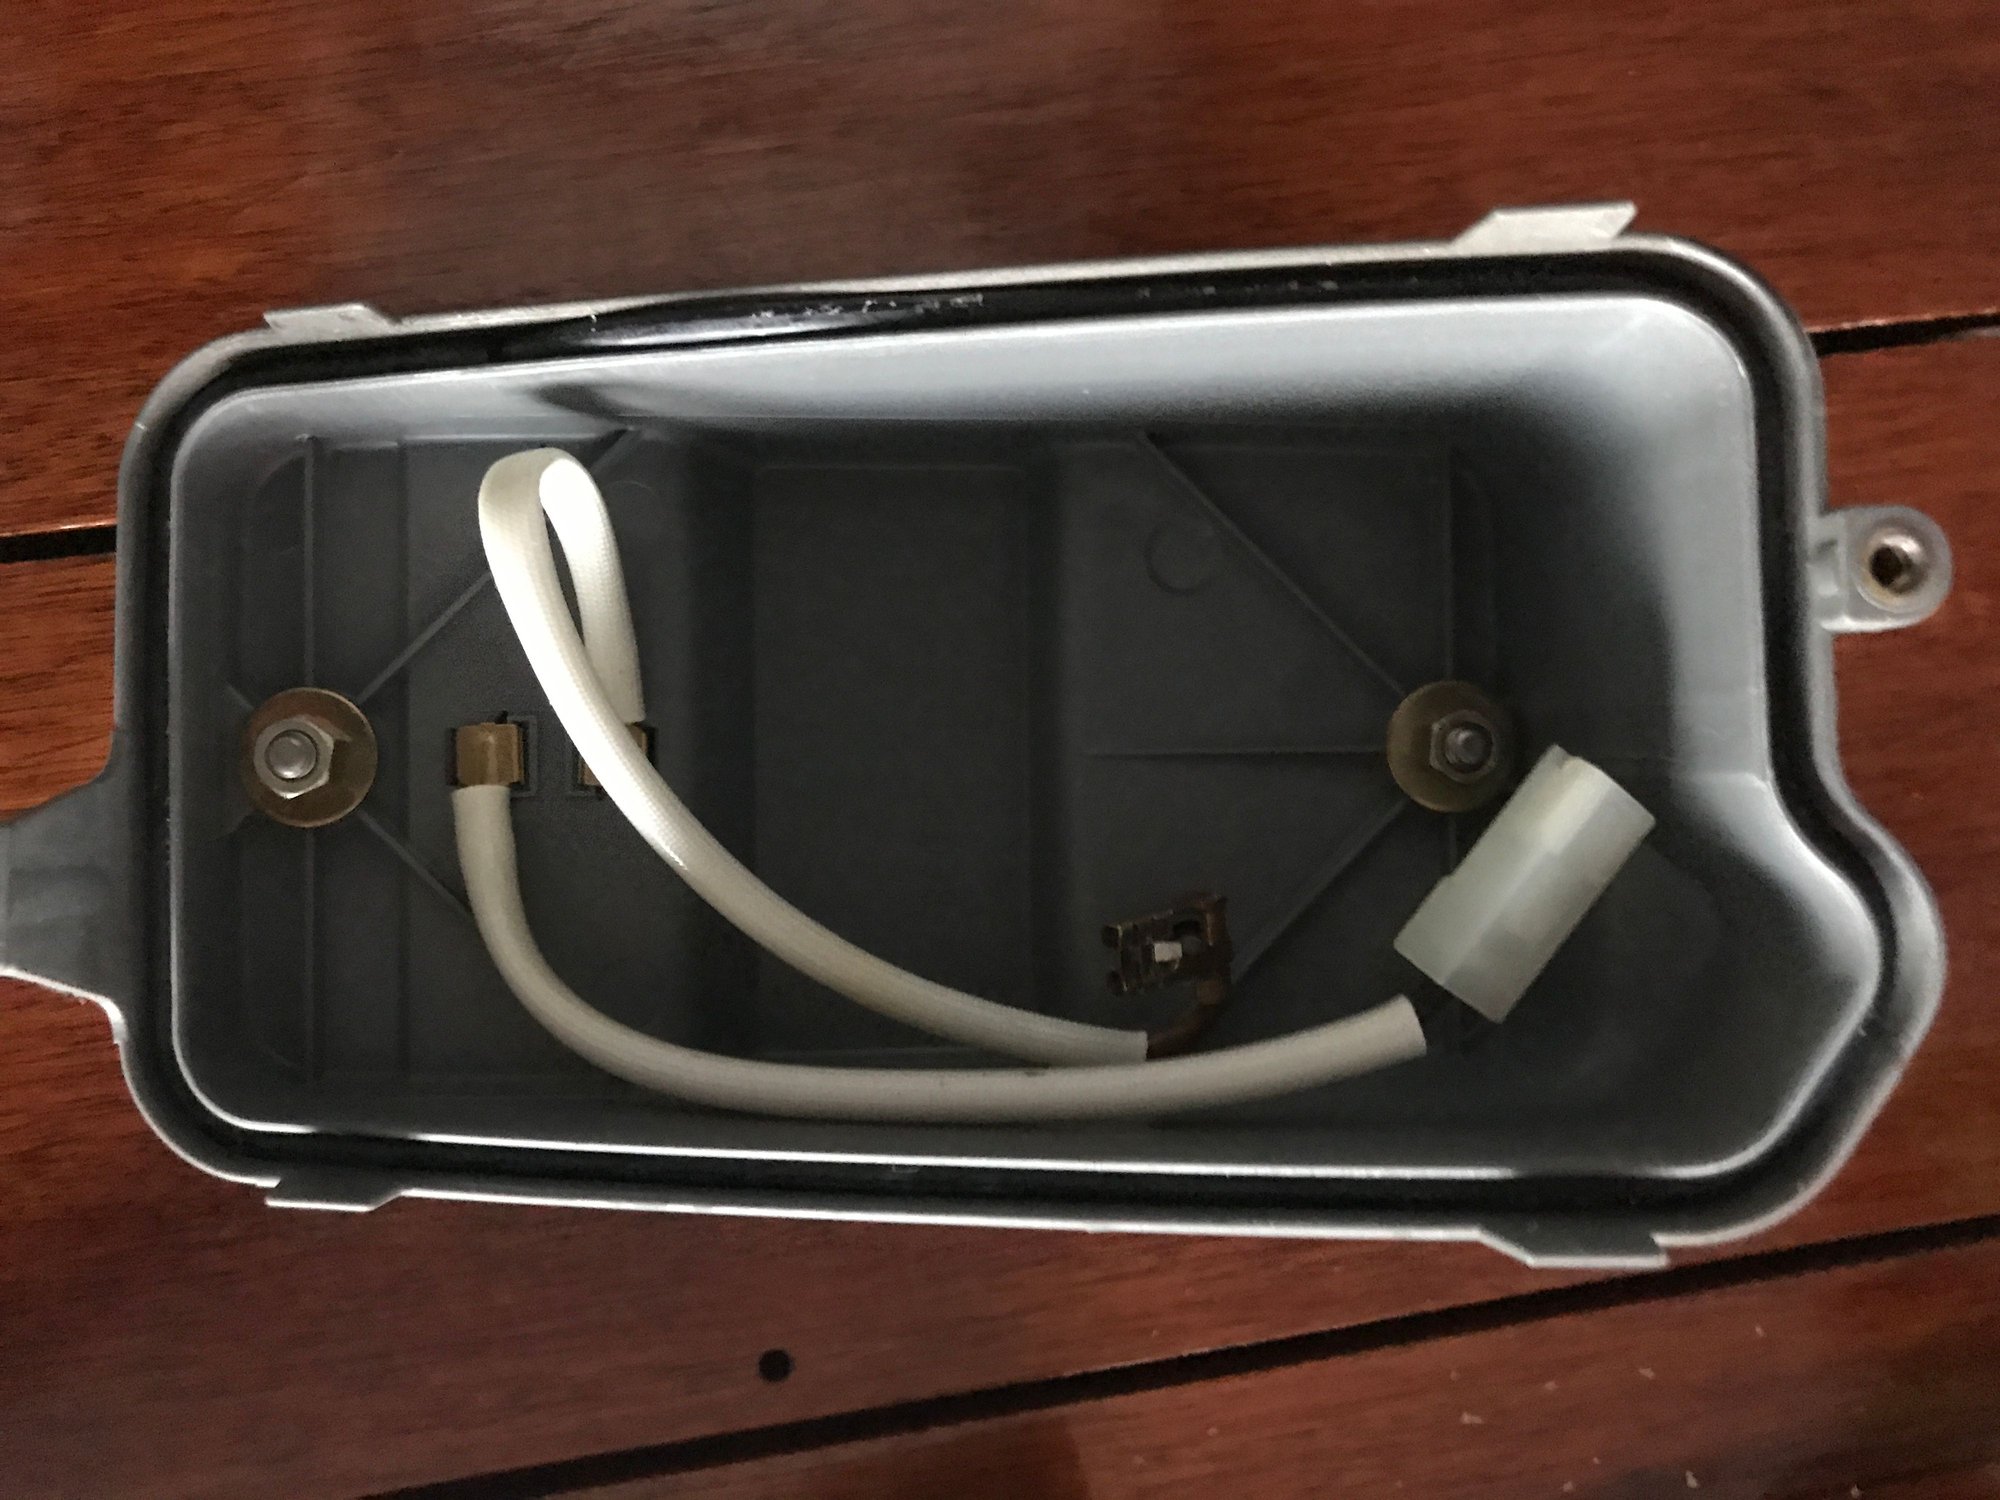
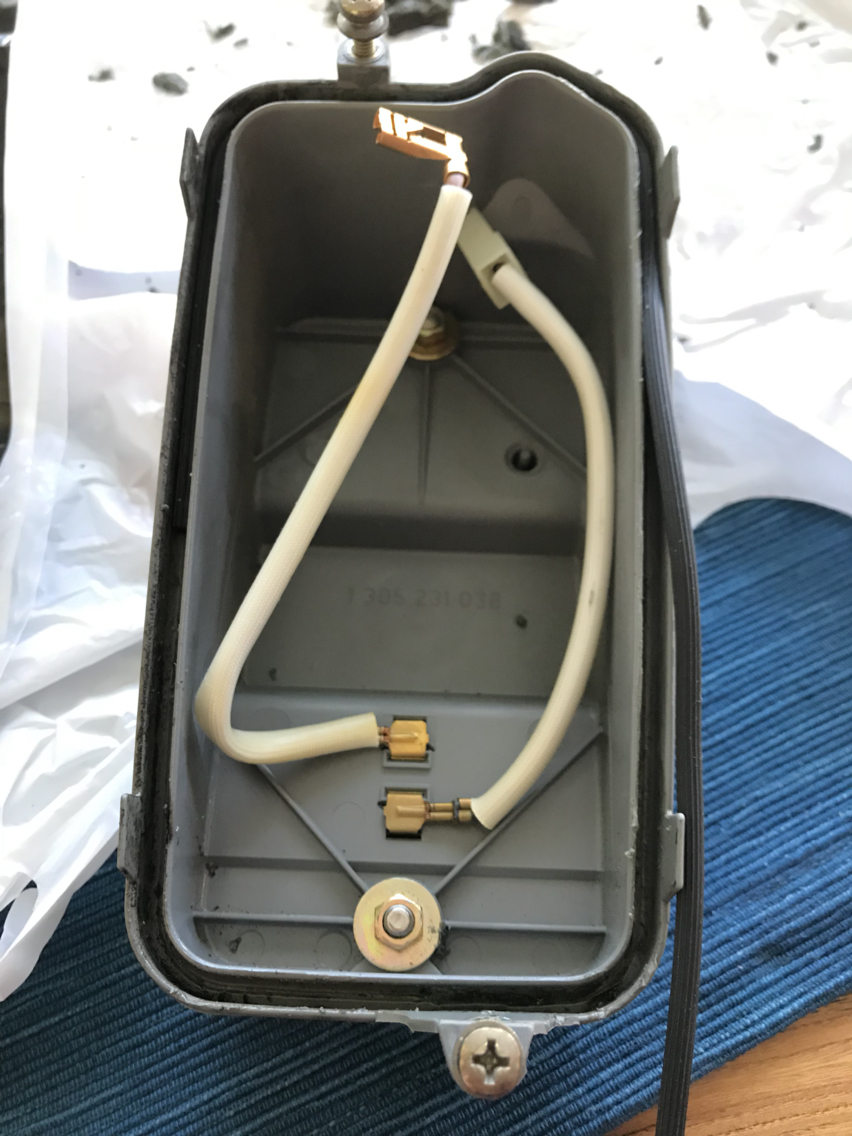
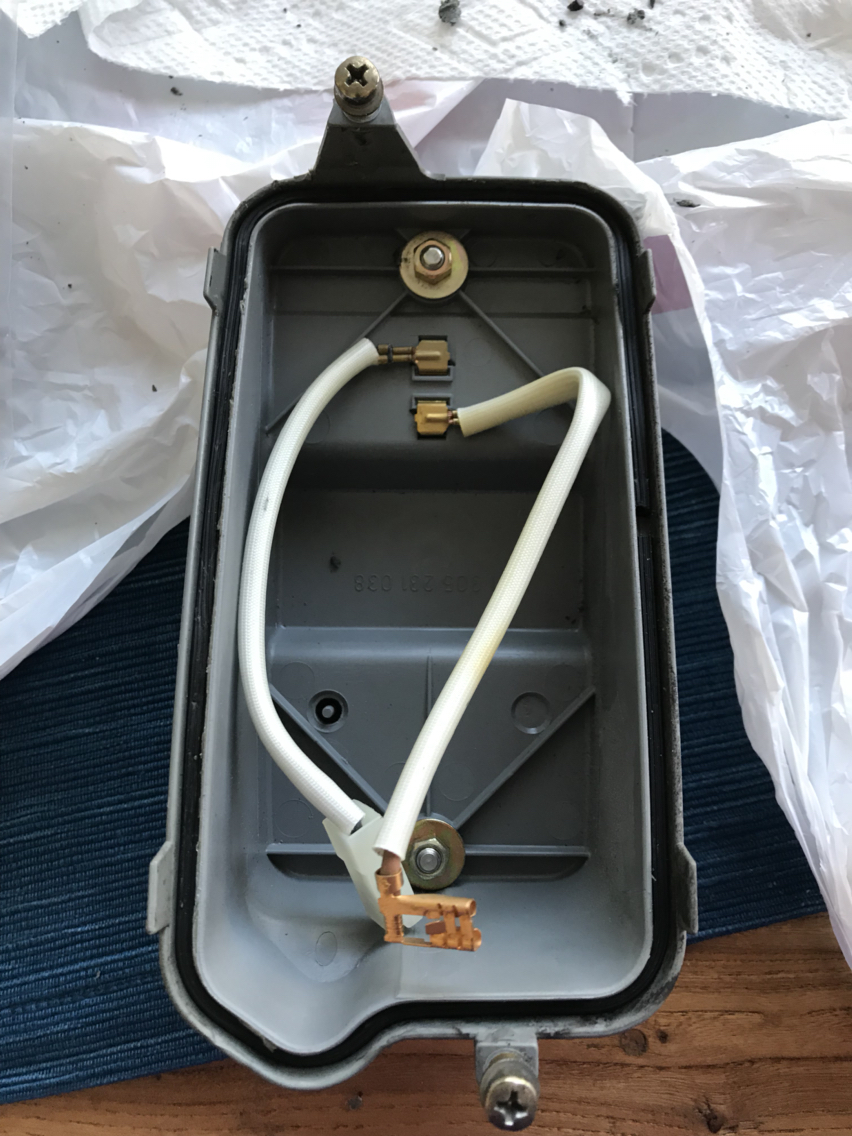
And THANKS COBALT for the help and pictures yesterday!! I would not have had the Cajones to pull that hard on the outer lens, if I did not have those pictures you sent (like the one above, showing the back socket section that the front fits into).
In my case, some knucklehead, at least over 14 yrs ago, but probably 20 yrs,... glued the two halves together with some Anaerobic sealant, and it was tough to get them apart. There is very little room for fingers to pull.
I was also thinking some form of screen-door rope like I could probably get at Home depot or Door Store.
If I come up with something creative, I'll let you guys know.
Hey,... back to the PET,... for those of you that are wizards at reading them (& thus were probably brought up in a German household) ....
Do you see in the above schematic,.. left side drawing, where it shows a line with #19 above it,... Question: is that saying that if you bought Part #19 ( 911.631.119.00 ), you would get all the parts underneath that bracket (ie #'s 20-24, 31 & 32)??
And if that's true,... and you wanted to buy all the parts listed under the #1 bracket,... where would you look for that part # (xxx.xxx.xxx.xx) ??
Yes, I was thinking the O-Ring direction too,... if I could not find anything grooved (or at least more square to fit down in the slot).
And THANKS COBALT for the help and pictures yesterday!! I would not have had the Cajones to pull that hard on the outer lens, if I did not have those pictures you sent (like the one above, showing the back socket section that the front fits into).
In my case, some knucklehead, at least over 14 yrs ago, but probably 20 yrs,... glued the two halves together with some Anaerobic sealant, and it was tough to get them apart. There is very little room for fingers to pull.
I was also thinking some form of screen-door rope like I could probably get at Home depot or Door Store.
If I come up with something creative, I'll let you guys know.
Hey,... back to the PET,... for those of you that are wizards at reading them (& thus were probably brought up in a German household) ....
Do you see in the above schematic,.. left side drawing, where it shows a line with #19 above it,... Question: is that saying that if you bought Part #19 ( 911.631.119.00 ), you would get all the parts underneath that bracket (ie #'s 20-24, 31 & 32)??
And if that's true,... and you wanted to buy all the parts listed under the #1 bracket,... where would you look for that part # (xxx.xxx.xxx.xx) ??
=Steve
I am assuming the seal is made with the groove or it is possible it has formed that way over time by being squashed closed. I don't think it is that critical. The seal is just to keep moisture out and a half decent seal should do the job. The Screen door rope is probably a good bet. So long as it gets sandwiched in place you should be good.
Yes you are correct the 19 and 1 are for the complete assembly comprising of all the sub parts noted. If the fog light parts were sold separately (gasket, screws, lens etc) it would have a line and its own number as well. The #1 is for H4 which was not used on US cars. You can find the info on the ROW PET.
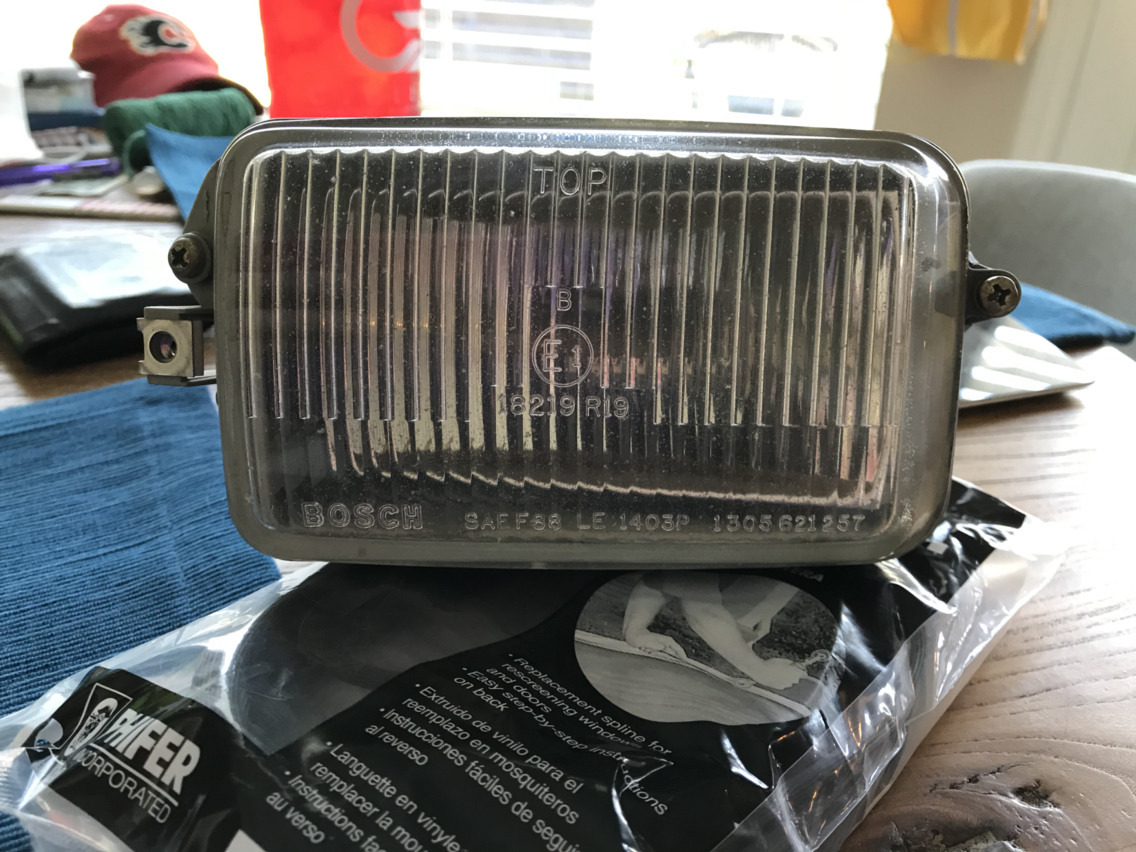
These have become hard to find lately. The original Bosch units are NLA and are now made by AL under license by Bosch. Same exact product just no Bosch markings on the lens they are marked AL. If you are looking for a set I have two sets for sale. Both are used but in like new condition and far less than the $575 each price new. I have a set with 55/60 watt bulbs and a set with 90/100 watt bulbs. I have relays and other parts as well. I also have H1's like I am using on my C2 which IMO look better and throw a better light with the dual bulb dual reflector setup. These are quite pricey though. All you would need are the trim rings painted to red to be set to go.
Thanks again Anthony. yea, I'm thinking as long as a round rubber screen door "rope" was large enough to fit tight in the groove,... the outer light assembly would sit against it fine to create a seal.
Hey, speaking of headlights,... have you seen these? He was a SEMA, and I've been following him for a long time on Instagram.... https://9elevenheadlights.com/
He has a very cool rear lens for 964's that will be coming soon.... that lights up the "P O R S C H E" on that center lens. Might be fun,... if I actually drove mine much at night,... which I don't.
=Steve
I have seen them in person. Great product and throws a great light. I just am not fond of the looks or the price for the amount of night driving I do.. Fine for some but I will stick with the classic lenses they look best IMO. I am considering upgrading the bulbs to LED though.
I am assuming that is for the earlier cars but you say they are making one for the 964? Fun piece but not necessary.
I have a buyer for a set of the H4's I haven't said yes yet but if your interested now is the time.
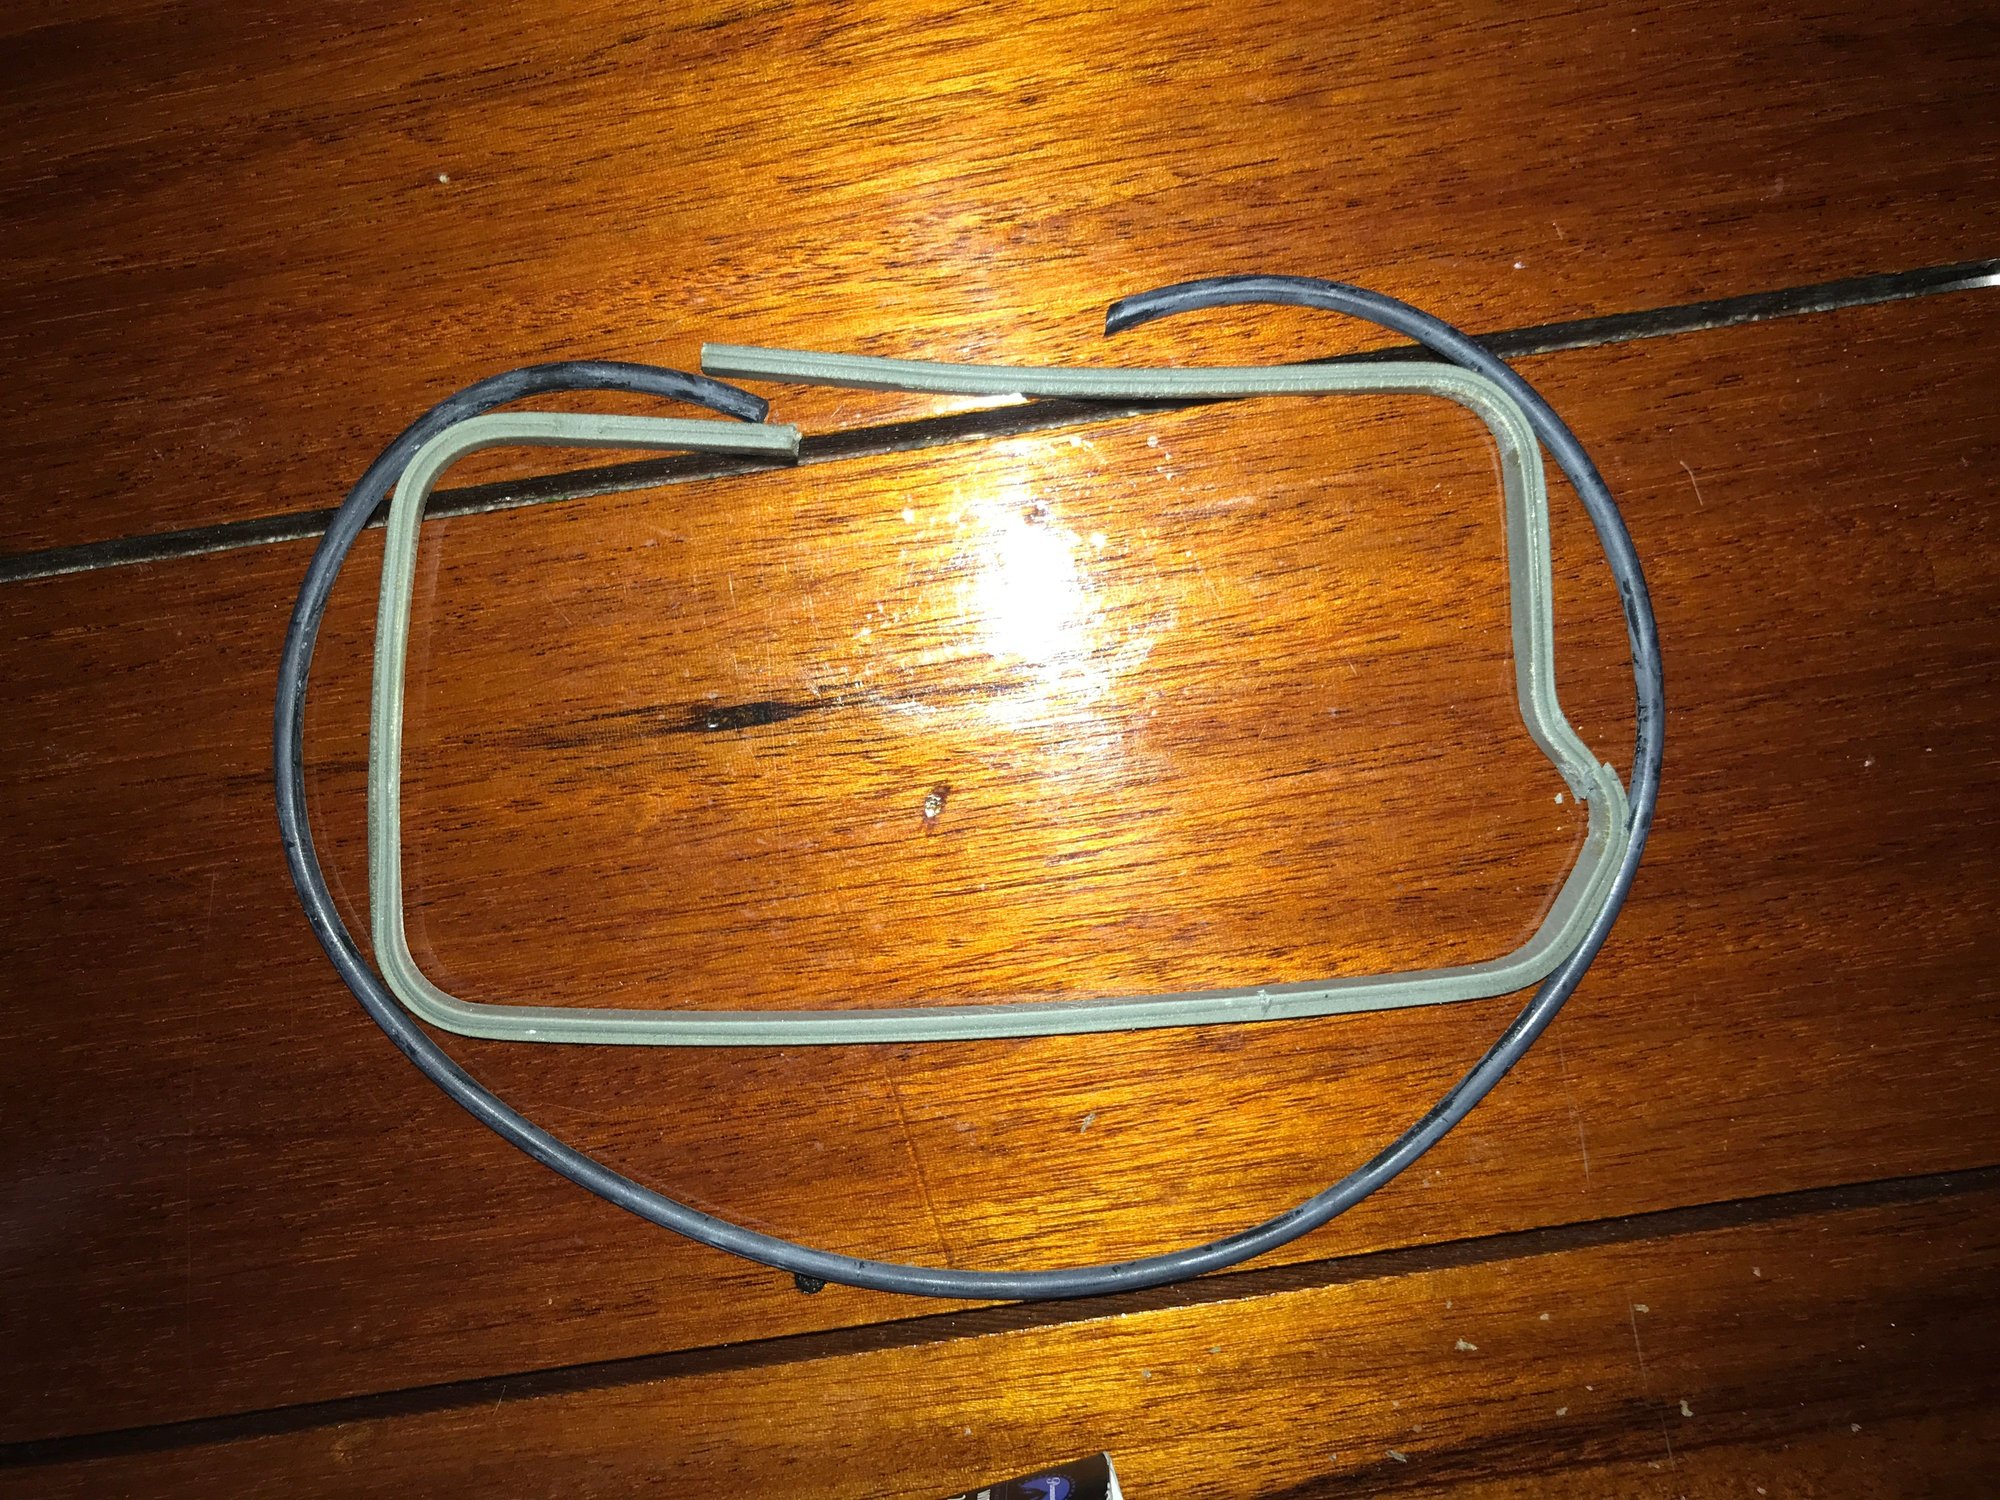
Figured I would follow up on this thread,... and close it out.
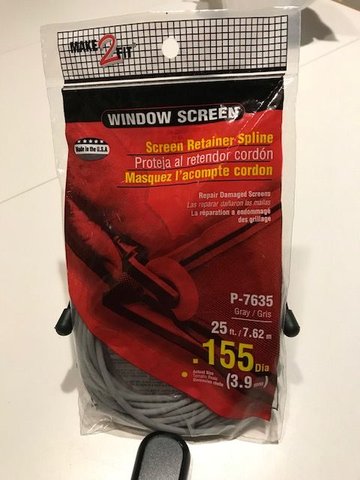
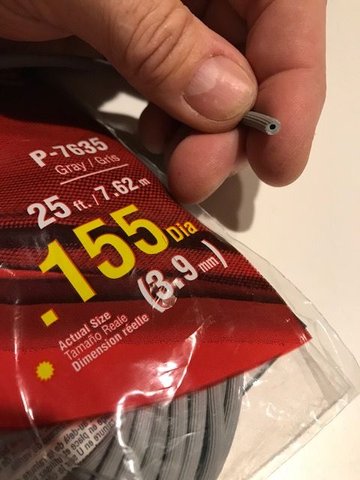
I went the quick, easy route of using a screen door gasket rope. It was cheap ($6) at my local ACE hardware store.... Worked perfectly. Fit snug in the channel... mm sizing shown on the pics below...
Figured I would follow up on this thread,... and close it out.
I went the quick, easy route of using a screen door gasket rope. It was cheap ($6) at my local ACE hardware store.... Worked perfectly. Fit snug in the channel... mm sizing shown on the pics below...
=Steve
Thanks for following up with the details and pictures! I opened up one of mine to replace my busted adjuster screw with a 3D printed piece designed by Rennlister Mojorizing and it looks like it needs a new gasket, too. It seems odd to me that Porsche wouldn't sell a part like this, but this sounds like it will work perfectly. I'll be headed to ACE soon (there's one conveniently around the corner from me).
Thanks for following up with the details and pictures! I opened up one of mine to replace my busted adjuster screw with a 3D printed piece designed by Rennlister Mojorizing and it looks like it needs a new gasket, too. It seems odd to me that Porsche wouldn't sell a part like this, but this sounds like it will work perfectly. I'll be headed to ACE soon (there's one conveniently around the corner from me).
Glad to hear it helped. This is what RL is all about.
I am not sure I understand what piece is broke on yours though Sooner964. Sounds like the plastic ear loop that the screw goes through to hold the face onto the backing socket.
If so, please take some pics and post the before & after here so folks can have a reference to that as well.
Plus, if you could post a link to the RL thread on 3D printed piece from Mojorizing too. I have not seen what he built.
I'm glad mine did not break when I was pulling them apart,... but they could have (they were stuck very tight). So for future reference, your experience could help us too.
=Steve
Hey Steve, Yep, it was the plastic screw adjuster that allows you to adjust the vertical aim. Here is the other thread started by Deserion to which I was referring for the 3D printed screw adjuster, and here is Mojorizing's post with the STL file he so generously created and shared. Here is a link to my most recent post with the new 3D piece installed.
I don't know how often they fail, but up until Mojorizing put together a 3D model, the only way to fix the problem was to buy an entire new unit, as the individual screw adjuster is not sold on its own, just like the gasket as you have experienced.
For reference, it is this piece (the image has the newly 3D printed replacement part) on my fog light:
3D printed screw adjuster attached to the reflector and screwed on!
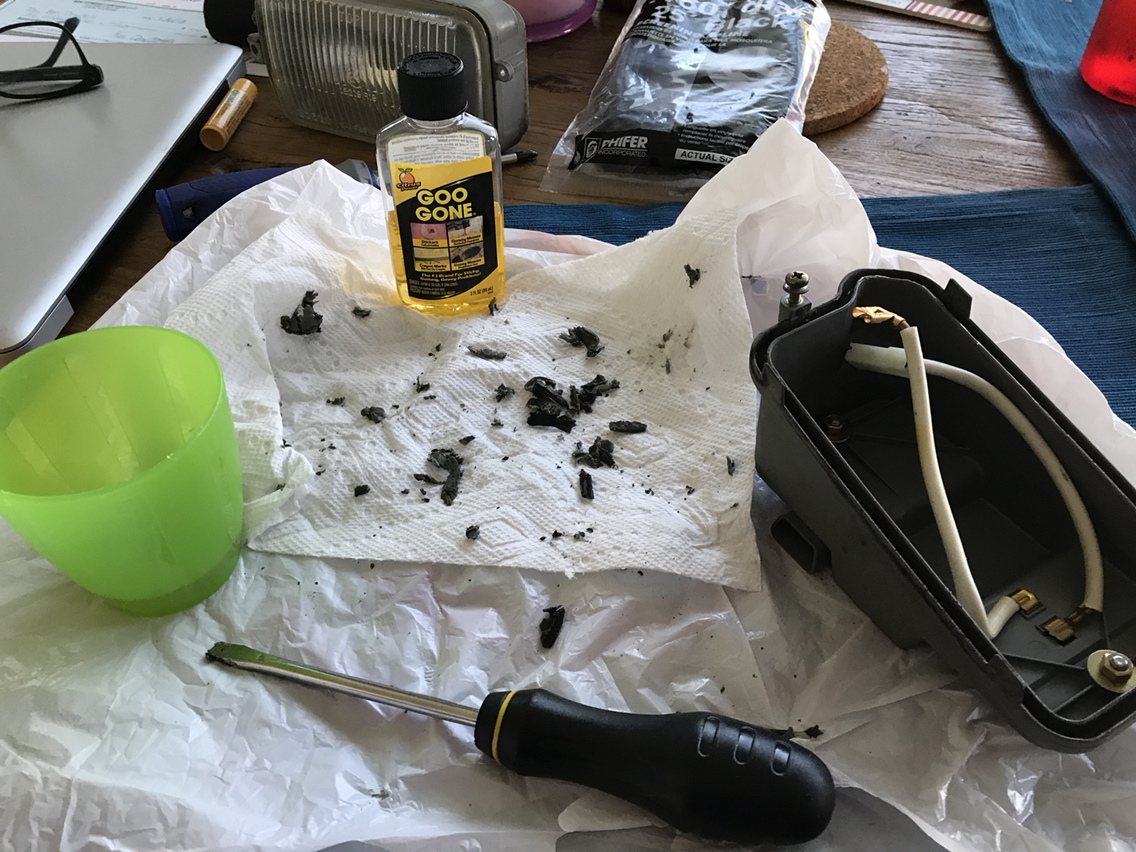
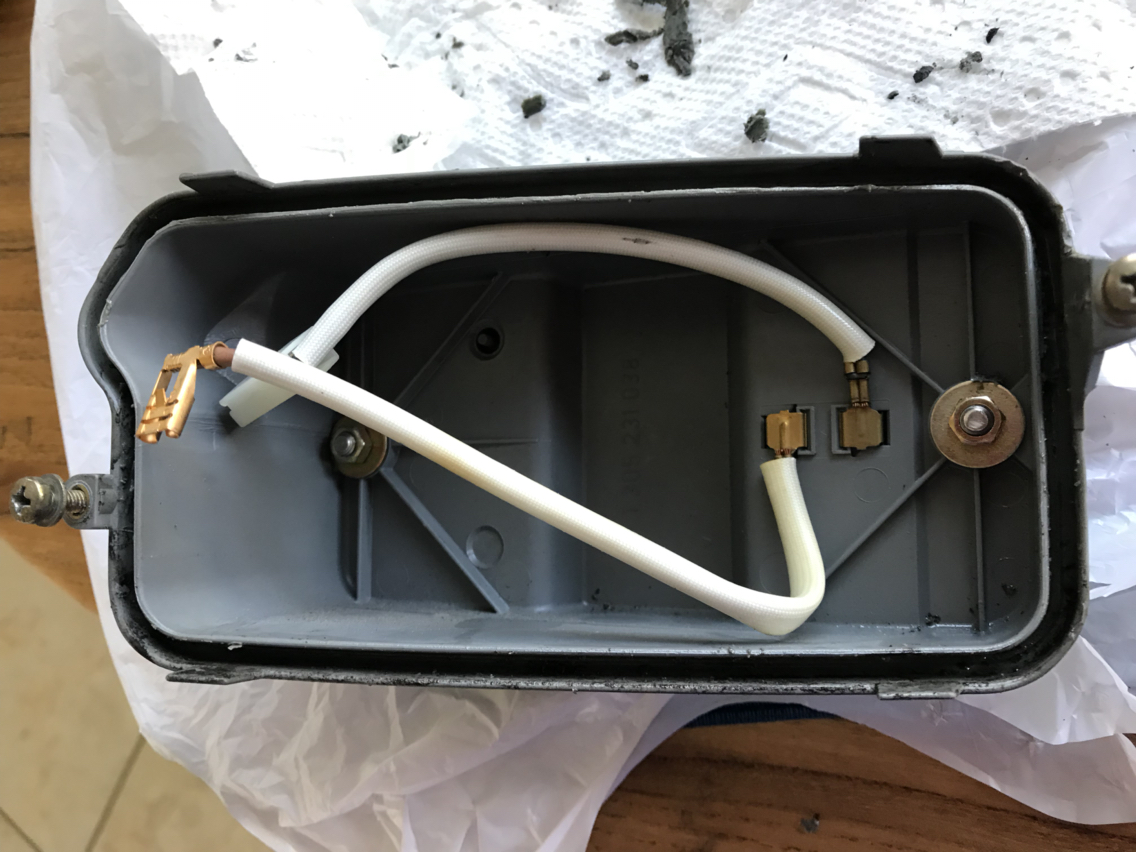
27 years of exposure to the elements had turned my fog light gasket into more of a melted silicone gelatinized mess. Remedy: flat bladed screw driver dipped in Goo-Gone, which is pure magic. Took about 15 minutes, but I got it all worked out. It was hardened in some places which required some pressure, but I didn't want to overdo it and break something, so I went slowly.
Once that was cleaned out, I worked in the new gasket consisting of roughly 12" (guesstimating, I didn't actually measure) of Phifer 0.160" diameter screening spline. I started at the middle of the based and worked it in to the channel with my flat bladed screw driver. It went in perfectly, and I think it should be good for at least another 27 years of use. And I guess I have roughly 24' of screening spline left for another 24 fog light gaskets, haha!
The fog light lens itself could use some refinishing, as it is very pitted and a bit dull compared to the new unit I bought for the right side a few years back, but that will be for another day.
Steve, thanks again for working out a solution to the lack of an OEM gasket! I think this should work perfectly.


 02-13-2018, 11:13 PM


 Inversely the RoW PET skips the US/Canada H5 headlights.