
951 Maintenance/Performance List
 05-28-2017, 11:18 PM
#61
Instructor
Thread Starter

Join Date: Sep 2013
Location: Spokane, WA
Posts: 206
Likes: 0
Received 0 Likes
on
0 Posts
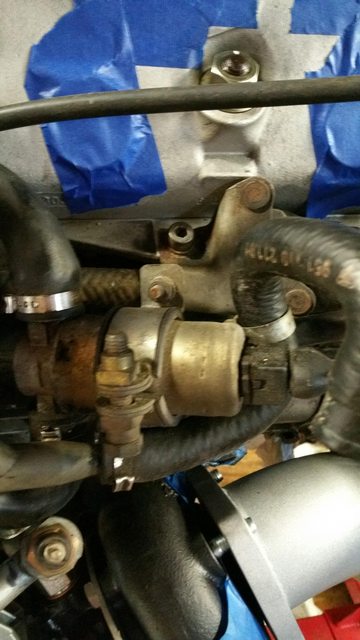
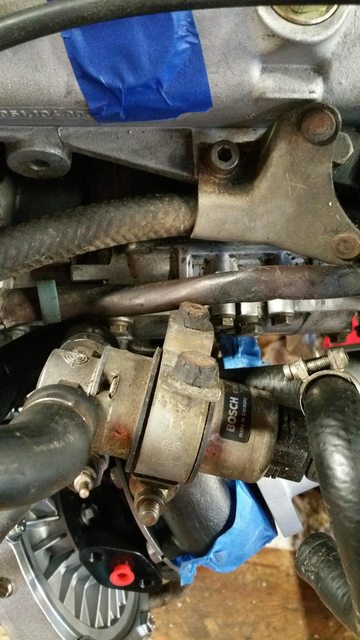
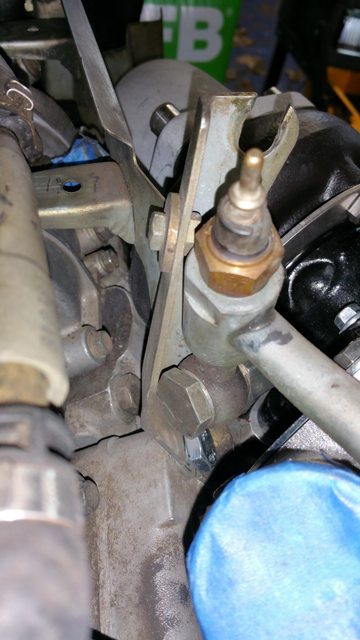
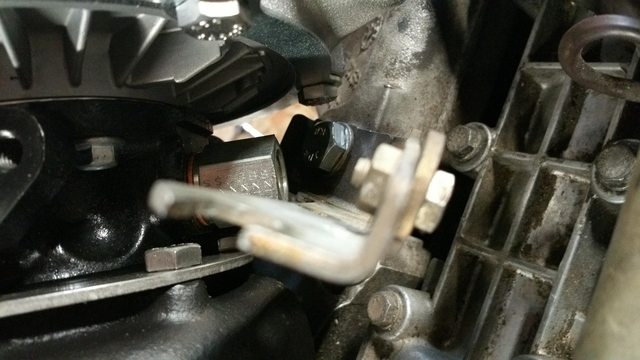
Two more issues. First, I have no idea how this idle speed adjuster mounts. On Pelican's guide, it looks like there's an extra hole in a bracket that the allen head bolt goes through. Clark's garage says to undo a 13mm bolt and slide it out of the clamp/bracket. Am I missing a piece or how does this re-attach?
Second, I can't get my lower balance shaft to not bind. I replaced the seals and re-sealed the cover. Without the cover on, or with the cover pressed fully in, the shaft spins fine. Once I tighten the cover on it, it binds to where I can't spin it. I've taken the cover off and cleaned it, checked everything, and tried 5 times, but it binds every time it's tightened.
Second, I can't get my lower balance shaft to not bind. I replaced the seals and re-sealed the cover. Without the cover on, or with the cover pressed fully in, the shaft spins fine. Once I tighten the cover on it, it binds to where I can't spin it. I've taken the cover off and cleaned it, checked everything, and tried 5 times, but it binds every time it's tightened.
 05-29-2017, 03:41 AM
#62
Instructor
Thread Starter
Join Date: Sep 2013
Location: Spokane, WA
Posts: 206
Likes: 0
Received 0 Likes
on
0 Posts
Looks like the balance shaft issue is probably due to the L bracket on the shaft cover being too far forward, not letting the cover seat fully.
The idler valve, I'm not completely sure. Based off the PET, it looks like the rubber feet things in the idler clamp and the bracket on the block are supposed to be one piece and broke in half. It must have been floating there since I got the car.
The idler valve, I'm not completely sure. Based off the PET, it looks like the rubber feet things in the idler clamp and the bracket on the block are supposed to be one piece and broke in half. It must have been floating there since I got the car.
05-29-2017, 10:22 AM
#63

Yes you you can get replacement mounting bolts on PP for the IAC, they have broken on your mount.
Looks like the balance shaft issue is probably due to the L bracket on the shaft cover being too far forward, not letting the cover seat fully.
The idler valve, I'm not completely sure. Based off the PET, it looks like the rubber feet things in the idler clamp and the bracket on the block are supposed to be one piece and broke in half. It must have been floating there since I got the car.
The idler valve, I'm not completely sure. Based off the PET, it looks like the rubber feet things in the idler clamp and the bracket on the block are supposed to be one piece and broke in half. It must have been floating there since I got the car.
05-31-2017, 07:57 PM
#64
Instructor
Thread Starter
Join Date: Sep 2013
Location: Spokane, WA
Posts: 206
Likes: 0
Received 0 Likes
on
0 Posts
Ok, ordered the rubber mount/bolts and fixed the balance shaft binding.
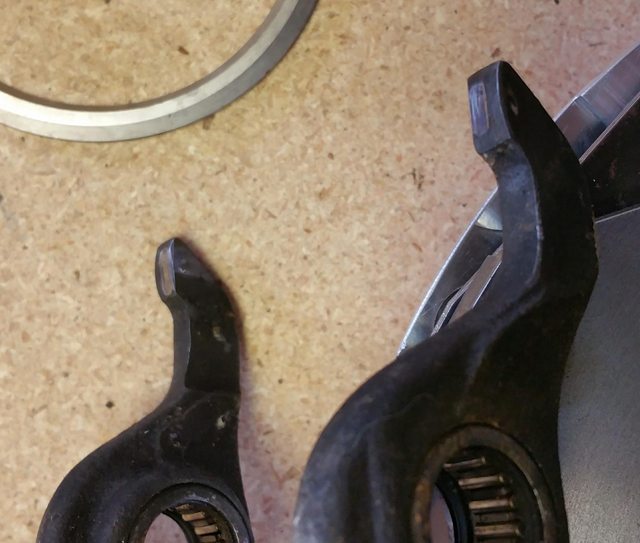
What should I do with this clutch fork? Run it as is, grind it flat, or have someone weld/build it up? It does have grooves but looks significantly better than most pictures I've found.
Then this SFR 3" downpipe. It looks like I'll have to use 3 allen head bolts (from SFR) and and 1 stud/lock nut where the bolt won't fit into the turbine housing. I got the rennbay exhaust hardware kit and it has huge nuts in it. It looks like it will barely fit, but the washers will not. If the nut is too big and won't seat flat, I think I'll be able to grind the weld next to it a little and it should fit and avoid special ordering the smaller stock nut. What should I use for washers though? Just some small regular ones that will seat, or lock washers, or no washer?
And is there anything on the exhaust I shouldn't anti-seize?
06-01-2017, 11:29 AM
#65
Is there a crack in the metal or is it bent?
That clutch fork looks to be in great shape from the photo
I have 2 working good clutch forks on my bench right now and you have less wear on the ends than mine have by look of the photo.
That clutch fork looks to be in great shape from the photo
I have 2 working good clutch forks on my bench right now and you have less wear on the ends than mine have by look of the photo.
06-01-2017, 11:56 AM
#66
Instructor
Thread Starter
Join Date: Sep 2013
Location: Spokane, WA
Posts: 206
Likes: 0
Received 0 Likes
on
0 Posts
No, it looks like it's in surprisingly good shape compared to everything else I've had to replace on my car. I was concerned by the grooves before I saw the 2+mm wear some people have posted on here. I just wasn't sure if I should just run it, which I'm leaning towards, or try to flatten it out, which I feel like I'd mess up the angle or make them uneven.
06-01-2017, 02:09 PM
#67
Every one that I have seen have that wear pattern on them. One of mine more than the other.
I've been planning on having my friend machine one up eventually.
I should probably drop one off with him tomorrow......this has been on my mine for at least 5 years....priority procrastination at it's best
I've been planning on having my friend machine one up eventually.
I should probably drop one off with him tomorrow......this has been on my mine for at least 5 years....priority procrastination at it's best
06-02-2017, 02:51 PM
#68
Instructor
Thread Starter
Join Date: Sep 2013
Location: Spokane, WA
Posts: 206
Likes: 0
Received 0 Likes
on
0 Posts
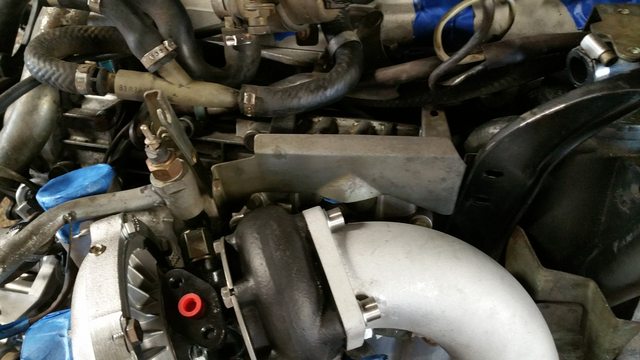
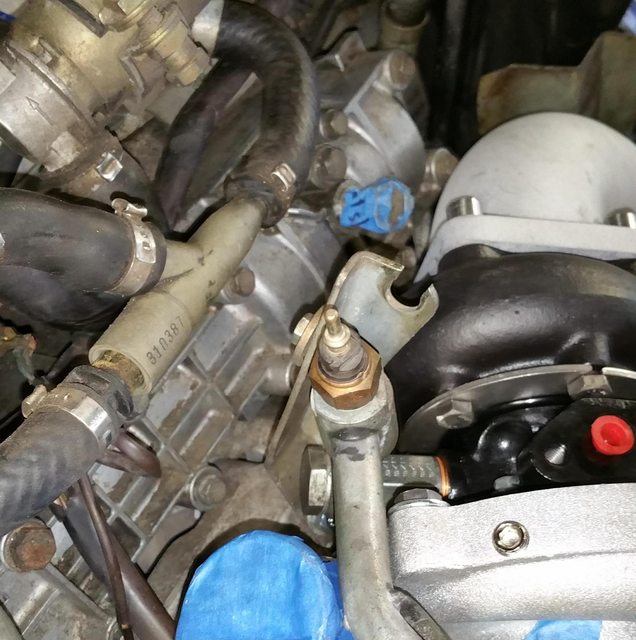
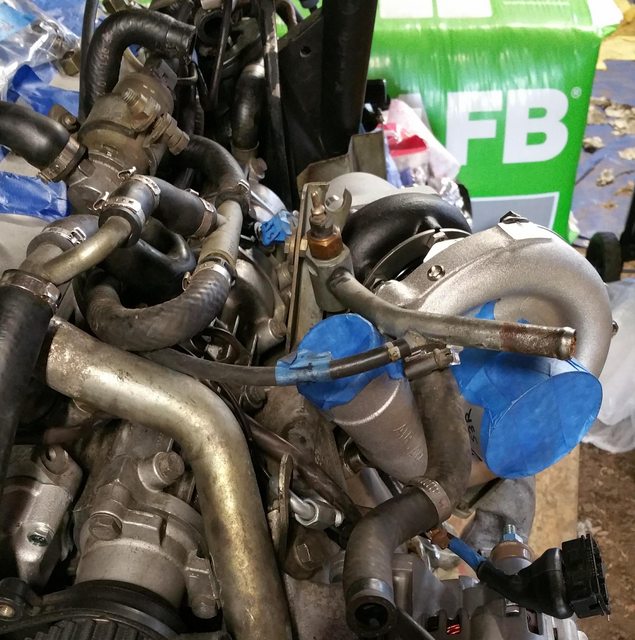
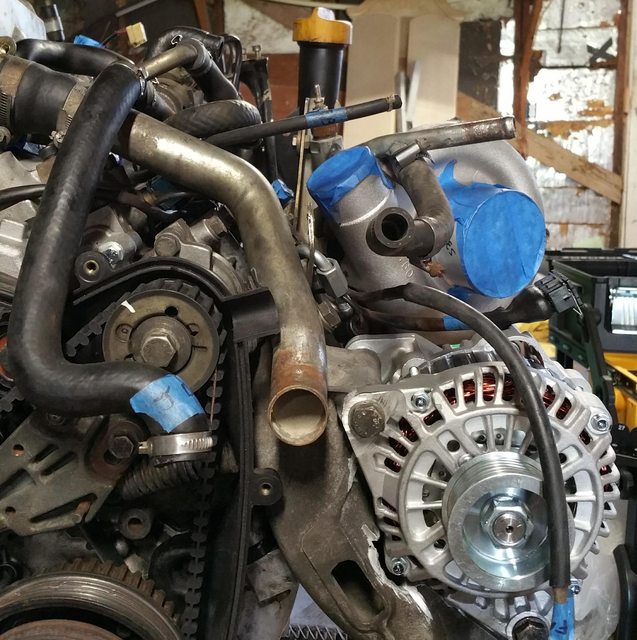
This bracket that attaches to the alternator mount no longer fits. It hits the water pipe on the turbo and doesn't look like there is any way it's going to fit. It looks like it just holds up that heat shield over the balance shaft and something I don't remember (?) clips into the top of it. Does it get eliminated with bigger turbos? Should I leave it out and just attach the heat shield on the one side by the AOS?
06-02-2017, 03:25 PM
#69
Rennlist Member
I've never had a problem with those brackets/shields with big turbos. The one hear the aux turbo pump sensor holds up the front of the intake, so you'll want that. I can't tell from your pictures what problem you're having? Often you have to modify that banjo fitting pipe so it clears the turbo, so am wondering if you have yours tilted way back in an effort to clear the turbo, causing it to hit the bracket?
p.s. good time to do the venturi delete, since it looks like you still have that...
p.s. good time to do the venturi delete, since it looks like you still have that...
06-02-2017, 03:43 PM
#70
Rennlist Member
See this thread for extending the pipe:
https://rennlist.com/forums/944-turb...ggestions.html
See this thread for the short Napa sensor:
https://rennlist.com/forums/944-turb...mp-sensor.html
See this picture for how it all goes together...
https://rennlist.com/forums/944-turb...ggestions.html
See this thread for the short Napa sensor:
https://rennlist.com/forums/944-turb...mp-sensor.html
See this picture for how it all goes together...
06-02-2017, 04:26 PM
#71
Instructor
Thread Starter
Join Date: Sep 2013
Location: Spokane, WA
Posts: 206
Likes: 0
Received 0 Likes
on
0 Posts
I am using the spacer for the water fitting that Vitesse included, which pushes it a lot closer to that bracket, causing it to hit both sides of it. You aren't and you are still pretty much touching it it looks like. Your banjo bolt is behind the bracket though, and there is no way mine could do that, nothing would come close to lining up.
It looks like the only way I could clear is if I rotate the water pipe forward, either by trying to bend the pipe out of the way of the compressor outlet or re-clocking the compressor towards the block. Based on yours and other pictures, does it look like I need to rotate the compressor housing more towards the block?
And thanks for the heads up on the venturi. I didn't even look into it because mine's an '88 and I thought they were only on early cars.
06-02-2017, 04:52 PM
#72
Rennlist Member
Use the factory intercooler pipes as your guide for how to clock the turbo outlet. You want the outlet to point up so that the big molded elbow slips on and lines right up with the intercooler hard pipe, if that makes sense. Tough to tell from internet pictures, but if anything it looks like your outlet is pointing up a little more than needed (so you could turn it counter clockwise a few degrees probably). I'm still not clear on what's hitting what. I see the pipe almost touches the turbo outlet, which will prevent you from getting the coupler on, but you seem to be saying the banjo pipe with the sensor in it is hitting the intake support upright -- even though it looks like it is clearing in those pictures?
06-02-2017, 05:19 PM
#73
Instructor
Thread Starter
Join Date: Sep 2013
Location: Spokane, WA
Posts: 206
Likes: 0
Received 0 Likes
on
0 Posts
On a stand, I'm guessing it's hard to tell if the compressor is right or not, but I can line the intercooler pipe up and see how it looks at least.
The water pipe is loose now, so yeah it will hit the bracket even more to rotate it out of the way for the coupler. The banjo area clears, it's hitting further up from the banjo by the temp sensor.

The water pipe is loose now, so yeah it will hit the bracket even more to rotate it out of the way for the coupler. The banjo area clears, it's hitting further up from the banjo by the temp sensor.
06-02-2017, 05:45 PM
#74
Instructor
Thread Starter
Join Date: Sep 2013
Location: Spokane, WA
Posts: 206
Likes: 0
Received 0 Likes
on
0 Posts
Well, it looks like the spacer might be causing the problem. With the turbo mounting bolts in place, there is no room for the water pipe with that spacer on. The banjo would hit. That entire water pipe section would hit and no rotation would fix it.
I'll have to ask John if I'm doing something wrong. I really didn't want to try to modify/braze in new pipe for this.

I'll have to ask John if I'm doing something wrong. I really didn't want to try to modify/braze in new pipe for this.
06-02-2017, 09:51 PM
#75
Rennlist Member
I'll ask Crazy Eddie if he has a spare pipe. He brazed a handful of them at one time. That thread shows several DIY techniques for modifying the pipe too... Never used the that adapter but know Johns supplies them, so assume he has a way to make it work. All I can tell you is you will be very happy with his turbo once it's up and running.
Last edited by Tom M'Guinn; 06-03-2017 at 12:54 PM.