

A good / easy winter project for everyone
 11-25-2011, 07:13 PM
#1
Nordschleife Master
Thread Starter
Great weather in the north east today, so i took care of one of the easy things on my winter to-do list.
The wiring to the resistors for the low-speed fans was in very bad condition on my car. This is a very common condition for the later cars with the resistor pack located by the battery tray / blower motor. I fixed some really bad wiring on my friends car (i am talking just a few strands of wire left!), finally took a look at it while vacuuming leaves out of my battery tray and saw mine was getting pretty bad also.
I think everyone should check the condition of the wiring here, between the heat the resistors put out, age and exposure to water..etc this is a fairly common problem. Aside from fixing a potential fire hazard and making sure your low speed fans dont randomly stop working, your headlights will probably not dim so much when the fans kick on .
.
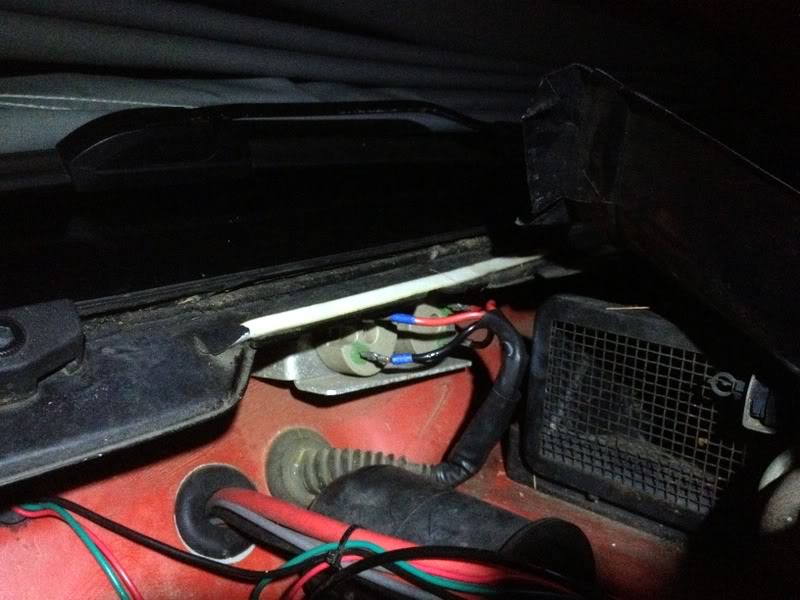
Anyhow this wiring powers the fans on low speed, one resistor for each fan motor. Your wiring may be so bad you cant tell them apart so.. The red with black stripe goes with the red with white stripe. Black with red strip goes with red with green stripe.
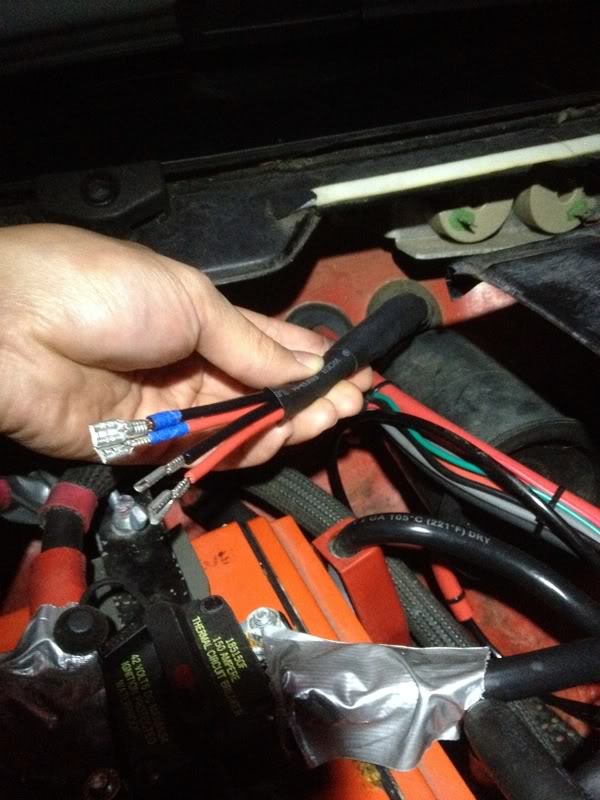
Fixing this takes all of an hour or so, hardest part is the relatively tight space to work in. It was kind of easy for me because the blower motor cowl cover was cracked on my car, so i pretty much just ripped it off the rest of the way (another winter project is to replace that piece finally). It also depends how far back you need to cut the original wiring. I had to cut about 4" of the old wiring off, this included cutting off the original wire sheathing, pretty much up to the rubber boot.
Start out by making 4 pig tails with female spade connectors.
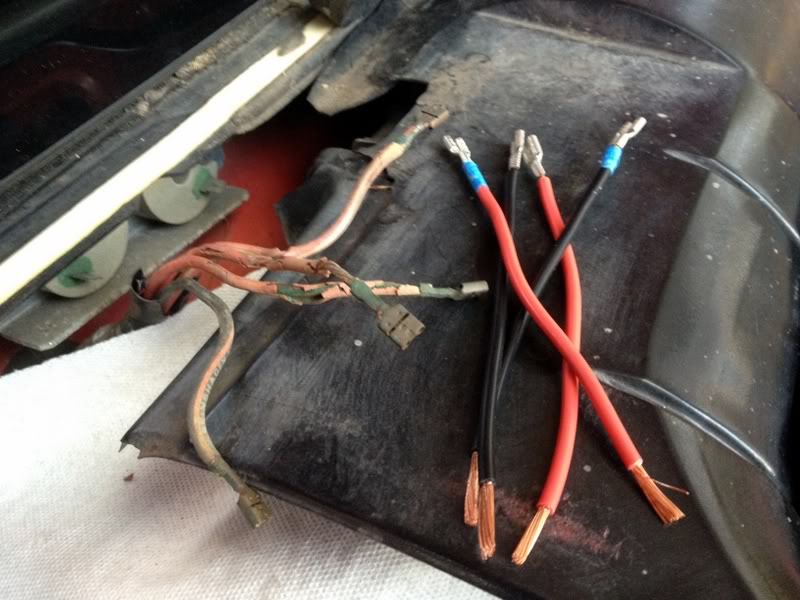
Solder everything on and use heat shrink tube to insulate everything. Then bundle everything together using larger diameter shrink tube. The blue tape denotes the two wires that need to go together.
The wiring to the resistors for the low-speed fans was in very bad condition on my car. This is a very common condition for the later cars with the resistor pack located by the battery tray / blower motor. I fixed some really bad wiring on my friends car (i am talking just a few strands of wire left!), finally took a look at it while vacuuming leaves out of my battery tray and saw mine was getting pretty bad also.
I think everyone should check the condition of the wiring here, between the heat the resistors put out, age and exposure to water..etc this is a fairly common problem. Aside from fixing a potential fire hazard and making sure your low speed fans dont randomly stop working, your headlights will probably not dim so much when the fans kick on
.Anyhow this wiring powers the fans on low speed, one resistor for each fan motor. Your wiring may be so bad you cant tell them apart so.. The red with black stripe goes with the red with white stripe. Black with red strip goes with red with green stripe.
Fixing this takes all of an hour or so, hardest part is the relatively tight space to work in. It was kind of easy for me because the blower motor cowl cover was cracked on my car, so i pretty much just ripped it off the rest of the way (another winter project is to replace that piece finally). It also depends how far back you need to cut the original wiring. I had to cut about 4" of the old wiring off, this included cutting off the original wire sheathing, pretty much up to the rubber boot.
Start out by making 4 pig tails with female spade connectors.
Solder everything on and use heat shrink tube to insulate everything. Then bundle everything together using larger diameter shrink tube. The blue tape denotes the two wires that need to go together.
Last edited by Techno Duck; 10-21-2017 at 12:28 AM.
 11-25-2011, 11:16 PM
#4
Nordschleife Master
Thread Starter
 .
.
Trending Topics
11-26-2011, 06:13 PM
#8
Rennlist Member

Jon, When my car gets back from Exotic, doing the M030 suspension, with sway bars , bushings and so on; you can come over and help. These days, I seem to have no mechanical abilities left in me. Are you back?
We did the run and it was a blast. Give me a call.
We did the run and it was a blast. Give me a call.
 11-26-2011, 07:07 PM
#10
Addict
Lifetime Rennlist
Member
Lifetime Rennlist
Member
Judging by the rather short length of those pigtails, is it fair to say that you only spliced them in to replace the exposed portion of each wire? Did you just roll back the rubber sleeve to cut the wires and splice in the new pigtails? Got any pics of where the pigtail connections were made?

 11-26-2011, 10:05 PM
#14
Nordschleife Master
Thread Starter
Judging by the rather short length of those pigtails, is it fair to say that you only spliced them in to replace the exposed portion of each wire? Did you just roll back the rubber sleeve to cut the wires and splice in the new pigtails? Got any pics of where the pigtail connections were made?
In the top picture, you can see the plastic wire sheathing that i cut is still present, i ended up cutting the entire piece off though to get to a good piece of wire.
Steve, ive got off probably another 3 weeks or so. My boat is in the shipyard with no solid ETA yet. Put my car away for the winter, may take it out tomorrow with the nice weather but i doubt it. Shoot me a PM when you get the car back and i can help you out with it.
11-26-2011, 11:40 PM
#15
Race Car
Join Date: Sep 2005
Location: TEXAS
Posts: 4,247
Likes: 0
Received 0 Likes
on
0 Posts
I highly suggest this. I think because I didn't address this problem that the wires finally touched and shorted out all the way back to the fuse box, taking out many wires along the way. - length of dash wire harness on firewall.
I had HUGE issues with my car before switched from Max chips to Vitesse. I swapped out 3 DME's. I went from Max chips to Vitesse, then finally to a stand alone with its own power source. When that last option finally worked, I was sure it was in the stock harness. So, when I cut her to shreds to add her wide body, I removed the whole wiring harness. I cut it up. Every bit. The part that went along the whole dash that housed those wires..... melted and cooked and cracked in random spots throughout the harness. In between looked just fine, but about 6-7 random spots had worn through and cooked other wires.
Now to be sure, I don't know. I'm still fairly certain it was these wires had finally shorted. I didn't fix the the ends like this and then shorted at the puck and it cooked back to the fuse panel taking out random wires in the process. JUST enough to cause intermittent problems that confused the HELL out me.
I hope this saves a few of you from a ridiculously hard wiring issue to find.
Good advice and write up Techno..