

EDIT: Help coil mounting bracket.
 12-06-2010, 08:32 PM
#1
I am finishing up mounting the coil near plug set up. I may need to lower the mounting of the the bracket, but I would like not to cover the Porsche insignia on the camtower if possible with the coils.
Anyone know how much room I have from the the top of the FPR to the hood, My coil tips are slightly lower?
Also, I would aslo like to modify the plug wires I have which are 8.5 performance wires from Paragon. Since I wouldlike to have plug wires with a boot that seals the spark plug hole. MSD does not have anything that will do this, but I can buy the tips that I can crimp onto my wires and slip on the boot.
I plan to call Magnecor tommarrow and see if they can make a set, if not Does anyone have experience with doing this, and do I need to buy the MSD crimp tools?
I have the coils roughtly set in place, justto get an idea. I plan to use hex bolts and helicoils , rather then the nuts and bolts.
Last edited by DrZ1; 12-09-2010 at 06:22 PM.
 12-06-2010, 09:29 PM
#2
Three Wheelin'
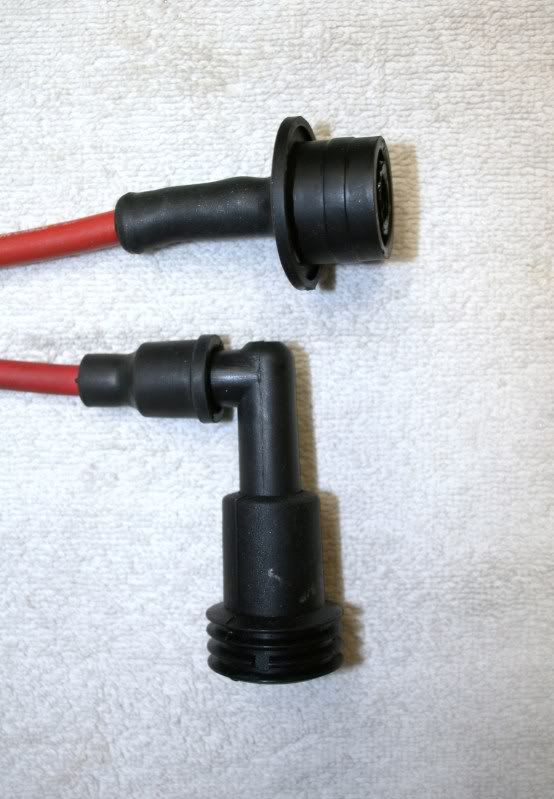
Just went through the same thing. I ordered set a custom (competition) plug wires from Magnecor and thought they would have the same boot as the stock and Bremi 8.5 pictured here with a 90 degree bend. They didn't, these came with a straight boot and it's a bitch getting them to seat well. I know there is a tool to get them in and out, but still...not easy.
Couldn't you tweek the bracket you made so the coils lay more horizontal?
Couldn't you tweek the bracket you made so the coils lay more horizontal?
12-06-2010, 09:54 PM
#3
I can reposition if need be, but hoping I will clear the hood, tired of messing with it. I plan to tape some styrofoam the thickness of the tips, and shut the hood and see how much clearance I have.
These are the tips I plan to use, just unclear if i need special tools to secure the tips to the plug wires I have. I imagine for the boot to slip on the clip has to be a particular shape.
http://www.msdignition.com/Products/...�,_2/Card.aspx
Steve
These are the tips I plan to use, just unclear if i need special tools to secure the tips to the plug wires I have. I imagine for the boot to slip on the clip has to be a particular shape.
http://www.msdignition.com/Products/...�,_2/Card.aspx
Steve
12-06-2010, 11:09 PM
#4
Three Wheelin'
12-07-2010, 07:58 AM
#5
Addict
Rennlist Member
Rennlist Small
Business Sponsor
Rennlist Member
Rennlist Small
Business Sponsor
I'll post some pics later (I have to run out for the day). I can help you out with the plug wires, I have made several sets for the coil near plug set up. The LS style coils have their own style plug wire end.
Your coils will be close to hitting the hood they way they are – and plug wires touching the hood is not a good idea!
Your coils will be close to hitting the hood they way they are – and plug wires touching the hood is not a good idea!
12-07-2010, 12:05 PM
#6
Three Wheelin'
You may want to add a third point to bolt the coil pack mount. Especially since the two bolts being used are also for holding the fuel rail in place.
12-07-2010, 01:32 PM
#7
[QUOTE=Fluidplay;8112705]Just went through the same thing. I ordered set a custom (competition) plug wires from Magnecor and thought they would have the same boot as the stock and Bremi 8.5 pictured here with a 90 degree bend. They didn't, these came with a straight boot and it's a bitch getting them to seat well. I know there is a tool to get them in and out, but still...not easy.
Couldn't you tweek the bracket you made so the coils lay more horizontal?
Thanks,
I can probably notch where it fits over the the fuel rail, to allow it to sit flatter and mayby angle the tips to lay flatter. It will be close, but I would like to keep from covering the Porsche insignia.
I will order a few extra tips to how exact the crimp has to be.
Steve
Trending Topics
12-07-2010, 05:29 PM
#8
Burning Brakes
Just an observation, might be a little magnetic cross-talk between the pole pieces. Could be a problem for the plug of the adjacent cylinder, and the output of your electronics might benefit from some blocking diodes at the individual coil packs. Think I would call the Manufacturer and chat with an Engineer about spacing requirements... 'Just to be sure'.
12-08-2010, 05:55 PM
#9
Burning Brakes
Just an elaboration, although the torridal laminated pole piece is the most efficent at containing magnetic lines of force, by mounting them side-by-side with a steel plate connection, you have built an effective transformer, coupling the plugs of two cylinders. Spread them apart by a half inch and mount on a non magnetic plate [SS] or you may blow your intake off, bend the rods, or develop some other minor hiccup.
12-08-2010, 08:29 PM
#10
Just an elaboration, although the torridal laminated pole piece is the most efficent at containing magnetic lines of force, by mounting them side-by-side with a steel plate connection, you have built an effective transformer, coupling the plugs of two cylinders. Spread them apart by a half inch and mount on a non magnetic plate [SS] or you may blow your intake off, bend the rods, or develop some other minor hiccup.
Pffft, As if I wasn't having enough issues already. Now I get a explanation that will make me have to dig out my collage physics books.

Sent you a PM.
Thanks
Steve
12-09-2010, 06:19 PM
#12
Thanks Ronin-951 for prompting me to do more homework. The more I move away from stock the more muddy the water is becoming. 
OK, I have moved the coil harness to the battery area behind the fire wall. I will mount the new bracket to the vaccum resivour. I will tuck the vaccum resivour behind the blower motor.
I need help to fabricate the new mounting bracket out of a material that is non conductive. I spoke w/ tech at MSD and the reccommended a material such as Phenolic, which is new to me. I was thinking of using some aluminum brackets to mount to the coils and then have the brackets embeded in a nonconductive block of Phenolic resin or similar material. and then secure the block to the resiviour mount.
EDIT:: Looking around a bit, I cam across the MSD 8825 vibration mounts. I called tech support and since they have a solid rubber core, I should be able to sandwitch 4 between the mounting plate for the coils and the mounting plate for the resiviour mount. I will check a bit more to confirm. This should be easy, unless missing something.
Any suggestions appreciated.
Steve
Last edited by DrZ1; 12-10-2010 at 10:11 AM.
12-10-2010, 06:23 PM
#13
This was much easier, I can't belive how much time I wasted for not doing my homework on the first bracket. I cut out some brackets and brought to the welder to weld together on a strip. I will mount a piece of angle iron to the resiviour bracket and secure the two pieces with the MSD vibration mounts in between which will also give me the non conductance
I have just set in place, and will order the mounts next week. Need to get the car loaded up for Turbo T to help get it closer to completion.
Steve
I have just set in place, and will order the mounts next week. Need to get the car loaded up for Turbo T to help get it closer to completion.
Steve