
home paint jobs
 07-18-2007, 03:27 PM
#46
Addict
Rennlist Member
Rennlist Member
Join Date: May 2002
Location: Phoenix, AZ - NJ Runaway
Posts: 3,649
Likes: 0
Received 0 Likes
on
0 Posts
Originally Posted by azmi951
and deal with 8 foot long panels.
 07-18-2007, 07:41 PM
#47
Drifting
Very nice job. Did you paint the fenders and doors separately or with them installed on the car?
Originally Posted by amjf088
Almost all the seals and gaskets are new. The interior bits are original, but I am re-finishing any that need it, for instance I�m using SEM colorcoat on the leather seats.
I did not take the car down to bare metal. There are some pros and cons to this:
Pros:
1) The original primer has excellent adhesion.
2) By minimizing bare metal areas, you will leave most of the zinc coating intact.
3) It is faster.
Cons:
1) To get a true show-quality paint finish, bare metal is the way to go, as even a carefully block sanded base of the original paint will have very subtle surface irregularities that you can discern (if you look hard enough) when viewing the surface from very oblique angles � despite having a �perfectly� flattened clear coat. As picky as I am, I do not mind it and the finish on the car really does look like in the pictures. People who have seen it in person are amazed and think the paint is perfect, but I know if a really knowledgeable bodyperson saw it, he/she would probably say: �Terrific job � for an amateur!�
One of the unexpected results of the whole learning process of painting my car was that I can now pick apart paint jobs mercilessly and find myself looking at some OEM jobs on brand new cars and thinking how crappy they are, whereas before I thought they were fine!
If you are interested in painting your car, you certainly can do it. I had no prior experience. There are other people on this board (and within this thread obviously) who have also achieved great results. There is a lot of info out there (as you are probably finding out) and it can be very overwhelming at first. You really do have to research for a good chunk of time before buying equipment and materials. At this point, I would summarize some of the general key points I have learned:
1) Buy good equipment. Make sure your air compressor can handle your spray guns (flow, measured in CFM is usually the deciding factor). You will need at least two guns � one for primer and one for top coats. I ended up with four. One for the etch primer (thin), one for the HS primer (ultra-thick), a top coat gun and then a Sharp detail gun. Moisture filtration is important as well. Finally, pay very special attention to your safety gear. These paints are nasty!
2) One of the great sayings I like in painting is �everything you do, or choose not to do, will have a discernible effect on the outcome�. Prep is very important, but also extremely time consuming and tedious. The more you can remove from the car, the better. I stripped the car extensively and am happy that I did.
3) When getting ready to sand the old paint, you want to clean it very thoroughly to remove any traces of silicone and other stuff. If you sand first, you will �grind� it in. A thorough scrub with a scouring pad and Comet is very good for this (of course, you will be committed after this step!)
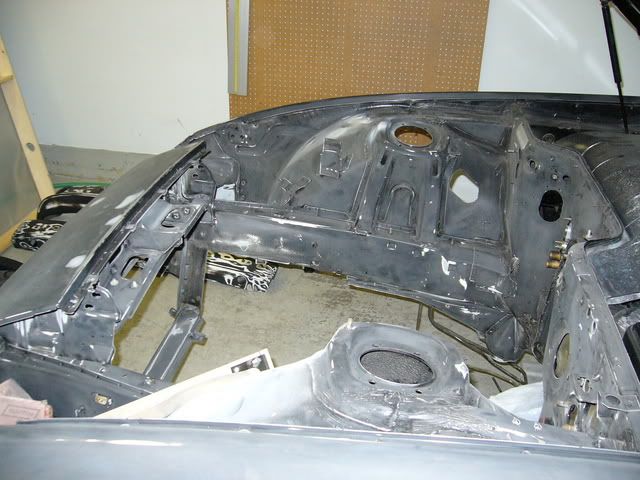
4) Sand thoroughly. Every part of the surface should be well-scuffed. Follow the paint manufacturer�s data sheets for recommendations on grit. For the products I used, P320 was what I needed. Just to give you an idea on how onerous this is, I spent eight hours on sanding the engine compartment alone:
5) Spend the $$ on good quality paint. Glasurit (BASF), PPG, DuPont, Sikkens are some of the brand names. Find the automotive paint supplier(s) in your area and see what they carry and work from there. Some people believe that any paint, given good prep, can be good. I disagree. I think prep and product quality are both key.
6) Stick with one system. Mixing and matching brands does not always work. I used Glasurit products throughout and had no technical issues whatsoever.
7) As referred to above, make sure you have studied the paint manufacturer�s data sheets for the exact products you are spraying. They will specify everything from recommended tip size to flash times. Typically they are easy to download from the manufacturer�s site.
There is obviously a lot more, but I think those are some of the key points.
I read some books on painting, each told me a little, but none really gave me the whole picture. I hung around on these two forums:
http://autobodystore.com/forum/index.php?noframes;
http://www.leopardsystems.com/paintucationforum/
I picked up quite a bit and was able to ask some pretty specific questions and get good answers. The other issue with books, is that the products are evolving significantly and much of the advice is now out-of-date.
Finally, plan this (if possible) so that there are no time constraints so that you are free to let the job take the time it needs. When you have to rush to get the car done, compromises will be unavoidable. If you experience is anything like mine, it will all take much longer than you expect. However, with patience great results are very achievable.
I did not take the car down to bare metal. There are some pros and cons to this:
Pros:
1) The original primer has excellent adhesion.
2) By minimizing bare metal areas, you will leave most of the zinc coating intact.
3) It is faster.
Cons:
1) To get a true show-quality paint finish, bare metal is the way to go, as even a carefully block sanded base of the original paint will have very subtle surface irregularities that you can discern (if you look hard enough) when viewing the surface from very oblique angles � despite having a �perfectly� flattened clear coat. As picky as I am, I do not mind it and the finish on the car really does look like in the pictures. People who have seen it in person are amazed and think the paint is perfect, but I know if a really knowledgeable bodyperson saw it, he/she would probably say: �Terrific job � for an amateur!�
One of the unexpected results of the whole learning process of painting my car was that I can now pick apart paint jobs mercilessly and find myself looking at some OEM jobs on brand new cars and thinking how crappy they are, whereas before I thought they were fine!
If you are interested in painting your car, you certainly can do it. I had no prior experience. There are other people on this board (and within this thread obviously) who have also achieved great results. There is a lot of info out there (as you are probably finding out) and it can be very overwhelming at first. You really do have to research for a good chunk of time before buying equipment and materials. At this point, I would summarize some of the general key points I have learned:
1) Buy good equipment. Make sure your air compressor can handle your spray guns (flow, measured in CFM is usually the deciding factor). You will need at least two guns � one for primer and one for top coats. I ended up with four. One for the etch primer (thin), one for the HS primer (ultra-thick), a top coat gun and then a Sharp detail gun. Moisture filtration is important as well. Finally, pay very special attention to your safety gear. These paints are nasty!
2) One of the great sayings I like in painting is �everything you do, or choose not to do, will have a discernible effect on the outcome�. Prep is very important, but also extremely time consuming and tedious. The more you can remove from the car, the better. I stripped the car extensively and am happy that I did.
3) When getting ready to sand the old paint, you want to clean it very thoroughly to remove any traces of silicone and other stuff. If you sand first, you will �grind� it in. A thorough scrub with a scouring pad and Comet is very good for this (of course, you will be committed after this step!)
4) Sand thoroughly. Every part of the surface should be well-scuffed. Follow the paint manufacturer�s data sheets for recommendations on grit. For the products I used, P320 was what I needed. Just to give you an idea on how onerous this is, I spent eight hours on sanding the engine compartment alone:
5) Spend the $$ on good quality paint. Glasurit (BASF), PPG, DuPont, Sikkens are some of the brand names. Find the automotive paint supplier(s) in your area and see what they carry and work from there. Some people believe that any paint, given good prep, can be good. I disagree. I think prep and product quality are both key.
6) Stick with one system. Mixing and matching brands does not always work. I used Glasurit products throughout and had no technical issues whatsoever.
7) As referred to above, make sure you have studied the paint manufacturer�s data sheets for the exact products you are spraying. They will specify everything from recommended tip size to flash times. Typically they are easy to download from the manufacturer�s site.
There is obviously a lot more, but I think those are some of the key points.
I read some books on painting, each told me a little, but none really gave me the whole picture. I hung around on these two forums:
http://autobodystore.com/forum/index.php?noframes;
http://www.leopardsystems.com/paintucationforum/
I picked up quite a bit and was able to ask some pretty specific questions and get good answers. The other issue with books, is that the products are evolving significantly and much of the advice is now out-of-date.
Finally, plan this (if possible) so that there are no time constraints so that you are free to let the job take the time it needs. When you have to rush to get the car done, compromises will be unavoidable. If you experience is anything like mine, it will all take much longer than you expect. However, with patience great results are very achievable.
07-18-2007, 09:17 PM
#48
Burning Brakes
Join Date: Mar 2003
Location: Mobile,Al
Posts: 1,085
Likes: 0
Received 0 Likes
on
0 Posts
Originally Posted by 5speed300
So should I just strip one panel a day, and then primer that same panel on that day? Will the overall outcome of the paintjob be affected if I'm sprayiing body parts that have primer thats a few days older/newer than some of the other primered pieces?
07-18-2007, 09:38 PM
#49
Racer

Join Date: Apr 2006
Location: Raleigh, NC
Posts: 364
Likes: 0
Received 0 Likes
on
0 Posts
So when I have stripped to the metal and applied a coat of epoxy primer, will I then be prepping the epoxy primer and spraying color over that? Or will I be prepping the epoxy primer to shoot the "real" primer ontop. Im just a little confused as to what layer I will be doing some of the minor bodywork over.
Should I do that right over the epoxy primer or go ahead and spray some real primer and then a red primer coat followed by another reg. primer coat to find the high/low areas on the car?
Another general question. when you guys are prepping the primer do you sand it up to like a 1200-1500 grit? Or is it better to leave it a little rougher with a 600-800 grit?
Last question I promise... If I do end up having to go to bare metal, is there any prepwork besides cleaning the metal thoroughly with mineral spirits that I need to do prior to spraying the epoxy primer?
07-18-2007, 11:53 PM
#50
Rennlist Member
i usually...
sand down through the clear at least-
if i hit bare metal, i will primer over the entire surface as normal w/ a hi- fill eurethane primer UNLESS there is alot of bare metal then you need to metal etch prime that area.
epoxy primer is great but when your painting on a budget its just another 100 or so to spend that i dont usually spend.
Prime panel after sanding w/ 80-320 grit- i usually 180 everything and then primer
then guide coat w/ some black spray paint and reblock everything w/ 180 again to check for low /high spots- reprime
do this until everything is smooth and straight, wetsand primer w/ 500grit wetdry and let sit in the sun or in the warm as long as you can bear before you paint to let it cure up...
go over car again if necessary and paint w/ DUpont Chromabase paints and clearcoat 2 coats only.
1000-2000 wetsand-more if dark color- and buff w/ 3m perfect it products like buffing compound and machine glaze.
07-19-2007, 03:23 PM
#51
Racer
Join Date: Apr 2006
Location: Raleigh, NC
Posts: 364
Likes: 0
Received 0 Likes
on
0 Posts
I thought that when going to bare metal, at least larger areas of it, an epoxy or etching primer is necessary so the paint will adhere to the surface. The epoxy/etch primer debate is just another thing I need to look into, but from what I've read epoxy is better at moisture sealing, which is part of its intended use on the bare metal. I guess I could do epoxy and then etch primer ontop but that seems a little redundant.
Also, when you guys were talking about just sanding down to the original paint's primer, how do you determine how much to sand when you get there? Is it really obvious as you go through the different layers of paint/primer when your sanding? Prob. a newb question but since I've never actually done this before I'm not quite sure.
Also, when you guys were talking about just sanding down to the original paint's primer, how do you determine how much to sand when you get there? Is it really obvious as you go through the different layers of paint/primer when your sanding? Prob. a newb question but since I've never actually done this before I'm not quite sure.
07-19-2007, 05:16 PM
#52
RL Community Team
Rennlist Member
Rennlist Member
Originally Posted by sm
Very nice job. Did you paint the fenders and doors separately or with them installed on the car?
I also left the fenders on. This gives a really clean �factory� finish to the mounting bolt areas. I sprayed the inner fenders as well.
In regards to sanding� it all depends on what you�re working with. If you are fortunate enough to have the original paint (like I was) then you just sand until you see primer showing up on the high points (the factory primer is a very pale yellow. You do not need to remove all the top coat, it is really well stuck on too, you just need to make sure every nook and cranny is well-scuffed.
If you have a re-paint, then the situation is a little different. Assuming you don�t know the actual products that were used, you are best to remove as much of it as possible. It is usually fine to spray a sealer on well-scuffed re-paint and then go, but the ultimate performance on your new paint will be dependent on the old paint and if something cheap was used, then ... well, you know�
You can shoot an etch primer, then an epoxy, but not the other way around (well, at least with Glasurit). But you are correct, if you are shooting epoxy, then the etch is not necessary. I went with an etch, as I had only a few very small bare areas. I then used the Glasurit HS 285-60 primer which sticks like crazy and wet sands really well for top coat application. As long as you stick with a quality system and use a chain of product choices that are recommended for your application, you will have great results.
07-19-2007, 06:43 PM
#53
Burning Brakes
Join Date: Mar 2003
Location: Mobile,Al
Posts: 1,085
Likes: 0
Received 0 Likes
on
0 Posts
Etch primer is only for bare metal. If you use epoxy it isn't necessary. However, if the metal has been bare for a few days you should treat it w/ a metal prep or etch prime it.
07-19-2007, 09:29 PM
#54
Racer
Join Date: Apr 2006
Location: Raleigh, NC
Posts: 364
Likes: 0
Received 0 Likes
on
0 Posts
This just makes me wonder what the pro hotrod builders and such do when they have bare metal shells. Do you think they do it 1 panel at a time like I probably will have to or do they finish all the paint removal at once?
07-19-2007, 11:25 PM
#55
Pro
Originally Posted by 5speed300
This just makes me wonder what the pro hotrod builders and such do when they have bare metal shells. Do you think they do it 1 panel at a time like I probably will have to or do they finish all the paint removal at once?
Here are some more pics of my home paint job using sikkens autocryl single stage paint
