When you click on links to various merchants on this site and make a purchase, this can result in this site earning a commission. Affiliate programs and affiliations include, but are not limited to, the eBay Partner Network.
I thought when you had a test light or multimeter to the fuel pump plug with the ignition on it should read 12v even though it�s not pumping? Years ago I found out mine was bad and I remember trying this but can�t remember if this worked. Which if theres 12v at the plug that lets you know the circuit is working so would point to the pump.
Yeah, that was my thoughts also. But it does not seem to work that way with these cars?? I got to break it down to basics again???
The "Tach Bounce" is meaningless if there is no pressure in the fuel rail?? As "apparently" I don't know if this fuel works either?? But "now" I seem to have it least two rejected FP's, that do hum when I put power to them but they are not very loud??
The DME computer prevents any voltage from getting to the fuel pump unless it detects that the crankshaft is turning (speed sensor feedback). That's what the DME Relay is for.
If you jumper 30 and 87b and the fuse panel DME socket like I said then you are bypassing the protection circuit of the DME computer and directly applying 12V to the fuel pump. If you put that jumper in and don't measure 12V at the fuel pump then you have an open circuit in the wiring somewhere. Measure the voltage back near the fuel pump w/o the wires connected to the fuel pump as the first step to make sure 12V is getting all the way back there. If you have 12V but it won't run the pump you might have a bad ground which can limit the current you need. The pump needs about 10A. With the pump connected, what voltage to you read across the pump terminals when 30 and 87b are jumpered? If it's less than 12V that might be your problem.
Do you have a know good jump box? Connect that directly to your fuel pump. If the pump doesn't run then you probably have a bad pump.
The circuit Travis shows on his Rennbay site is how you can bypass the DME Relay and start the engine. It's a "get you home" sort of fix but it forces all the current to go through the ignition switch which is not a great idea as a long term solution.
Hmm w/o the wires to the FP connected??? OK this maybe where I messed up, I've always had the FP wired in and turned the key to on when trying to get it started.
So a new plan. Disconnect FP, sigh which may or may not be bad?? Jump the DME (which I could replace but screw it) and question here with the DME jumpered, and the FP disconnected using a DVOM or a test light ... I should see voltage ... correct??
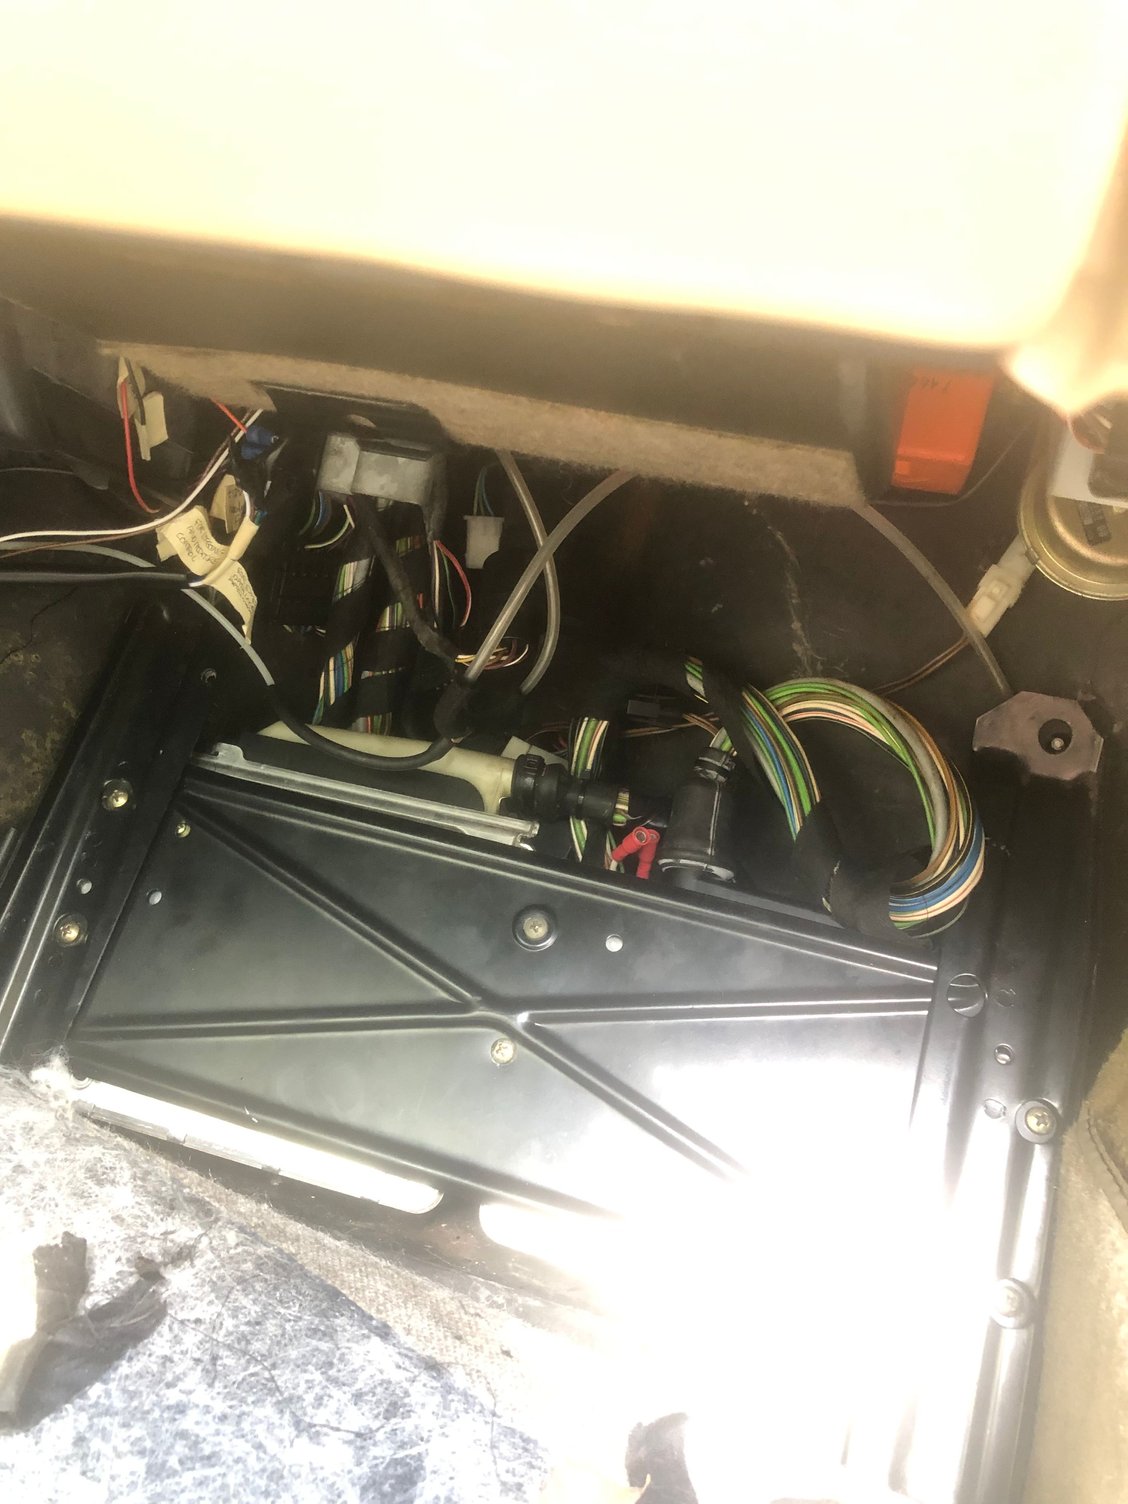
I just reinstalled the KLR and DME. Was not sure if I was going to put it back together nicely. It is such a rats nest underneath there. BUT, it went back together much easier than I had anticipated.
step 1: attach the klr and DME to the metal mount. DME on the left, klr on the right.
The trianglur part of the mount goes on the lower left position when you put it back in.
Step 2:
I played around with/ got familiar with the harness for the klr and DME. This way I spread them out the best way I thought they would fit and just get a feel for how they fragile might be. I was able to move them around without much concern something would break.
Step 3:
connect the wiring harness to the KLR and DME before (I repeat, before) mounting the metal bracket to the car.
I could not connect the harnesses to the KLR + DME when I mounted the bracket in place first. So I had to unscrew it again.
step 4:
I would slowly move in 2 inch increments bringing the mounting bracket to its proper place. I found that getting the lower left part in place first (the trianglur part) was the easiest.
step 5:
the harness pretty much fell in place how it needed to. After30 years the wires have a memory of which way to go. At this point I just played around with the harness to make sure everything was in its right place and moving freely. Much like a girl plays with her hair.
step 6:
screw the KLR and DME mounting bracket in place. I found loosely putting the 2 lower screws in place first was easiest. Then the top 2. Once everything was in place, I secured it properly.
step 7:
Reconnect the battery. Start the car just Incase the harness worked its way loose or something else is going on.
Step 8: install the wooden cover/shield.
done :-)
Extra:
-i left the black plastic FQS plug on the DME open for now as I am tweaking with things. Might be advantageous for you also.
-make sure the klr line is connected.
Working it in slowly. It was easiest focusing on getting the trianglur piece in place first.
OK Zero Fuel Pressure... Get some wire.... Attach one end to the + on the FP.. (Alligator clip or whatever) and Run that wire up into the cabin of the car.. Attach a test Light to it, Or Better Yet a Voltage Meter. You can pick up the ground on the Door ( That's usually what I ground to) because its EZ to clip on the flat damper thing) Hit the Key... See if you have 12V at the pump.. If you do and still no pressure... Then Switch the clip from the + terminal on the FP to the - terminal and take your meter and see if you have Zero Ohms to Ground. If you do... then its another bad FP..
I always test my Pumps before I put them in. Another "Quick" way is.. If you have an assistant you can just bump the key while their hand is on the pump to confirm that is Buzzes...
Hmm "Zero Ohms" to ground?? That sounds important and I can's say I have checked for that?? Sooo, if I don't see voltage with the FP disconnected and the DME jumped, no ground ... could be the problem???
I just reinstalled the KLR and DME. Was not sure if I was going to put it back together nicely. It is such a rats nest underneath there. BUT, it went back together much easier than I had anticipated.
step 1: attach the klr and DME to the metal mount. DME on the left, klr on the right.
The trianglur part of the mount goes on the lower left position when you put it back in.
Step 2:
I played around with/ got familiar with the harness for the klr and DME. This way I spread them out the best way I thought they would fit and just get a feel for how they fragile might be. I was able to move them around without much concern something would break.
Step 3:
connect the wiring harness to the KLR and DME before (I repeat, before) mounting the metal bracket to the car.
I could not connect the harnesses to the KLR + DME when I mounted the bracket in place first. So I had to unscrew it again.
step 4:
I would slowly move in 2 inch increments bringing the mounting bracket to its proper place. I found that getting the lower left part in place first (the trianglur part) was the easiest.
step 5:
the harness pretty much fell in place how it needed to. After30 years the wires have a memory of which way to go. At this point I just played around with the harness to make sure everything was in its right place and moving freely. Much like a girl plays with her hair.
step 6:
screw the KLR and DME mounting bracket in place. I found loosely putting the 2 lower screws in place first was easiest. Then the top 2. Once everything was in place, I secured it properly.
step 7:
Reconnect the battery. Start the car just Incase the harness worked its way loose or something else is going on.
Step 8: install the wooden cover/shield.
done :-)
Extra:
-i left the black plastic FQS plug on the DME open for now as I am tweaking with things. Might be advantageous for you also.
-make sure the klr line is connected.
Working it in slowly. It was easiest focusing on getting the trianglur piece in place first.
Yeah that crap is a horror show! And unfortunately IO misplaced all the bolts and stuff?? I know there was a brass bushing that went in there somewhere and I can't find that either?? It has dual port waste gate and a black Zeitronix WB O2 Box in there also. Lot's of "stuff" sigh there is "apparently" something to be said for leaving cars "stock??"
The DME Relay?? Yep that is a great basic question! I'm the third owner of this 89 951 and when I got it from my best friend, the first thing he said was the DME Relay ... you have a spare.
So when the first "no start happened" I swamped it with the spare and it made no difference?? So then I tried to jump it pin's 87 and 30. That seemed to make no difference either?? So I'm pretty sure I just put the original DME Relay back in place??
The original Speed and Reference Sensors have been replaced as well as the original harnesses to them. Even so it when did run ... I was having the occasional hot restart, no start issue??? If the tach don't bounce .. the car won't start ... apparently?
I did check the resistance and the AC Voltage at the DME. But hey maybe I tested it wrong??? And I know I have Zero FP. AS I also replaced ... added the Pauer Tuning SS fuel Lines with the on board FPG. Zero Fuel Pressure ... to this day.
But hey maybe I screwed up the trouble shooting with the DVOM?? Soo I kept buying and replacing fuel pumps. Made no difference ...surprise.
But yeah this crap is getting old ... I saw the Carmonica and I have set a deadline ...finally! If I can't get to start by Friday ... I will order one! Cuz I am not touching those things If I don't have too!! I really want to rip all that crap out and go with a standalone ... but really If you can't make it start when it should, that (Standalone) could make things worst???
DME ECU is notorious for having cold soldier joints that prevents the car from starting. Did you do a visual inspection to see if there were any cracks when you had them out?
DME ECU is notorious for having cold soldier joints that prevents the car from starting. Did you do a visual inspection to see if there were any cracks when you had them out?
LOL, well that would be a vote towards getting rid of all that old crap and going Standalone!
But while repairing cold solder joints is in my wheelhouse, I only moved all that stuff as much as necessary! But "Baby Steps" until I get Fuel Pressure, in the rail, I can't be blaming the Germans and there penchant for over engineering crap. The phrase "KISS" is not one they are familiar with. But yes ... when it ran, that (bad solder joints) could have been the random hot restart issue??? But I'm gonna go back again ...by pass it all and report back what I get.Thanks for pitching in.
Hmm w/o the wires to the FP connected??? OK this maybe where I messed up, I've always had the FP wired in and turned the key to on when trying to get it started.
So a new plan. Disconnect FP, sigh which may or may not be bad?? Jump the DME (which I could replace but screw it) and question here with the DME jumpered, and the FP disconnected using a DVOM or a test light ... I should see voltage ... correct??
Use of a volt meter is preferred over a test light but if that's all you have then use that.
To solve these problems you have to isolate the individual pieces and test / verify that each piece works or it doesn't. Jumpering 30 & 87b at the fuse panel and then measuring voltage at the end of the wire harness near the fuel pump (w/o the pump connected) isolates just the wire harness. If you don't have 12V then you need to solve this problem first. If you do, then great. Move on to the the next step.
Reconnect the wire harness to the fuel pump and continue testing. What voltage do you measure across the fuel pump terminals when 30 & 87b at the fuse panel are jumpered? Is the pump running or not? Are you measuring fuel pressure at the fuel rail?
Not running yet I am the master at "Baby Steps!" But I can now confirm that Jumping Pins 30 and 87b ... does indeed work! For the first time since I did the SS lines with the FP gauge installed ... I got's Fuel Pressure!!!
I only put the (Battery) terminals on hand tight but I checked voltage and it showed 13.2, so good enough. I installed the jumper and as soon as I did ... I heard something??? I looked at the FP gauge and it "Finally showed Fuel Pressure!!!!" And yes (to answer my question) you can heard it!
I was only going for simple and seeing if I could get it to do anything?? So I measured voltage at the FP and it was only 10 something or another. But the battery terminals were not tight and the motors was not running. But finally seeing FP at the fuel rail was Victory Enough!!! So no more fuel pump swapping and getting soaked with gasoline!
I still don't know if it will start?? But I will celebrate this little victory in full! In retrospect I think the one mayor difference between now and sigh five years ago??? F'ing 951 really ticked me off, so it was time to walk away. But when I first tried to jumper it ... I did not know you could heard it (the fuel pump) and I did not have a pressure gauge! So the original, DME relay could still be bad??
So the adventure continues but "now" I got's Fuel Pressure!! Thanks Guys!!!
There is a connector for the fuel pump back by the fuel pump that may have corrosion. You may want to clean that up. You may also want to clean up your power distribution block. I wrote up a thread on how to go about doing that. https://rennlist.com/forums/944-turb...-cleaning.html
There is a connector for the fuel pump back by the fuel pump that may have corrosion. You may want to clean that up. You may also want to clean up your power distribution block. I wrote up a thread on how to go about doing that. https://rennlist.com/forums/944-turb...-cleaning.html
OH yeah I have that one saved! I saw it a couple of months ago! Excellent write up and documentation ... we all say "Thank You!"
But for right now, I have enough sub systems to put back together. Lowered 951 are not good ones to be dumping off of four Jack Stands! Three of them properly placed the forth ...not so much, apparently ... my bad.
And yes right now the voltage to the FP, wires seems to be low?? But the battery terminals were not tight, so I got to tighten them down for real before going of on another tangent, KISS as it were.
Simple.. Put a meter right on your battery.. If you see the 10V There then you are good.. If its 12.. then you are dropping 2v somewhere in your harness..
Simple.. Put a meter right on your battery.. If you see the 10V There then you are good.. If its 12.. then you are dropping 2v somewhere in your harness..
Uh oh, maybe?? The battery was at 13.2 measured with a DVOM, and I just slapped the battery terminals on and twisted them in place. I was more concerned with jumping the DME then anything else. I was surprised, when I heard the fuel pump turn on and almost immediately saw FP!
I only half *** tested the voltage as I did not really want to climb under the car ...yet again! Stuff was in the way ... So I put the probe to the DVOM in, uh close enough?? I could see the positive terminal but the negative ... not so much??
I'll rehook the battery up to day "properly" and then check voltage to the pump and report back.
In the past.. When doing a Job Like this.. I just use alligator clips on the part Im testing and make sure I have enough wire so I don't have to keep crawling under the car..
I think you might need to update the Title of this thread to "Complicated question" LOL...
In the past.. When doing a Job Like this.. I just use alligator clips on the part Im testing and make sure I have enough wire so I don't have to keep crawling under the car..
I think you might need to update the Title of this thread to "Complicated question" LOL...
Potato potahto???
Last week I was still busy doing stuff and getting no where?? I did not "know" if it was the DME?? And I did not know if the Fuel Pump work and I still had zero Fuel Pressure?? It took me uh 6 to 7 years to finally reach out for help?? Why exactly ... I have no idea?? Sigh cept for perhaps, being "SERIOUSLY" pig headed and stubborn?? So you know all "ribbing" is fully earned!
Most likely had I not finally reached out, I'd have been doing the same things .. all over yet again and getting nowhere?? I would have drained the fuel tank, yet again and swapped out the fuel pump yet again?? And may or may not have jumper-ed the DME ... yet again???
I really have not done anything "now" that I had not already tried?? But this time ... it's different?? I suppose "trouble shooting" does not really mean anything, if you don't want results your suppose to get??
But as of "now" I have/can get fuel pressure at the Rail! And I now know the fuel pump works! And now no more leaks "anywhere" with fuel lines full of fuel! So it's all good. So the plan now is to disconnect the fuel pump terminals, properly attach the battery terminals and jumper the DME and then check voltage at the fuel pump.
The results from that should point me to where I need to go next ... that's the plan in any case.


 09-16-2019, 04:26 PM