When you click on links to various merchants on this site and make a purchase, this can result in this site earning a commission. Affiliate programs and affiliations include, but are not limited to, the eBay Partner Network.
Just something that reads DC voltages and Ohms (which they pretty much all do), but an auto-ranging digital unit is probably best and certainly easier to use for beginners. Every car guy needs one. Fluke is my favorite and they now have a simple entry-level version...
Here is what I�m looking at after get under the passenger floor. I see 2 cables not plugged into anything. Not sure if that�s normal. Other than that there didn�t seem to be anything loose.
Hey Billy... I too found those unplugged connectors; my white one is for the altitude sensor (connects to round gold disk) and my black one traces to the DME harness pin labelled 'AC'. However, I can't find its mate.
What year is your 951? Mine is '88 built around August '87
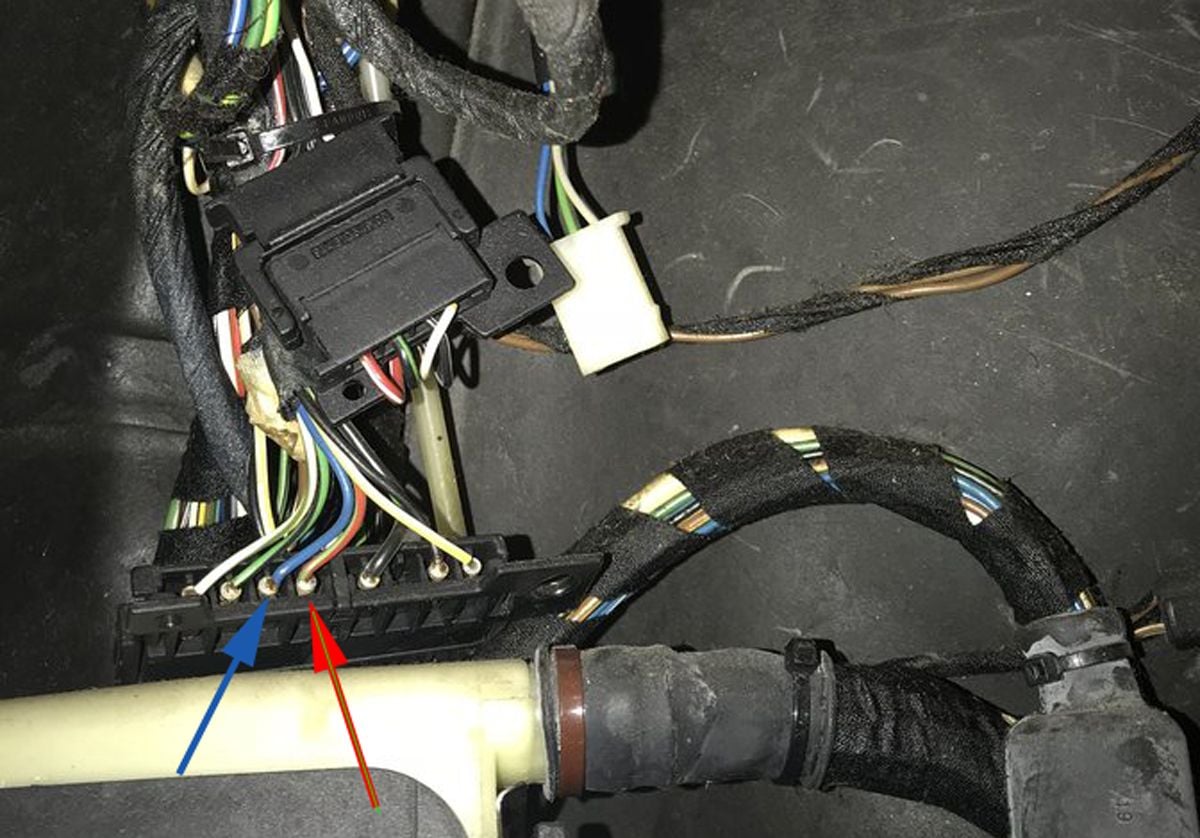
The wires that control the boost gauge are the two with arrows pointing to them below in your picture. The blue one carries the boost signal itself, straight from pin 5 of the KLR. With everything hooked up and the ignition on (engine not running), you should see about .45 volts on that wire. To test that, set the multimeter for DC volts, put its red test lead on the exposed metal connector of the blue wire, and put the black test lead of the multimeter on a solid ground point like the neg battery post. You should get something around .45 volts. If that checks out, then test to make sure the red wire with green stripe is grounded. To do that, set the multimeter to resistance and put one test lead on the exposed part of the red/green wire and the other test lead on a solid ground like the neg battery post. You should see close to zero ohms (e.g. less than 3 or 4 ohms). Be sure that connector is hooked up and connected to its mate when doing the multimeter tests!
Once you run those tests, it will point to you either the cluster side of that connector or the KLR side, and we can then do another test or two to pinpoint exactly what the problem is.
Hey Billy... I too found those unplugged connectors; my white one is for the altitude sensor (connects to round gold disk) and my black one traces to the DME harness pin labelled 'AC'. However, I can't find its mate.
What year is your 951? Mine is '88 built around August '87
The altitude sensor uses the two brown wires running to the upper right in that picture (with tape on them), not that white unplugged 3-wire connector. The black unused connector in the picture is the a coding plug for the DME (to switch the DME to country-specific maps), so not part of the problem here.
Ah yes, white is 3 wire; see that now. But.. my black one looks exactly like Billy's and 100% beeps continuity with AC on DME plug. I've checked this a few times..
Ah yes, white is 3 wire; see that now. But.. my black one looks exactly like Billy's and 100% beeps continuity with AC on DME plug. I've checked this a few times..
Not sure we're looking at the same thing, but there is a black two-wire connector on the DME harness shown in the picture that has one brown wire (ground) and one brown wire with white stripe that goes to pin 10 of the DME. Pin 10 is the country code pin. On the other hand, Pin 29 of the DME is the AC pin, and it has a red wire with green stripe that goes through the 14 pin bulkhead connector to the compressor. At any rate, none of that controls the boost gauge.
Last edited by Tom M'Guinn; 10-07-2018 at 02:39 PM.
Sorry for the delay, but I did get a meter and didn�t have much luck. I tested the meter on the battery and got 12v to be certain it was working. I ran the black jumper cable to the negative and retested the meter against the positive on the battery and black on the other end of the jumping cable and got the same 12v. I put the red lead on that blue wire,,, at the very base where you pointed and the black lead on the jumping cable with the ignition turned to the position before starting the engine. I got nothing on the meter. Well, not nothing but the numbers were never settling anywhere close to the .45 and were jumping everywhere. I am pretty certain I was touching the base of that blue wire/pin.
Sorry for the delay, but I did get a meter and didn�t have much luck. I tested the meter on the battery and got 12v to be certain it was working. I ran the black jumper cable to the negative and retested the meter against the positive on the battery and black on the other end of the jumping cable and got the same 12v. I put the red lead on that blue wire,,, at the very base where you pointed and the black lead on the jumping cable with the ignition turned to the position before starting the engine. I got nothing on the meter. Well, not nothing but the numbers were never settling anywhere close to the .45 and were jumping everywhere. I am pretty certain I was touching the base of that blue wire/pin.
That's a bummer, sorry. Try disconnecting that connector and rechecking to see if the blue wire (on the side that goes toward the engine harness and KLR) shows .45v or anything when you turn on the ignition. If not, then check for continuity between that same blue wire connection point and pin 5 in the main connector that goes to the KLR (i.e., remove the big connector from the KLR and make sure the signal is good from one end of the blue wire to the other). Bottom line is that if pin 5 of the KLR (which should be connected to that blue wire) doesn't show .45v or so when you turn on the ignition, then something is wrong with the KLR (or it's not getting power). It's possible you just have a cracked solder joint where the big connector plugs into the KLR motherboard, so that would be worth checking. It's that's not it, then you'd need to dig into the electronics in a way probably above your comfort level. Before replacing or sending off for repair (ECU Doctors...), confirm the gauge itself is working, just to rule out the possibility that the gauge is fried and took out the KLR with it. To check the gauge, you'd need to feed 0 to 5 volts to it through a 4k resistor. If you are up for that, I can walk you through it.
P.S., did you check for ground on the other wire I mentioned?


 10-04-2018, 01:14 PM
 Fluke is my favorite and they now have a simple entry-level version...