When you click on links to various merchants on this site and make a purchase, this can result in this site earning a commission. Affiliate programs and affiliations include, but are not limited to, the eBay Partner Network.
ok, I hope I haven't destroyed nothing.
For sure, destroyed or not, it is the last time I will do this job .it is so frustrating and mind****ing that Spanish inquisition is like a cut on the knee.
Anyway:
this is the "today" scenario:
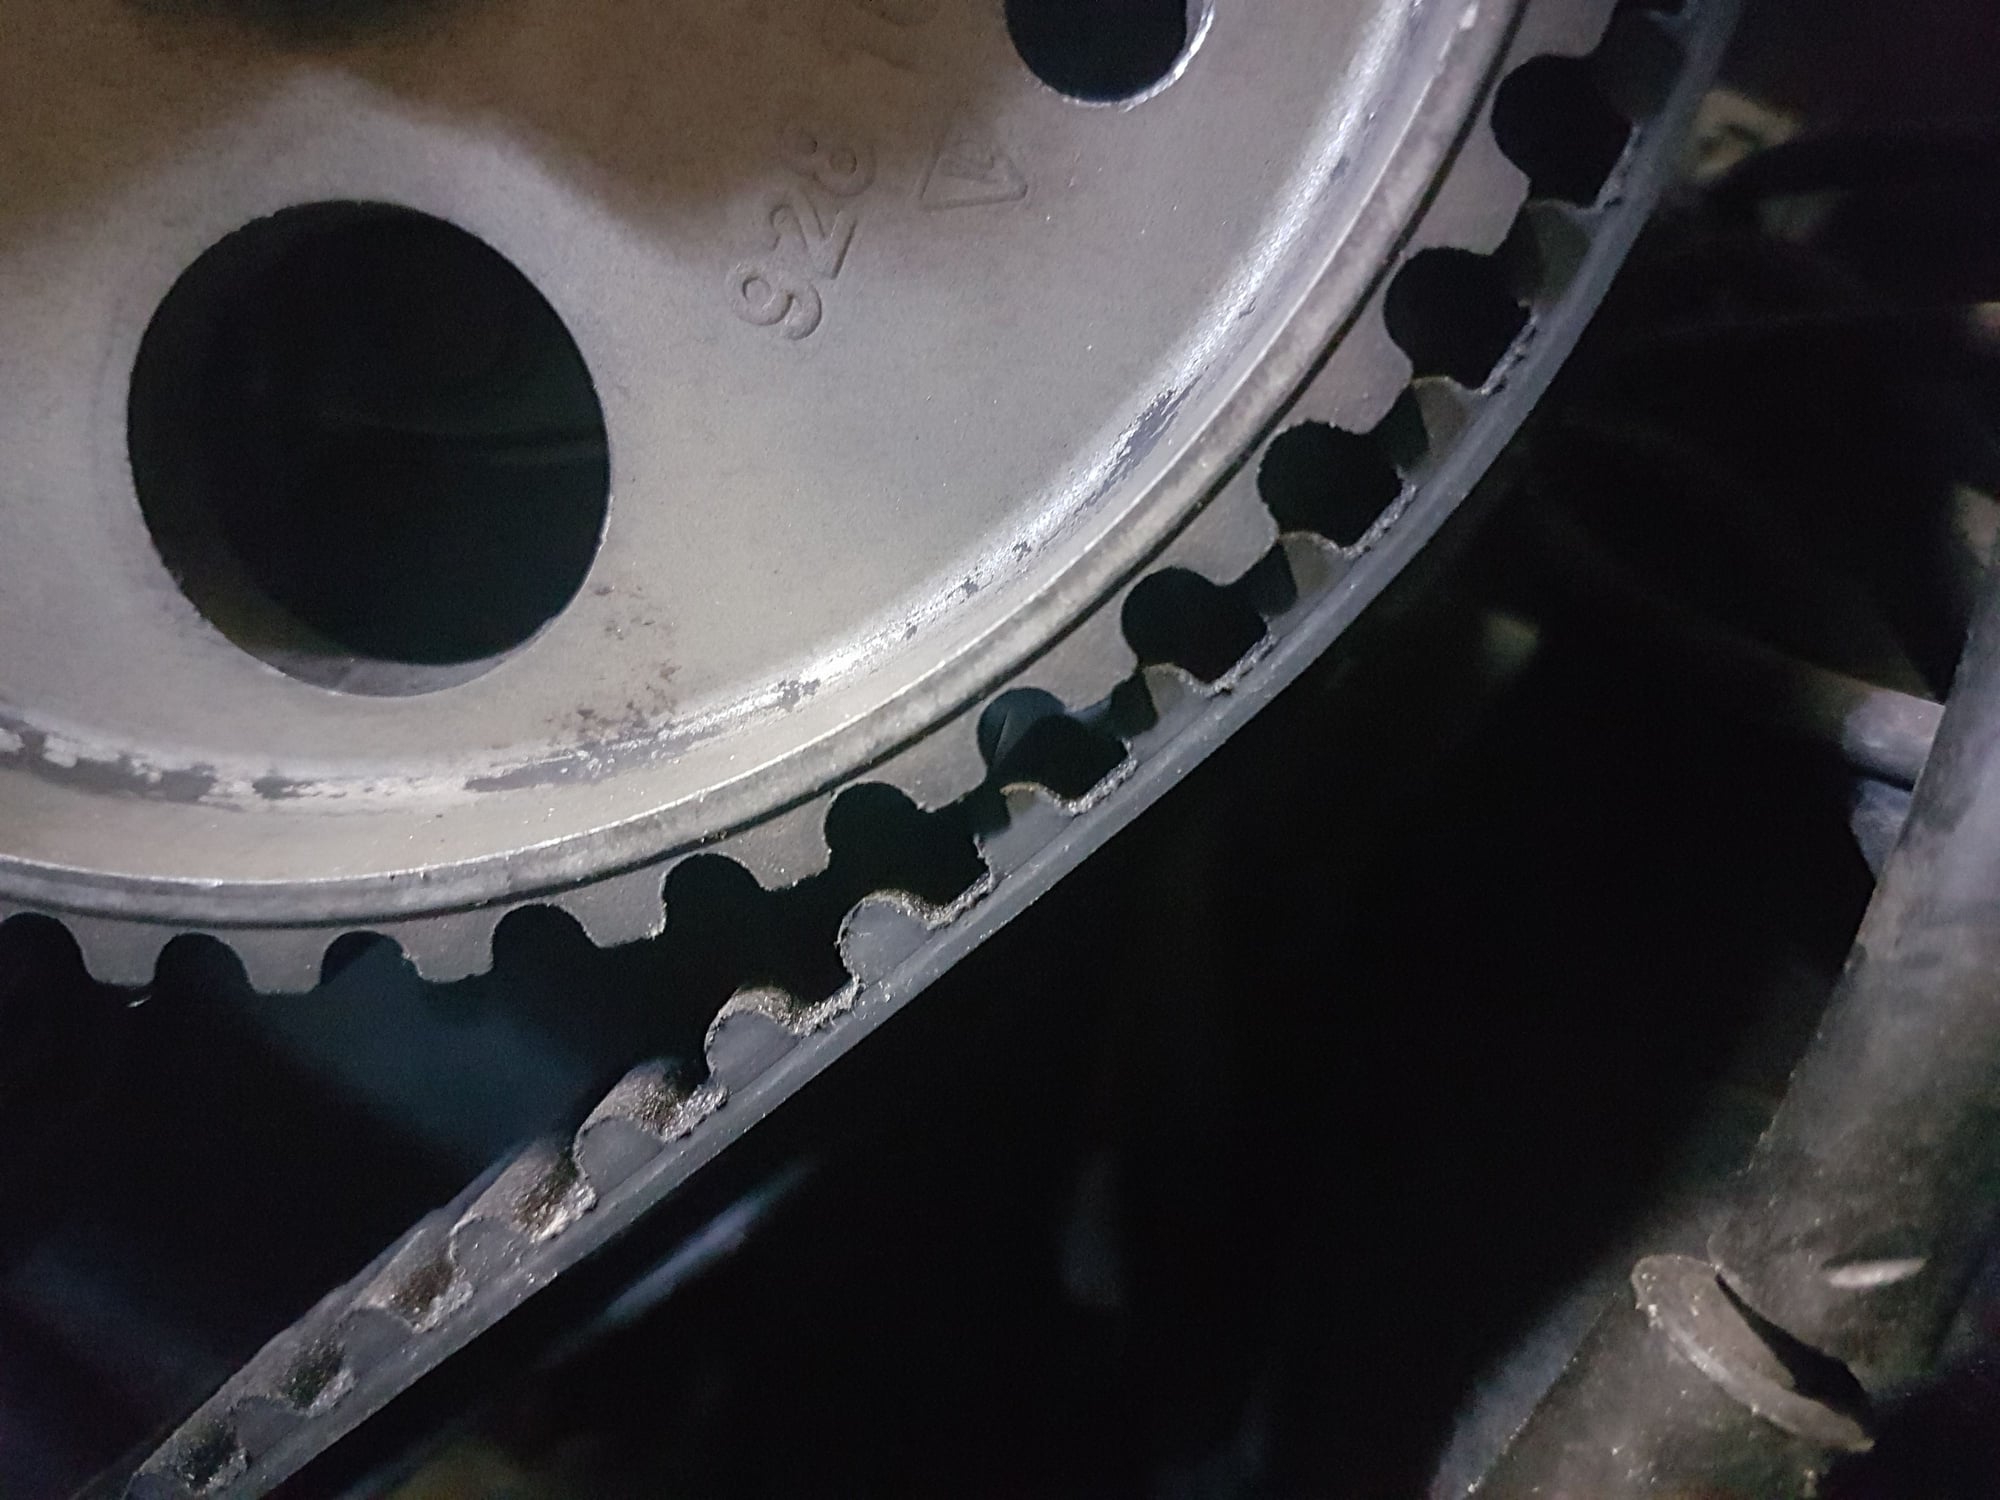
I am approximately 1 tooth off on both side, tensioner is loose .here's picture I hed to do Yesterday:
I removed belt, turned camshafts carefully counterclockwise , The gap of belt/sprocket
Then I carefully turn counterclockwise the sprockets , in order to obtain a perfect match.
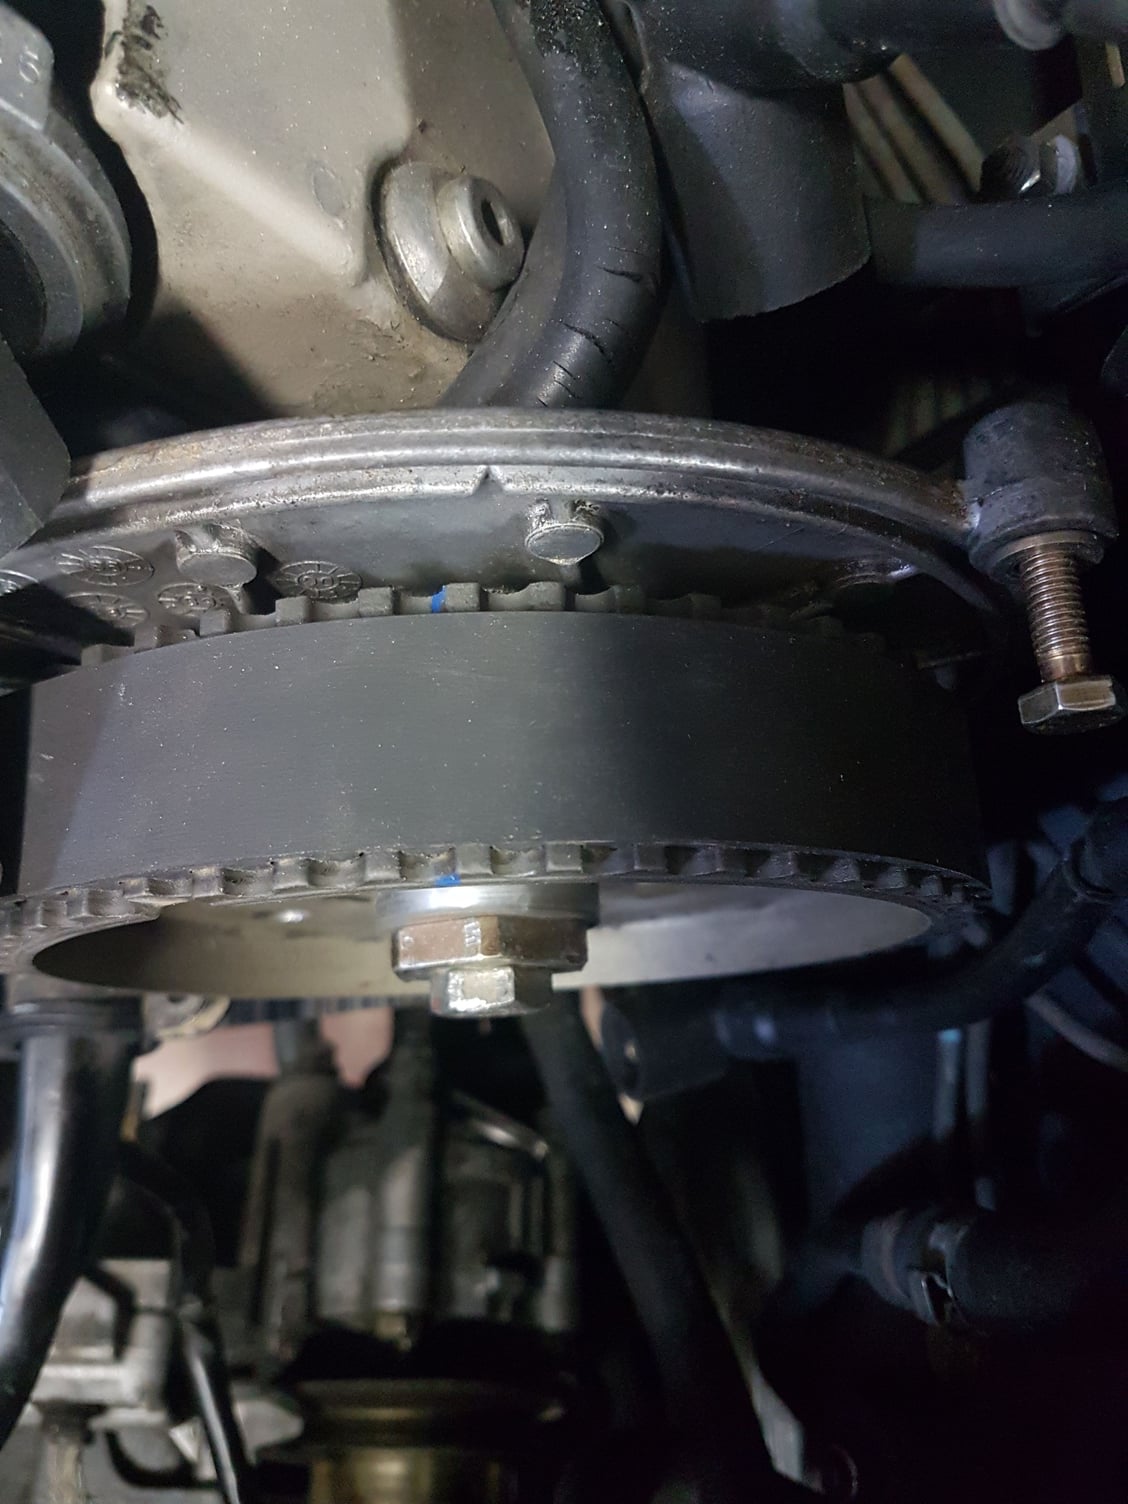
Iremove flywheel lock , I check that belt is properly in place, that tensioner is loose as much as I can ...
So a little pray and I start to turn the cranck.....after some degree(dunno know how many) the belt slipped from passenger side sprocket( it was mildly locked in place with a clamp), sprocket moved itself clockwise. A valve spring forced the sprocket to move.
I made rain all the saints from the heaven , as we say in Italy.
Looking at tensioner , it is way too loose.
Ok, I was 2-3teeth advanced at passenger side,after I turned the crankshaft " several degree... with the 30mm key I moved gently forth and back , just to feel if a valve touches anything.camshaft seems free, so valves,I turn ****erclockwise with no problem, I hopenothing happened to the timing chain of passenger side.
in the end the timing is this : 3 teeth out...I do not understand.
I don't know why, but I jumped from 1 tooth off spec to 3.
I will remove the belt and put the camshaft sprocket in place .Then I will tighten the tensioner a bit and remove the flywheel lock .then I will pray again.
I definitely have no skills for this job. that's it.
NOTE dont turn the engine over with the cam,
a little adjusting is OK .
only turn the engine over with the crank bolt
NOTE I think the point you missed is to tighten the tensioner bolt so that it is applying tension to the belt so the belt wont jump while you turn the engine to check the timing.
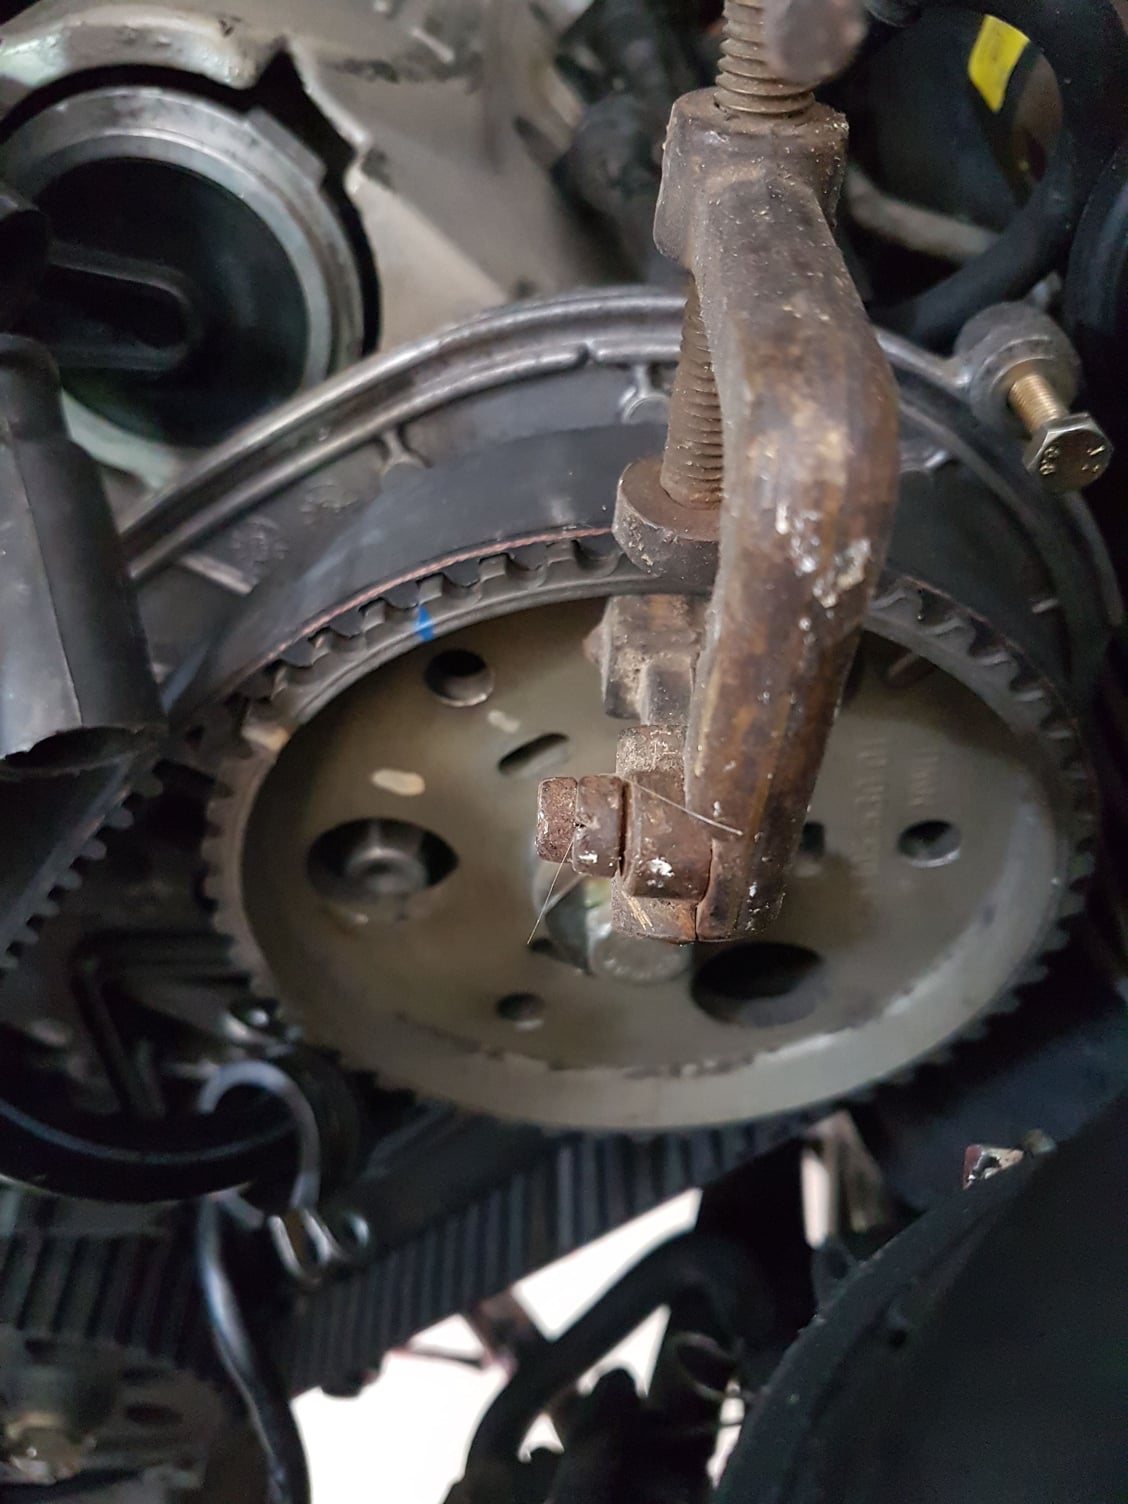
I would be careful using a big clamp like that you could bend the cam pulley better to use zip ties.
I would put the crank back to 45BTDC and put the lock tool in ,
NOTE if it needs to be turned backwards a small amount then thats OK dont force the crank.
then turn the cams to where they need to be since you marked them.
Before any panic sets in please advise where the crank is at the moment relative to where you started off when you were at 45 BTDC.
Appreciate you must be feeling a bit down at the moment but do not let your emotions take control. The best of people make mistakes- the smart ones learn from them!
Reality check:
If you are going to take on work ilke this you must follow the procedure and Dwayne's is bullet proof. Both Stan [Mr Merlin] and myself clearly advised you to tension the belt before removing the crank lock. I clearly advised you take take pictures and post them before removing the crank lock.
Hopefully you may have learned something, no damage has been done and you will laugh about it tomorrow but please follow instructions and if you are confused ask as many times as you feel necessary - but do not guess and do things that you may come to regret.
This !%$&#$~! is why I much prefer doing the TB job at TDC and never move the crank. But, we're in now so on with the show.
3 teeth out of time, is not close enough to move the assembly and guarantee no damage. If I recall, if 1 or 2 teeth off, then ok, but depending on if advance or retard, 3 teeth off is not good.
We don't know where the crank is at this time. The only thing you can safely do is go back to the 45deg location so the crank is safe from interference and restring the belt at the blue marks you made. If you are off 1 tooth either way, no problem, just get it strung on both cams, and then put some tension on the belt to keep it in place on the cams and crank. This is the best and safest you can do at this point. Trust the blue marks you made before removing the old belt.
Once you have this done, and check you have tension on the belt(not exact, but some tension so no slipping), then you can remove flywheel lock, and put on the balancer snug for timing marks.
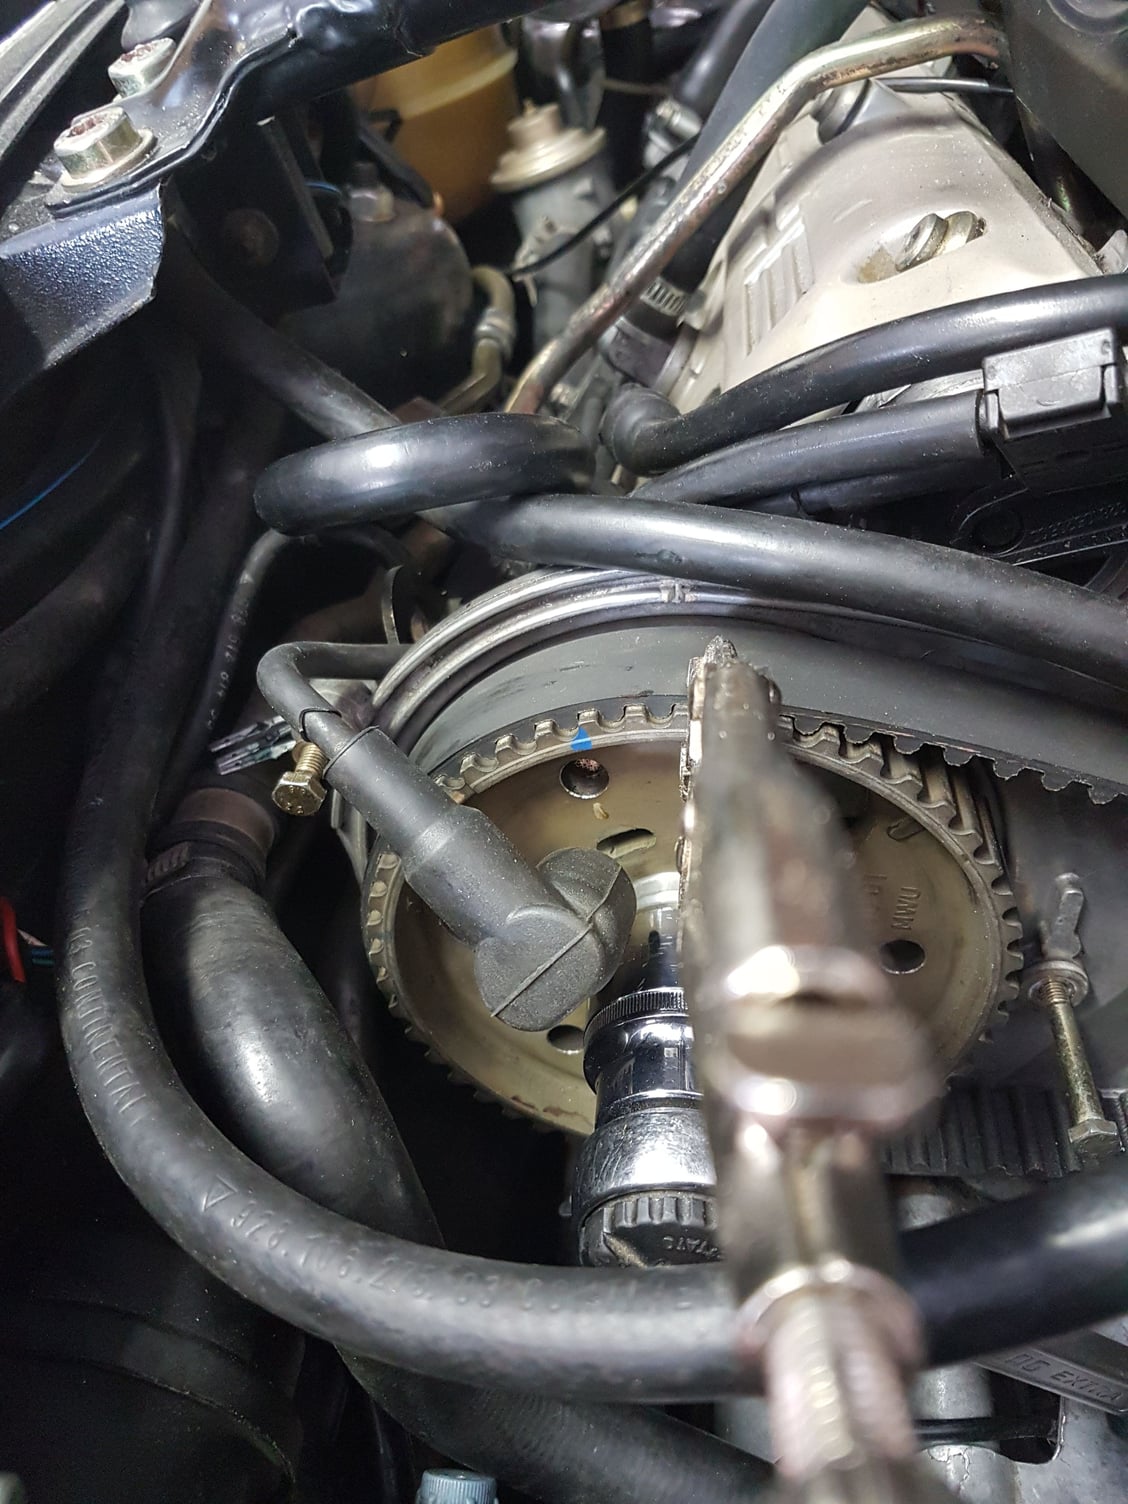
Then, you can use a large screwdriver on the starter ring and carefully pry around so the crank is at 0|T on the timing mark. Now, look at picture 3, and count 3 gaps to the left on the gear. You will see he small "v" notch in the BACK of the cam gear. This is the actual timing mark, and it should line up with the "^" in the alum backing plate behind the cam gear. This is the cam timing for gear and crank.
If it not on the correct tooth, then you can clamp the right side belt to the gear, have your helper hold the right gear and belt, then loosen the tensioner so that you can slip the left gear to the correct location, and slide the belt over the left gear. Tighten the tensioner a bit, and recheck crank balancer for 0|T, and the left cam for "v"on gear meets "^" on plate.
Now move to right side, and check for the notches V and ^ to align. If not, have the helper hold the left gear, and left side belt together, loosen the tensioner, and move the right gear so the notches match, and slip the belt over, then tighten the tensioner, and recheck all your marks.
Once the 0|T, and all gear notches line up, set the correct tension, and rotate the engine two revolutions then recheck the marks again, and the tension.
Hi,
I must admit I was a bit confused reading this thread and perhaps that is where the OP has gone wrong. If I look at the photo in #1 it looks retarded to me. If I was to put the cam timing tool on and check it would pin to the left of “0” and therefore retarded. When I read Freds post #11 his suggestion to rotate the cam anti-clockwise to tension the belt in point 3 was to confirm it was a full tooth out? Then the cam would need to be rotated 1 tooth clockwise, relative to the belt, to achieve tension between the cam and oil pump sprocket and the marks should then align. Is this correct? The next step is to clamp the 5-8 bank and tension it onto the 1-4 sprocket while holding the cam with the 30mm wrench relative to the mark on the rear cover.
Sorry to hijack but I feel it important OP reads instructions very carefully and provides pictures now of Crank position relative to Cam sprockets and advises if the crank was turned a few degrees as suggested in #16 or a few rotations(OP says the belt was clamped to cam sprocket so I am assuming only a few degrees before belt slips)? Is it safe to reposition Cams sprockets and crank back to correct position and if yes what order if important?
Yesterday i was a bit tired, nervous... So my post was written quickly and no correction.... I tightened the tensioner, but not enough. I was there with a helper, that warned me that belt was getting slack between the 2 cam sprockets, then the Passenger cam sprocket moved clockwise due to valve spring pressure. After half a second and with no warning. I can estimate i did half of crank turn when pass Side cam slipped , as the blue m
ark of non-slipped sprocket was about 90 degree after rear cover "v" Mark . Clamp is big in the picture maybe,and it is not tight, 1/8 of a turn and it falls down itself, but at least the belt cannot come off. think I wrote everything now. Thanks again and again for your support, i think that is a big job replying to a "potato head" like me.
Some further questions- please try to answer point by point:
1. As I can understand you removed the crank locking tool and then moved the engine forwards- correct?
2. When you moved the engine forwards how did you do this- did you use a 27mm wrench on the crank bolt or did you try to turn the entire engine using the 30mm washer on the cam?
3. If you turned the engine using the cam washer which bank did you do this from- driver side cam or pasenger side cam?
4. If I understand your post correctly when you moved the engine forwards you did so until the cam shaft had turned through about 1/4 of a revolution implying that the engine had turned through 180 degrees- is this correct? If not please describe how much forward you moved the engine.
5. After you moved the engine forwards do you know for sure that the belt had jumped at this point in time? If so, how did you know this?
6. I assume that in the latest photo you submitted the crank is once more at the 45 BTDC position- correct?
7. What did you do to get the engine back to the position where you took the latest photos- did you turn the engine backwards or did you continue to move the engine forwards?
ok, today I am quite calm, i can give you more info.
1 yes, and the tensioner was tightened , not enough for sure.
2 turned engine with 27 mm bolt on crank
3 haven't used cam washer to tunr engine
4 corret, about 180 degree,blue mark i didon driver's cam sprocket, the one that not slipped forward, was 1/4 of turn forward.
5 I know this because i stopped turning, because i wanted to hear what my helper(my father) was saying to me
6latest pictures, when you an see belt clamped in place, are taken with 45�btdc .
7 positions of latest pictures and 45� btdc are reached in this way: used 30mm key to move counter clockwise the passenger cam that slipped clockwise itself, for me 2 sprocket teeth, formy father 3 belt teeth. then i tightened tensioner bolt a bit more , and continued to turn crank , this time passenger cam sprocket did not slip .
now timing at cams sprockets are like the pictures above, crank is again at 45� btdc and locked.
Fred: probably I will come to Musquat next september, I will offer you 1 or 2 or 3 dinner.
Did you inherit that clamp from Leonardo Da Vinci? If so it may be very valuable!
My comments on your answers:
[point 5]. At the moment I do not understand how you could possibly know that the belt had slipped when the crank had moved through 180 degrees. Perhaps you can explain your thinking as to how you made the conclusion.
[point 7] Did the cam belt slip when under tension as you moved the engine forwards or did it slip after you stopped moving the engine forwards and the crank was not moving at all?
When I read Freds post #11 his suggestion to rotate the cam anti-clockwise to tension the belt in point 3 was to confirm it was a full tooth out? Then the cam would need to be rotated 1 tooth clockwise, relative to the belt, to achieve tension between the cam and oil pump sprocket and the marks should then align. Is this correct?
The next step is to clamp the 5-8 bank and tension it onto the 1-4 sprocket while holding the cam with the 30mm wrench relative to the mark on the rear cover.
Sorry to hijack ...
Norm,
Your query is logical- not a hijack.
From the original photo both Jim and myself saw what appears to be a belt thaat was out by one tooth on 5/8 bank and no photo at all of 1/4 bank.
When fitting a new timing belt it is very easy to get it one tooth out- many folks seem to do this but with the crank locked at 45 BTDC it is no drama - one simply removes it and starts again.
The problem is compounded by the tendency of the 1/4 bank to want to jump at this position or so I seem to remember.
The problem with the original photo was that it was taken from an angle of about 45 degrees relative to the perendicular axis of the notch on the cams and the back plate. Add to this use of a wide angle lens that distorts images and trying to read photos in such circumstance becomes very iffy.
One could see from the photo that there was no tension in the belt. To simulate the running position one has to put some anti clockwise tension on the cam washer, thus when this happens the cam position will retard even more relative to the back plate notch and then you can tell just how far out it is- logic suggested it would be one tooth out from where it should be.
Belt tension has to be set with the engine on No 1 cylinder TDC firing stroke. However, before releasing the crank lock and moving the engine, the belt must be tensioned and even though it will not be correct, I set mine just the same as I would when on No1 knowing that it might be on the tight side or on the slack side but safe to move the motor forwards. One then removes the lock and move themotor forwards to the correct position, check/correct the tension, move the motor forwards two complete revolutions, check again and if all is well finito!
Now it seems clear that the motor has been moved forward about 180 degrees, At some point [not yet clear to me] the cam has jumped relative to the belt, and the crank has been rotated through another 180 degrees with the cam belt 3 teeth out on the 5/8 bank and 2 teeth out on the 1/4 bank.
If St Francis of Assisi is smiling down on Francesco no damage will have been done but at the moment I for one have no idea whether he is "lucky" or "up Sh*t Creek without a paddle". Even those chaps who work on these things day in day out most probably cannot predict at this stage whether damage has occured because their craft is to make sure nothing happens during installation. For sure these motors are interference engines - i.e. if the piston is at TDC and the cams are rotated valves wil clout the piston and they will bend [they do so very easily]. Now in this case, being 3 teeth out on 5/8 and pistons having crossed TDC, the question is whether the amount of error is enough to cause contact.
At this stage better to hope for the best and not assume anything untoward has happened but when the system is reinstated a compression test, a leak down test or preferably both will be required to prove that no damage has occurred. Whether or not valve to piston contact happened and whether it would have been felt when manually cranking the motor I do not know. That Francesco did not report such is [hopefully] a very positive sign.
Did you inherit that clamp from Leonardo Da Vinci? If so it may be very valuable!
[point 5]. At the moment I do not understand how you could possibly know that the belt had slipped when the crank had moved through 180 degrees. Perhaps you can explain your thinking as to how you made the conclusion.
[point 7] Did the cam belt slip when under tension as you moved the engine forwards or did it slip after you stopped moving the engine forwards and the crank was not moving at all?
It is a old copper clamp, i know.I use it to repair old automatic pocket watch , in Italy wa call them onion watch. being copper a good electicity conductor, you can not ruin internal coils with static electricity, there's also(not in the picture) a plug for a copper bracelet to wear and plug to a good ground point to discharge me and the watch from static electricity.old the clamp because old the watches I repair.
point 5 : i know belt slipped because I saw the sprocket going forward and the belt was "out " the teeth.when it slipped passenger sprocket was 2-3 teeth forward(looking now at picture with clamped sprocket, 2-3 teeth retarded , it was like cam sprocket puts itself in perfect timing).
point 7 : i stopped doing anything just half a second before the forwardssprocket slipped and belt went off. I cant' really tell you if there was tension between sprockets as I was turning crank , I was using all the force to turn 27mm bolt slowly.
Originally Posted by FredR
Norm,
Your query is logical- not a hijack.
From the original photo both Jim and myself saw what appears to be a belt thaat was out by one tooth on 5/8 bank and no photo at all of 1/4 bank.
When fitting a new timing belt it is very easy to get it one tooth out- many folks seem to do this but with the crank locked at 45 BTDC it is no drama - one simply removes it and starts again.
The problem is compounded by the tendency of the 1/4 bank to want to jump at this position or so I seem to remember.
One could see from the photo that there was no tension in the belt. To simulate the running position one has to put some anti clockwise tension on the cam washer, thus when this happens the cam position will retard even more relative to the back plate notch and then you can tell just how far out it is- logic suggested it would be one tooth out from where it should be.
Belt tension has to be set with the engine on No 1 cylinder TDC firing stroke. However, before releasing the crank lock and moving the engine, the belt must be tensioned and even though it will not be correct, I set mine just the same as I would when on No1 knowing that it might be on the tight side or on the slack side but safe to move the motor forwards. One then removes the lock and move themotor forwards to the correct position, check/correct the tension, move the motor forwards two complete revolutions, check again and if all is well finito!
Now it seems clear that the motor has been moved forward about 180 degrees, At some point [not yet clear to me] the cam has jumped relative to the belt, and the crank has been rotated through another 180 degrees with the cam belt 3 teeth out on the 5/8 bank and 2 teeth out on the 1/4 bank.
If St Francis of Assisi is smiling down on Francesco no damage will have been done but at the moment I for one have no idea whether he is "lucky" or "up Sh*t Creek without a paddle". Even those chaps who work on these things day in day out most probably cannot predict at this stage whether damage has occured because their craft is to make sure nothing happens during installation. For sure these motors are interference engines - i.e. if the piston is at TDC and the cams are rotated valves wil clout the piston and they will bend [they do so very easily]. Now in this case, being 3 teeth out on 5/8 and pistons having crossed TDC, the question is whether the amount of error is enough to cause contact.
At this stage better to hope for the best and not assume anything untoward has happened but when the system is reinstated a compression test, a leak down test or preferably both will be required to prove that no damage has occurred. Whether or not valve to piston contact happened and whether it would have been felt when manually cranking the motor I do not know. That Francesco did not report such is [hopefully] a very positive sign.
From first pictures: my mistake not to put camera properly alligned with marks .The query is not an highjack.
Unless I become squint, blue mark on driver's cam sprocket was alligned to back cover mark.When I saw that slack between oil pump sprocket and that cam sprocket I made a picture of that slack and stopped the job , then I asked for help and major instructions from You.
"at some point " as you wrote, was not clear to me either,cause when I stopped turning engine there was no degree sign on that part of harmonic balancer.A compression test and a leak down test is the next step after I put belt and everything is timed properly.
regards, Francesco
now it is 45� btdc , sprockets as per pictures, no slack between pump and cam sprocket, slack between cams sprockets.maybe it isnormal as engine timing is out of spec .
now it is 45� btdc , sprockets as per pictures, no slack between pump and cam sprocket, slack between cams sprockets.maybe it isnormal as engine timing is out of spec .
Francesco
Not sure if I bother to write anything, but will go again.
Crank is now at 45deg mark. You can move the cams safely without interference.
Move the cams back to your blue mark position.
String the belt the best case you can, no matter if they are off one or two teeth, it's ok for now.
Apply tension to the belt so no more slipping.
Remove flywheel lock, and rotate to 0|T on crank balancer(TDC mark).
Check cam timing using the gear and plate notches: V and ^ line up.
If not lined up notch to notch, helper holds right gear and belt, release tension on belt, and set cam timing on left gear. It may not be perfect! But you can tell which gear tooth is best.
Apply tension to belt.
Helper now holds left gear and belt, release tension on belt.
Set right cam gear timing by notches; V and ^, the cam will try to spring around due to valve spring action. Use correct tool on cam bolt flanged fitting to move the gear. Apply belt tension.
Now, check all timing marks. If one is off a full tooth it will be obvious. Repeat process to set the gear and plate notches again; V to ^.
Remove flywheel lock and rotate engine two turns back to 0|T. Recheck timing of gears. Apply correct tension to the belt. Rotate around again, and recheck final timing and recheck tension. Proceed with the job.
Perhaps you can take a photo of the complete cam circuit including the crank sprocket if possible just to give a clear overview.
Forget about what has happened- it is history- concentrate on the present and recovery. If any damage has been done you will just have to deal with it so no point in fretting about it. I have a strong feeling the saints are going to be kind to you!
Now you need to remove the belt:
1. Reposition the cam wheels so that the marks align correctly and make sure the crank lock is engaged so that the timing mark is dead on the 45 BTDC marker.
2. Time to re-fit the belt, have your father and the local priest standing by for heavenly support!
3. Make sure the tensioner is fully slack and the belt sits around the tensioner pulley correctly.
4. Start from the crank sprocket, over the oil pump sprocket and then up to the driver side sprocket.
5. At this point you may find the belt seems to be half a tooth out, if so advance the driver side cam slightly until you can engage the nearest tooth and feed the belt over the sprocket but only engage about half way across the sprocket teeth..
6. Put a 30mm socket on the driver side cam washer and try to turn the cam anti clockwise and check where the alignment mark is [it should now be in line with the casing mark]. Get your father to hold the wrench putting some modest pressure in the anti clockwise direction and hold the belt onto the sprocket- the thing cannot go anywhere assuming you have the crank lock in place. You can also use a zip tie to hold the belt in situ but that should not be necessary if there are two of you.
7. You are now free to use both hands to finish off threading the belt. A new belt is always going to be tight but just be patient and it will slip over the sprocket and once you have got it partially engaged you can then feed the belt fully over the driver side sprocket as well.
8. Tighten the belt if you are confident it is correctly engaged. Assuming you are using the Kempf tool tighten until the tool suggests it is fully tensioned. As I wrote earlier this will probably not be correct but it will ensure the cam sprocket cannot jump.
9. At this stage take a photo and post it so we can see what you have done. If we agree then you can remove the crank lock tool, move the crank to TDC on No1 cylinder and set the tension correctly.
10. Rotate the crank two complete revolutions check the belt tension again and adjust if necessary.
11. If you have a compression tester you can test each cylinder at this stage but make sure nothing is going to foul or get caught up as the system rotates. Before doing this remove the fuel pump fuse and disconnect the wires from the coils. Although the motor is cold and the compression pressures will not be representative, it should be apparent if there are any bent valves because there will be no pressure at all- I had two bent inlet valves on No7 cylinder of my motor after my crash and they showed no pressure at all. If all cylinders are holding pressure you can get pissed in celebration. By the way when doing this test make sure you hold the throttle wide open!

 04-04-2017, 10:23 AM