Notices
928 Forum 1978-1995
Sponsored by:
Sponsored by: 928 Specialists

Saving a '79 Euro

Thread Tools
 
Search this Thread
 
Old 05-07-2017, 10:11 PM
  #61  
kiwiokie
Racer
Thread Starter
 
kiwiokie's Avatar
 
Join Date: Mar 2005
Location: Tulsa, Oklahoma
Posts: 320
Received 5 Likes on 5 Posts
Default

Thanks Hoi!!!! I will give that a try.

Originally Posted by hlee96
For the rubber bushings that had sheared off underneath the air plenum, I had used a chisel and a hammer to slowly "rotate" the bushings counterclockwise to loosen them up then a pair of tooth pliers to "unscrew" them. I think I read it somewhere here that Greg Brown has used this method and it worked for me. Good luck.
-Hoi
Old 05-07-2017, 10:36 PM
  #62  
Majestic Moose
Burning Brakes
 
Majestic Moose's Avatar
 
Join Date: May 2016
Location: Nazareth, PA
Posts: 832
Likes: 0
Received 42 Likes on 27 Posts
Default

Originally Posted by kiwiokie
Thanks Alex. Went to Home Depot and bought a 5ft 3/4inch galvanized pipe and tried that out on the breaker bar - hung on it until I thought the breaker bar would bend but the bolt did not move. I will try more Kroil each day this week and maybe will get lucky in a few days.
Wow that is surprising, next time try having a helper hit the end of the breaker bar over the socket with a hammer while you have it under as much torque as you can pull. If that doesn't free it I don't know what will. Be sure to protect your fender with layers of blankets and cardboard for when all that potential energy releases.


EDIT: forget the above, I remembered my favorite trick. Place your breaker bar handle onto a jack and pump up until the bolt loosens. This has never failed me yet and takes hardly any effort.

Last edited by Majestic Moose; 05-07-2017 at 11:29 PM.
Old 05-10-2017, 11:45 PM
  #63  
kiwiokie
Racer
Thread Starter
 
kiwiokie's Avatar
 
Join Date: Mar 2005
Location: Tulsa, Oklahoma
Posts: 320
Received 5 Likes on 5 Posts
Default

Finally got the crank pulley bolt out. Ended up cutting some aluminum flashing to the size of the fan belt pulley and duct taped it to the pulley forming a cup. I mixed 50:50 ATF and acetone and filled the pulley up which submerged the bolt. Fortunately the duct tape held for a day which was long enough for it to have an effect. Was still freaking tight to remove!
Old 05-11-2017, 11:15 PM
  #64  
kiwiokie
Racer
Thread Starter
 
kiwiokie's Avatar
 
Join Date: Mar 2005
Location: Tulsa, Oklahoma
Posts: 320
Received 5 Likes on 5 Posts
Default

Some previous owner artistry...
Attached Images  
Old 05-12-2017, 09:34 AM
  #65  
Wisconsin Joe
Nordschleife Master
 
Wisconsin Joe's Avatar
 
Join Date: Jan 2013
Location: Kaukauna Wisconsin
Posts: 5,926
Received 303 Likes on 232 Posts
Default

Ok, you have a slightly different definition of the word 'artistry' than I do.

Old 05-13-2017, 08:09 PM
  #66  
kiwiokie
Racer
Thread Starter
 
kiwiokie's Avatar
 
Join Date: Mar 2005
Location: Tulsa, Oklahoma
Posts: 320
Received 5 Likes on 5 Posts
Default

Looking almost clean! AC compressor still a pit of primeval slime. Need to discharge system first. Previous owner said AC never worked so was hoping it had no freon but no such luck.
Attached Images  
Old 05-13-2017, 08:15 PM
  #67  
kiwiokie
Racer
Thread Starter
 
kiwiokie's Avatar
 
Join Date: Mar 2005
Location: Tulsa, Oklahoma
Posts: 320
Received 5 Likes on 5 Posts
Default

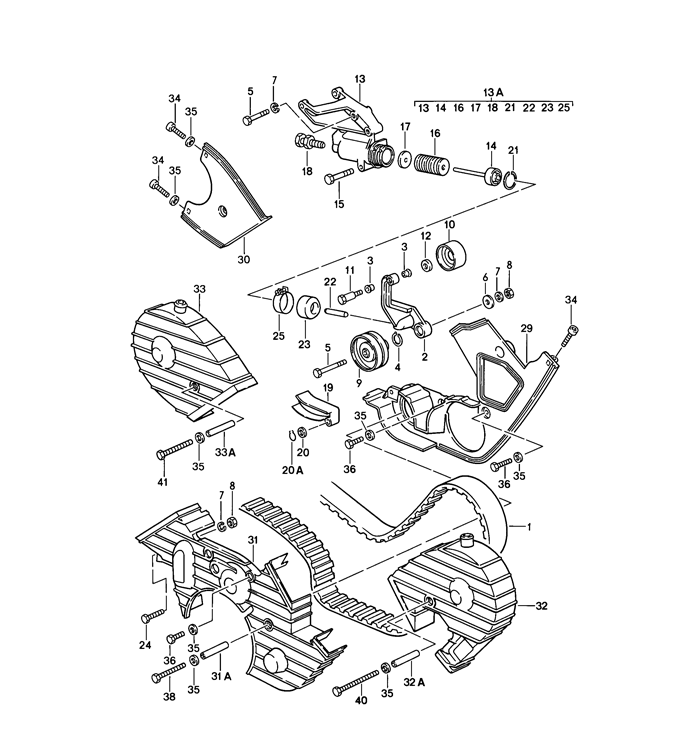
Can anyone help ID what goes here? This is underneath the crank end. Whatever was there is long gone. Guide rail perhaps? Hard to tell from the PET diagram.
Attached Images  
Old 05-13-2017, 09:18 PM
  #68  
hlee96
Rennlist Member
 
hlee96's Avatar
 
Join Date: Jan 2015
Location: Near Mushroom Capital of the World
Posts: 3,019
Received 198 Likes on 125 Posts
Default

Rubber/plastic belt guide in earlier cars. '83 and after would have the rollers. I will try to find a pic.
#19 on this pic

Old 05-13-2017, 11:57 PM
  #69  
kiwiokie
Racer
Thread Starter
 
kiwiokie's Avatar
 
Join Date: Mar 2005
Location: Tulsa, Oklahoma
Posts: 320
Received 5 Likes on 5 Posts
Default

Got it. Thanks Hoi. Thought that might be it but it is kind of floating in no-mans land looking like it lines up underneath the tensioner roller.
Old 05-20-2017, 10:24 PM
  #70  
kiwiokie
Racer
Thread Starter
 
kiwiokie's Avatar
 
Join Date: Mar 2005
Location: Tulsa, Oklahoma
Posts: 320
Received 5 Likes on 5 Posts
Default

Had a day of incredible wrenching karma last week and got all waterpump bolts out without any fuss at all. Could not have been more surprised. Waterbridge Allen socket bolts are another story. Lots of flakey scaling inside the waterpump.
Attached Images  
Old 05-20-2017, 11:41 PM
  #71  
Wisconsin Joe
Nordschleife Master
 
Wisconsin Joe's Avatar
 
Join Date: Jan 2013
Location: Kaukauna Wisconsin
Posts: 5,926
Received 303 Likes on 232 Posts
Default

Someone was using some pretty "hard" water in that radiator.
Old 05-21-2017, 01:16 AM
  #72  
kiwiokie
Racer
Thread Starter
 
kiwiokie's Avatar
 
Join Date: Mar 2005
Location: Tulsa, Oklahoma
Posts: 320
Received 5 Likes on 5 Posts
Default

Agreed. When I drained the block and radiator it looked to be 98% water and likely tap water rather than distilled. I need to look for one of those flush products to cycle through once I get the engine all back together.
Old 06-01-2017, 12:41 AM
  #73  
kiwiokie
Racer
Thread Starter
 
kiwiokie's Avatar
 
Join Date: Mar 2005
Location: Tulsa, Oklahoma
Posts: 320
Received 5 Likes on 5 Posts
Default

Got my COA. VanD was right about cloth inserts but pinstripe rather than pasha. Leatherette but sure looks and feels like leather to me!
Attached Images  
Old 06-01-2017, 10:51 PM
  #74  
docmirror
Shameful Thread Killer
Rennlist Member
 
docmirror's Avatar
 
Join Date: Aug 2004
Location: Rep of Texas, N NM, Rockies, SoCal
Posts: 19,831
Received 100 Likes on 65 Posts
Default

Originally Posted by kiwiokie
Had a day of incredible wrenching karma last week and got all waterpump bolts out without any fuss at all. Could not have been more surprised. Waterbridge Allen socket bolts are another story. Lots of flakey scaling inside the waterpump.
The problem with descaling agents is that it'll take the scale off the head gasket area, and also the head where it's been etched. Might wind up with serious water leaks and enough recession of the alum that you'll need to have welding done to restore material at the head/block interface. I would just go back with good water and approved coolant, and let it work like it should. Some point you may have to deal with a water leak anyway, might as well let it last as long as you can. On your trip home you had no overheat issues. Would suggest a good clean rad to maximize cooling capacity.

Glad you got the COA and it's mostly what you want. Gonna be a great example when you're done. Keep on keepin on.
Old 06-02-2017, 09:51 AM
  #75  
kiwiokie
Racer
Thread Starter
 
kiwiokie's Avatar
 
Join Date: Mar 2005
Location: Tulsa, Oklahoma
Posts: 320
Received 5 Likes on 5 Posts
Default

Thanks for the advice. I will back flush the radiator and heater core with a hose and leave it at that.


Quick Reply: Saving a '79 Euro


All times are GMT -3. The time now is 04:30 AM.