When you click on links to various merchants on this site and make a purchase, this can result in this site earning a commission. Affiliate programs and affiliations include, but are not limited to, the eBay Partner Network.
Wondering if I have the sequence wrong in bolting on my rebuilt upper and lower a-arms.
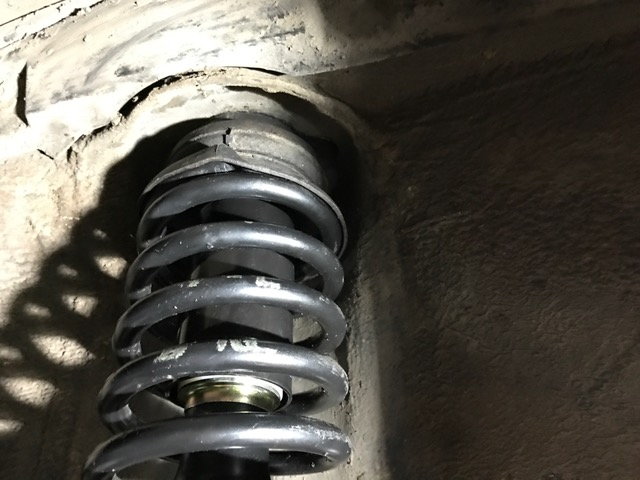
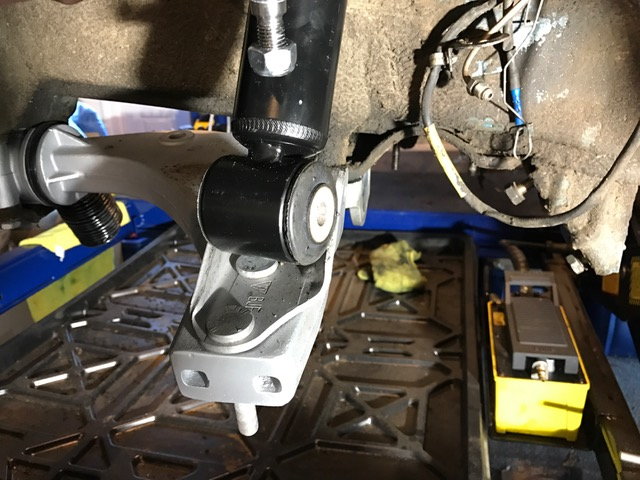
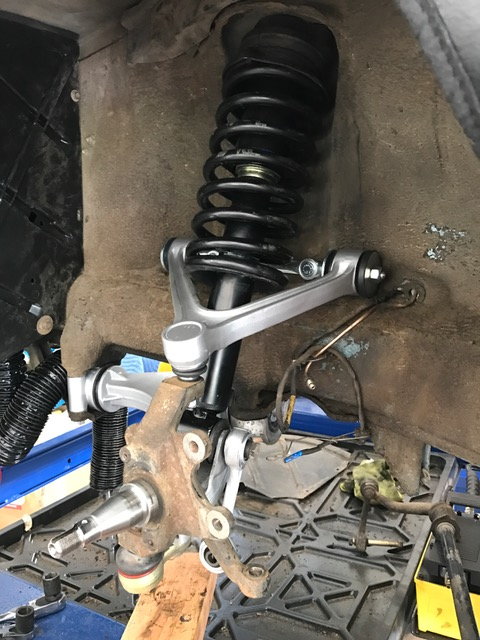
As you can see, the new strut-springs are against the top of the frame, and upper A-arm bolt through the body into the engine bay. However, the lower strut insertion will not fit into the lower A-arm bracket.
Am I missing a step or maybe I need to unbolt something in order to make it fit. How do I rotate the lower strut insertion into the bracket correctly so that I can insert the bolt?
Im trying to work out how you got the spring thru the upper A arm, in that position.
Did you install a new upper A arm at the same time??
That A arm, in it's normal position, is..6-8" higher than that, and wouldnt be a problem at all to drop/raise the spring through.
If that's what you did, you are gonna have to remove the upper A arm from the chassis, drop the spring assy, reposition the upper A arm HIGH on the spring, and put it back in.
That may solve your alignment issues down at the bottom as well, the lower A arm has to come UP a lot too, to meet the lower shock mount.
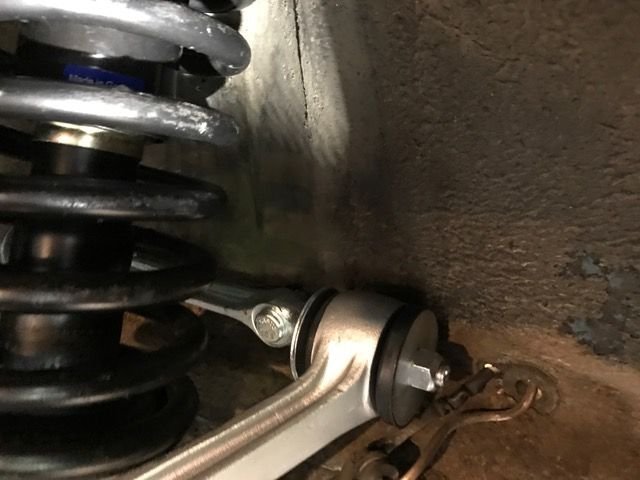
Put a jack under the end of the lower arm to pick it up some. If you need to, loosen or remove the nuts underneath at the adjusting cams so the bracket can be more easily lined up with the shock bushing. The bushing may take a little rubber-mallet persuasion to get it started between the bracket ears, after twisting it with a long punch or screwdriver as Bertrand suggests above. And before you snug stuff up at the bracket, lift the outer end of the upper arm so it's around the spring and lower perch, easier with the outer end of the lower arm jacked up a little. Remember that the bracket sits with the shock mount ears towards the center-line of the car, inboard rather than outboard. It looks right in the picture, just want to be sure.
Keep in mind the lower rear control arm mount is supposed to be left loose until the car is back on the ground with the weight on the suspension, then torqued.
Volume IV
Page 40-5
Bolt #19
From the manual:
"Screw in until only 2 threads are visible. Do not tighten to 120Nm (88 fltb) until assembly is completed and springs have settled"
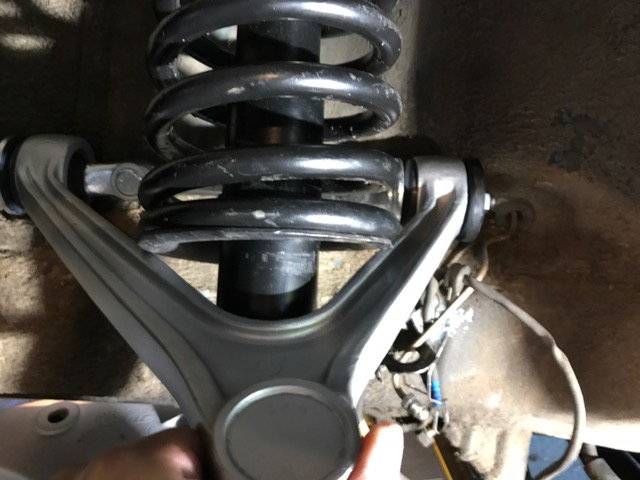
I believe "Speedtoys" is onto the true issue. The reason you can't get the bottom strut bolt started...is because the coil-over spring's lower mounting pad is hitting the upper A-arm, and in turn...not letting it move back towards the inner portion/opening of the assembly. You need to loosen or remove the upper A-arm from the sub-frame, lift it up so it is around the coil spring and above lower spring mount, align the mounting area of the lower strut with lower control arm bracket (with screwdriver as previously mentioned), then move strut into position for bolting up, once you have the lower bolt started, then mount the upper A-arm to the cars sub-frame.
I think the root cause is the length of the new unsettled springs. If you have a spring compressor it won't take much to get the clearance to fit the lower shock mount. If you do not, they are really cheap and may be worth it to avoid messing with the upper arm. Those mounting nuts are a pain to access.
I believe the spring is already compressed, as the distance from the lower spring perch to the upper strut mount is fixed. Thus, new springs should not have an effect on this...
Put a jack under the end of the lower arm to pick it up some. If you need to, loosen or remove the nuts underneath at the adjusting cams so the bracket can be more easily lined up with the shock bushing. The bushing may take a little rubber-mallet persuasion to get it started between the bracket ears, after twisting it with a long punch or screwdriver as Bertrand suggests above. And before you snug stuff up at the bracket, lift the outer end of the upper arm so it's around the spring and lower perch, easier with the outer end of the lower arm jacked up a little. Remember that the bracket sits with the shock mount ears towards the center-line of the car, inboard rather than outboard. It looks right in the picture, just want to be sure.
I believe the spring is already compressed, as the distance from the lower spring perch to the upper strut mount is fixed. Thus, new springs should not have an effect on this...
The length at the top is fixed. The bottom is adjustable. Under load the spring will be be the same length regardless of the position of the adjusters, but static extended like this the length of the spring changes with the adjustment collar position. The Usual Guidance is to put the adjusting collars at the same positions both sides, and start with them at about where they were prior to removal.
Getting the shock bottom in far enough to pick up the upper control arm is easy with the lower bracket removed. Holding the lower arm down, push the spring towards the center-line of the car, lift the end of the upper arm and support that outer end with mechanic's wire to an upper spring coil until the spindle is installed again. Put the bracket in place on the lower arm, so you can get the bottom eye of the shock absorber between the ears correctly and a bolt passed through.
Thank you to everyone for your help and guidance. My spring-strut does not have adjustable collars from an '78. I ended up:
1. Insert the strut tower into the top frame and hold it loosely in place by nuts
2. Insert upper control arm into the holes in the subframe and loosely secure it with 1 nut
3. Loosening the lower control arm rear bolts so that they are only engaged by a couple of threads to allow max flexion for LCA bracket and lower strut bushing
4. Rotate the lower strut as suggested to fit into the bracket
5. Insert M12 x 120 mm bolt through the stabilizer bar and into the LCA bracket and strut bushing
6. Slowly tighten the front and rear bolts of the LCA and this will naturally apply upward pressure into the strut up into the top frame
7. Insert the steering knuckle to ensure proper distance in between UCA and LCA
8. With a jack, slowly apply upward pressure into the LCA-ball joint to allow for easier torquing of the nuts. This is harder than stated since the engine is out and not much pressure is needed to lift up the entire front end.
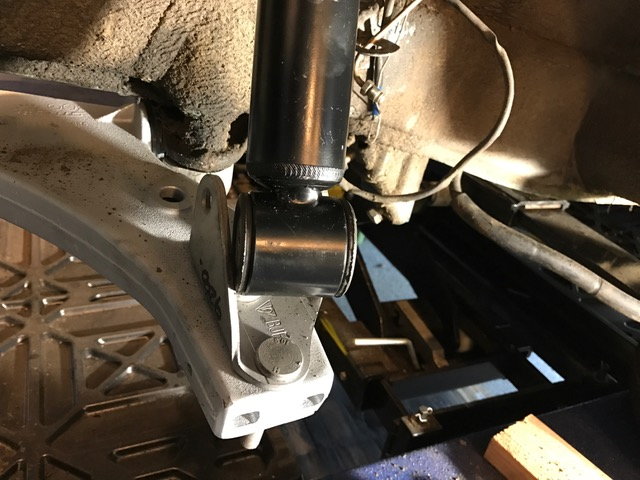
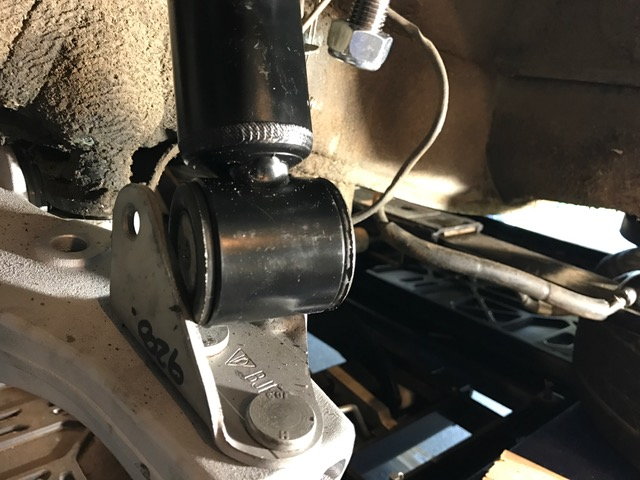
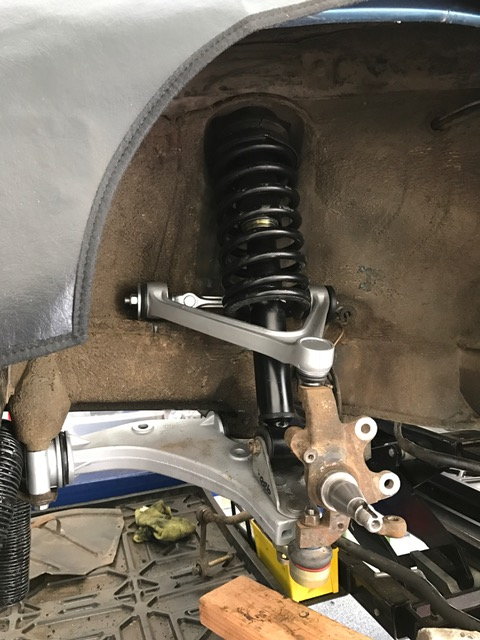
Here are the results; not everything is torqued yet (especially the rear bolts to the LCA as stated by Erik and WSM) in case I messed something up!
Thanks for checking!
Hoi
Stabilizer angled forward as recommended by WSM
Sorry for being so dirty, but I don't want "perfection to get in the way of progress". I will probably get it power washed once I am rolling the car out of the garage. The mud is caked into the frame, tried steam washing but failed.
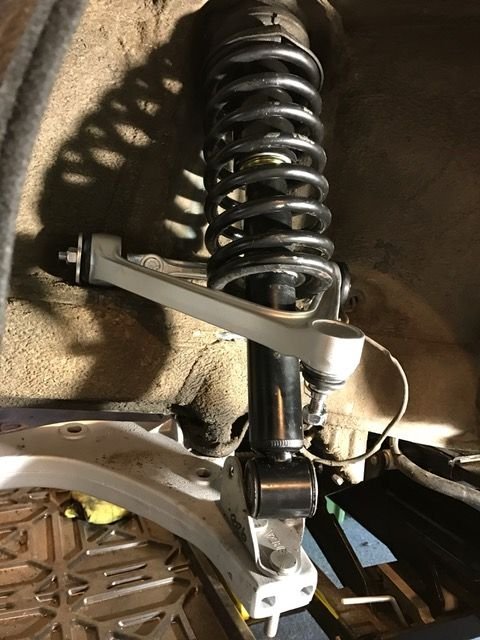
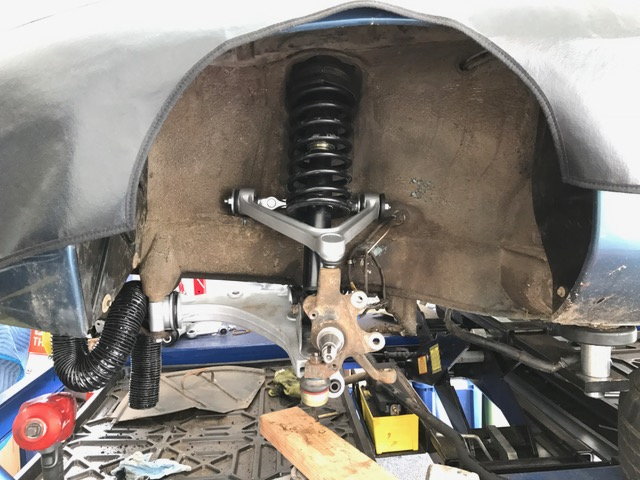
Maybe I'm crazy, but it looks like you're going to have a huge problem when you go to lower the car back on the ground.
The lower portion of the spring perch should not be resting on top of the upper A-arm. Unless that whole strut has movement I'm not familiar with, you're going to be resting the entire weight of the front end on the corners of that upper A arm, and either break it or the front of the car will ride like 4 x 4.
Understood, but I looked at the suspension in multiple ways and there is no way the a-arms can move if the perches are below it. There is even less room within the a-arms for the springs.
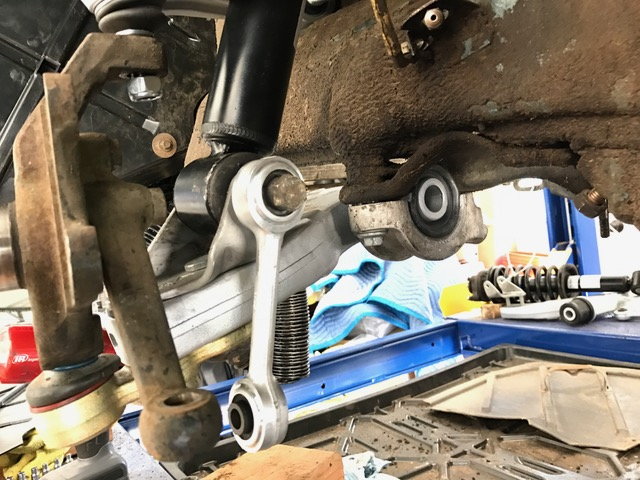
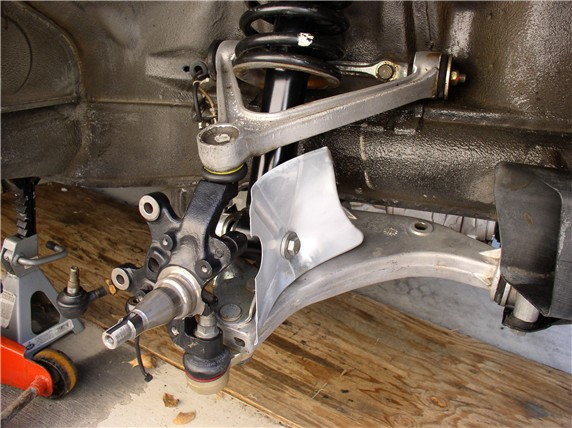
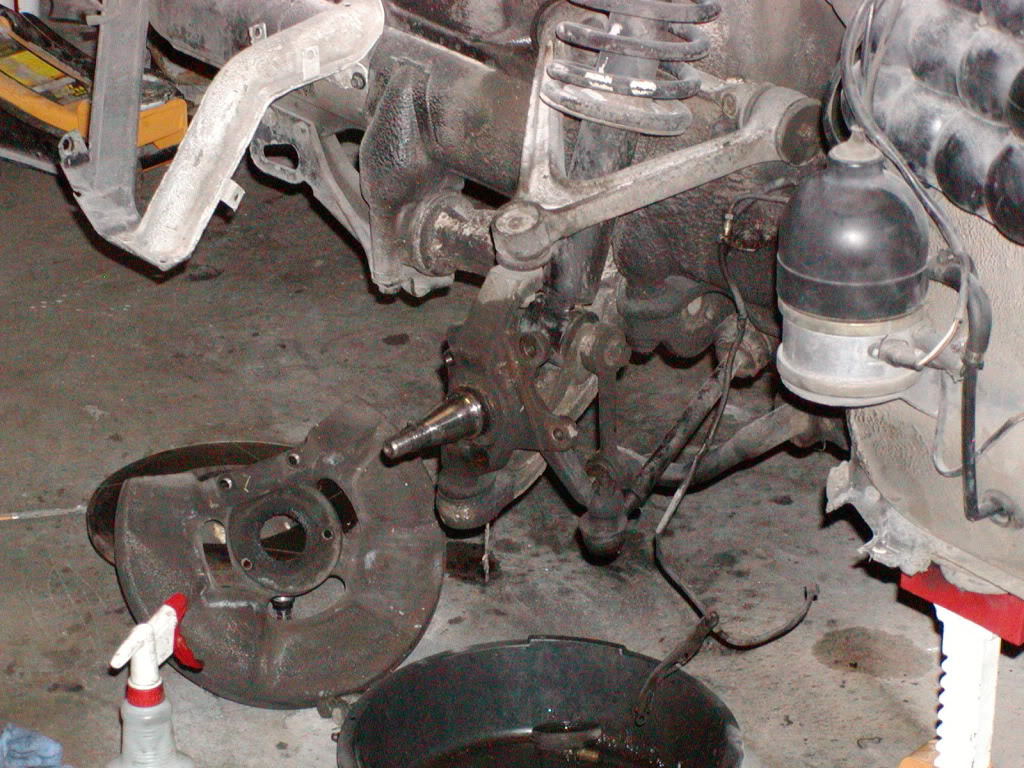
Here is a pic of another front suspension overhaul and the lower strut-spring perch is above the UCA triangle.
Originally Posted by corellian vette
Maybe I'm crazy, but it looks like you're going to have a huge problem when you go to lower the car back on the ground.
The lower portion of the spring perch should not be resting on top of the upper A-arm. Unless that whole strut has movement I'm not familiar with, you're going to be resting the entire weight of the front end on the corners of that upper A arm, and either break it or the front of the car will ride like 4 x 4.
You should install the upper control arm so it is horizontal when free, not hanging down. Yours may be horizontal, but I can't be sure from the angle you took the picture. The nuts on the end of the shaft through the A arm bushings lock the bushings in position when tightened. So, loosen and retighten them with the arm held horizontal. You should be able to get the upper arm horizontal by jacking under the lower control arm. If you install it hanging down, then it will elevate your ride height as the bushings do not rotate but are locked so that deflection of the bonded rubber performs as part of the resistance to movement.
This is an independent observation I made after detaching the upper control arm balljoint on cars with original upper arms intact. It would be nice to have some confirmation. It seemed logical to me that if you have the arm hanging down when you tighten the end nuts, the ride height could end up difficult to get down into spec range.
The rebuilt arms I got from 928 Intl came with the end nuts loose. I could find no specific torque spec for these nuts. Be careful as the shaft is aluminum. I assume factory original upper A arms come with the nuts tightened so the arm is horizontal.

 10-10-2016, 06:24 PM