When you click on links to various merchants on this site and make a purchase, this can result in this site earning a commission. Affiliate programs and affiliations include, but are not limited to, the eBay Partner Network.
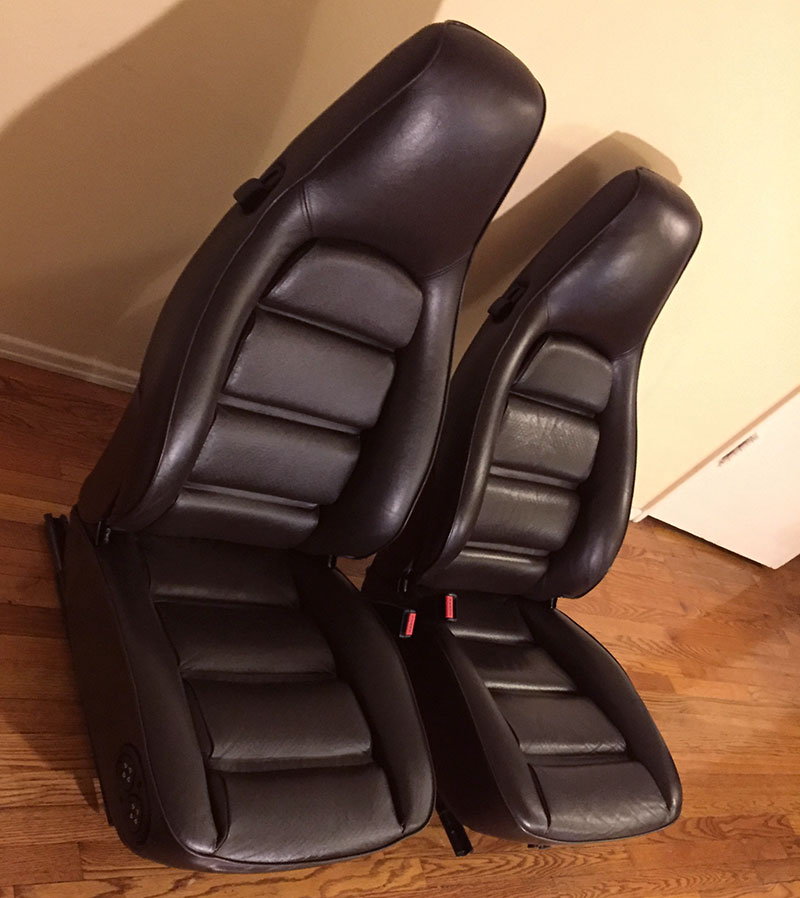
I’ve been on the lookout for a good original set of early chocolate brown leather seats for my 1983 car for a while. As there appears to be a total dearth of early seats that aren’t totally buggered, I snapped up a set of near-perfect later seats for cheaps (from an auto salvage place here in the valley, they have two other 928s on their lot but were too covered in car detritus to get a good look at them).
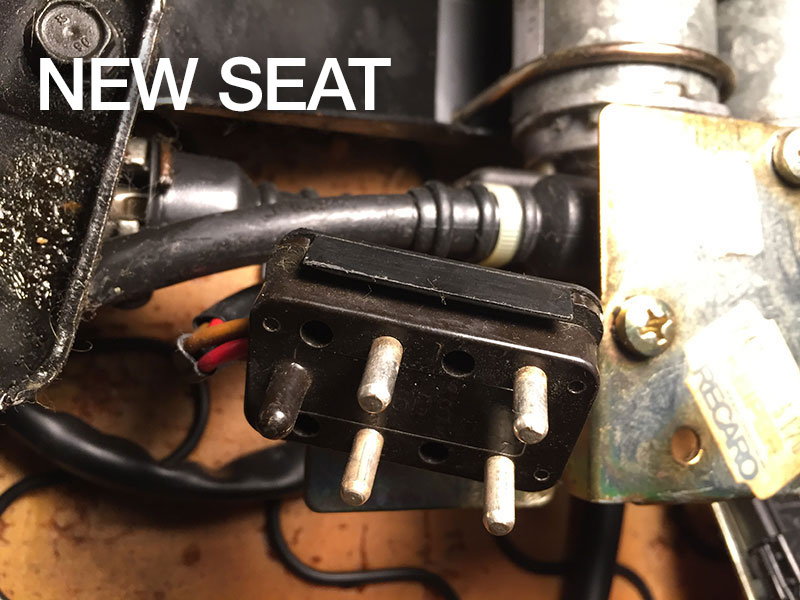
The electrical connectors for the old and the new seats aren’t even close and there are more of them on the new ones.
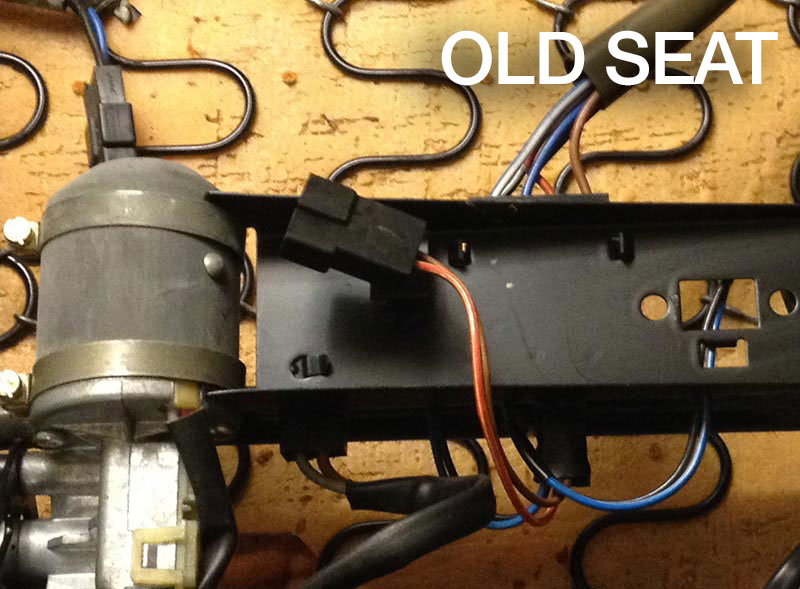
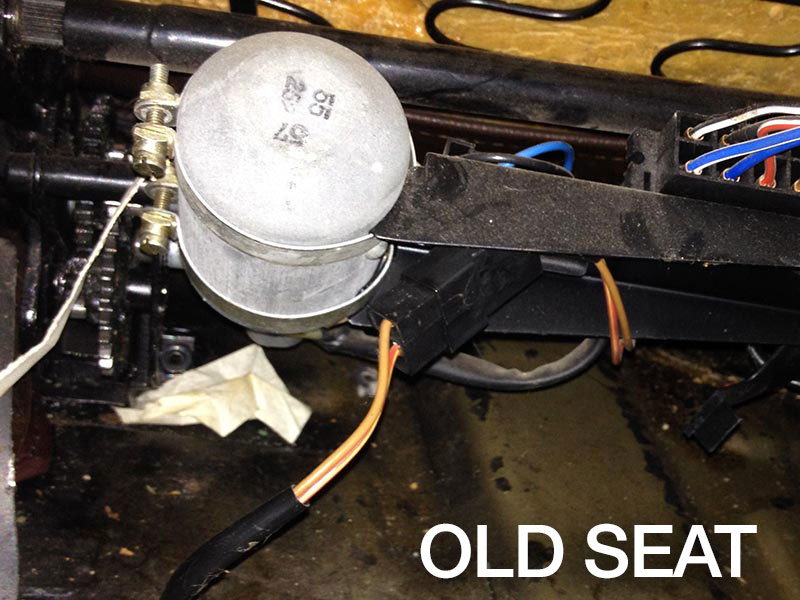
Here’s the single connector on one of the old seats (sorry for the bad shots, taken when I last had them out of the car)
The new seats have these connectors:
and the driver’s seat has this extra one (for lumbar maybe?)
Can anyone offer any guidance as to how I can make this work?
Thanks
but you did such a great job recovering the old seats
Hi Mark. Thanks, that’s nice of you to say. They’ve held up well but the color is a little off (kind of a purple-brown) and I guess I prefer the look of slightly aged real leather.
Plus they didn’t look factory at all. In my opinion, even seats that have been professionally retrimmed never look quite right. Always something ‘fake-*****’ about them.
Originally Posted by Mark Anderson
picture 4 looks like the connectors to the motor itself
Not rocket science. You test resistance with a cheap multimeter -> this tells you which wires drive the same motor. Then you apply 12v and see what each pair actuates (only on those that have resistance).
Each motor needs a pos and neg. Your harness supplies pos & neg. Keep in mind this applies only to the large flat connector The other wires are for seatbelt warning.
Now you will have some fun with the connectors but if you're going backwards its easier. Either be willing to destroy, or use watch flat screwdrivers to extract each wire from the block; be sure to tape & label as you go. From there, easy peasy.
That black connector lasgt pic I believe is seat belt warning. The flat black spade females are I believe motor pos & neg ... possibly from a removed memory module? Either way -- keep remembering. Motors -> pos + neg -> car has those -> simple..
Forgive the typos I was cooking with my new toy (mandolin) and I have @#$%^&* band-aids all over my fingers LOL
Thanks for your reply heinrich, I appreciate it. Okay, I’ll need to unpack your comments/suggestions a little further and buy a multimeter and figure out how to use it. It’s about time I learned. I have one somewhere I think.
In the meantime, is there anyone out there who has done this retrofit and is happy to tell me what it was like? I would be even more grateful if you could describe what you did as though you’re talking to a five year old.
I have not done and old for new conversion,but I did recently do a bunch of work to my 1986 seats and may be able to explain the wiring somewhat.
You're going to need to make a connector between the car's wiring and the wiring in the seats you have purchased. I would suggest trying to make a little bridge connector that plugs into both ends, so that oyu don't have to cut the wiring on your car's end or your new seat. Perhaps you can obtain a few inches of wiring from a parts car, with the connectors for each side. Otherwise you'll have to come up with connectors or cut wires, and I like keeping factory wiring intact as much as possible.
Looking at your photos...
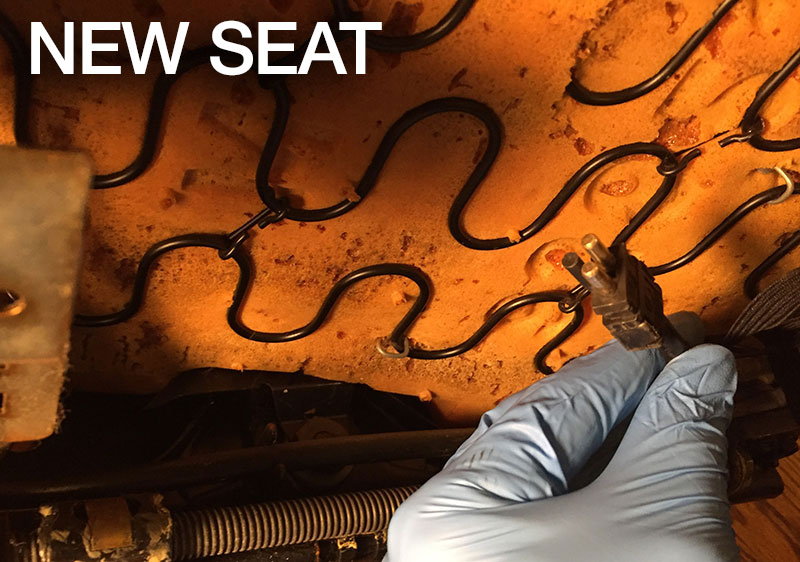
the last photo of the connectors shows a wire that goes to the seatbelt buckle, probably for the warning light that your seatbelt is unhooked. This is the smallest of the connectors pictured on the seat, and you'll be able to see that it goes up to the buckle.
photo labelled New Seat where your blue gloved hand is holding two very small wires -- this is the wiring within the seat's harness that brings electricity to the motor that moves the seat. Each barrel like motor has a set of these two connectors plugged into it. They provide 12v & Ground when the seat movement switch is pressed in one direction, turning the motor clockwise. When the sat switch is pressed in the other direction, the 12V and Ground are reversed through the same wires, and the motor turns the other way. this reversal is done Inside the seat switch, which is a fairly complex mechanical switch (that you should not need to open or mess with to do your conversion to newer seats).
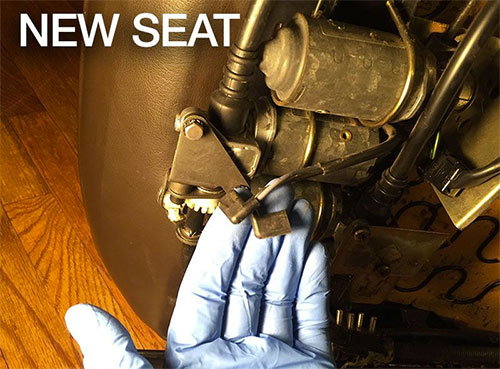
The Crux: the third photo labelled new seat shows a rectangular connector with 5 prongs sticking out. This is where power is carried into your seat from the car's wiring harness.
You can pry open the back of the plug connector fairly easily. It is a backing plate with little tabs along the lenght of each side. Inside, you will see how there are 4 prongs carrying electricity, but they are only carring 12V or Ground, and of the four, they are hooked together in pairs. Basically, two of the prongs carry 12V and two carry Ground. One set of each goes to each seat switch.
When you open the back of this connector, you'll see how 12V is going to one pair, and ground to the other pair. You'll need to make a connecting plug that goes from your car's plug (which apears to have 1 12V wire and 1 ground wire) to this plug (2 12V and 2 grounds). The actual wiring is simple, it is finding the nice connectors that may be difficult - but if you have access to a parts car... The rectanglular connector pictured is actually a very nice set up, bc it is bulky enough to carry the wires, but easy to plug and unplug.
So you'll make a connecting little "mini harness' that hooks to the Car's end of the wiring, which is probably one 12V wire and 1 ground. it'll split into a Y shape, and hook into the wires from the big rectangular connector, bringing 12V and ground to each seat switch (if you follow the wires through the seat's wiring harness, that's where they go).
I sure hope this makes sense. I am working the reverse of my usual shift, and my body and brain are a little confused - going to work at 3am tonight, instead of coming Home at 3am!
Sorry to be tedious, but the small female spade connectors here:
Originally Posted by fiatrn
photo labelled New Seat where your blue gloved hand is holding two very small wires -- this is the wiring within the seat's harness that brings electricity to the motor that moves the seat. Each barrel like motor has a set of these two connectors plugged into it. They provide 12v & Ground when the seat movement switch is pressed in one direction, turning the motor clockwise. When the sat switch is pressed in the other direction, the 12V and Ground are reversed through the same wires, and the motor turns the other way. this reversal is done Inside the seat switch, which is a fairly complex mechanical switch (that you should not need to open or mess with to do your conversion to newer seats).
I’m a little confused: ‘this is the wiring within the seat's harness’ does that mean that I don’t connect them to the car’s original 12V and neg as I am doing with the larger connector with the pins (also in the photograph, next to my pinky)?
Sorry to be tedious, but the small female spade connectors here: I’m a little confused: ‘this is the wiring within the seat's harness’ does that mean that I don’t connect them to the car’s original 12V and neg as I am doing with the larger connector with the pins (also in the photograph, next to my pinky)? What do these female spade connectors connect to?
The female spade connectors connect to male spade connectors directly mounted on each motor.
This is a great thread! I'll be doing the same job on my '84 as soon. Please keep updates posted with your progress. I've searched over the years and there are very few threads discussing installing newer seats in OB cars.
The female spade connectors connect to male spade connectors directly mounted on each motor.
Great, thanks. There they were.
Originally Posted by z driver 88t
This is a great thread! I'll be doing the same job on my '84 as soon. Please keep updates posted with your progress. I've searched over the years and there are very few threads discussing installing newer seats in OB cars.
Well, I'm pleased to say, this really was an easy job. All you'll be doing is combining both grounds and both 12v connections into a single ground and single 12v. Everything is color coded so you really don't need to break out the multimeter and figure out how to use it. In terms of bolting it all in, everything fits just like the old seats apart from the old plastic covers; they aren't compatible with the new seats. Here's my not entirely elegant piece of guerrilla engineering which thankfully didn't require destroying anything:
Genuinely great feeling to have a presentable interior and though the idea of the wrong era seats in my 1983 car did gash me to begin with, doesn't seem to bother me anymore.
Did you put a "wanted" thread on here? If so, I must have missed it. I have a nice set of brown early seats that I couldn't use in my nephew's '85 since there are no tapped holes for the seat belts. I would sell them. Oh well. It looks like it worked out for you after all. I personally like the look of the new seats versus old.


 03-31-2016 | 07:06 PM