When you click on links to various merchants on this site and make a purchase, this can result in this site earning a commission. Affiliate programs and affiliations include, but are not limited to, the eBay Partner Network.
I have a photocopied shop manual in FAT binder, but the procedures for removing and replacing the Brake MC seems to only cover up to 1986. There are descriptions of pressure regulators attached to the MC on post 84 ABS equipped cars, with photos, but I'm not seeing any of that on the MC in my 88. Actually, things look WAY simpler on the 88 compared to what is in the manual for any of the year specific procedures. I see a MC with a reservoir on top and brake line fittings that are easy to access.
But step #4 describes a brake line between firewall and MC that I can't see or feel. So, again, this procedure seems to be for cars older than mine.
These appear to be instructions based on a combination of referring to the shop manual and experience. Steps 7 through 9 are not mentioned in my copy of the shop manual, and seem like the kind of thing a savvy mechanic improvised to make removal easier.
Would appreciate any comments on the procedure or tips from experience before I get too much farther into it. I have a Power Bleeder and the ATE Super Blue fluid, and a new ATE MC from Roger. I was happy to see a new O-ring for between the booster and MC is included.
I'm sucking the fluid out of the reservoir this afternoon and hope to have the new MC in and system bled by the weekend.
Last edited by Captain_Slow; 06-27-2015 at 10:40 AM.
Reason: Improve title for relevancy
Correct late model 86 1/2 > is simpler at the master cylinder .... also has a bleed screw on the master which helps get out the air. The lines however run to the ABS unit in the left front fender which is more complicated can be harder to bleed the system.
Jim -
Thanks for the info. Do you happen to know what the symptoms of air in the ABS section tend to be? Assuming I were to observe said symptoms, do you know the procedure to remove the air? I'm guessing it could require cycling the ABS "pump" but otherwise I'm in the dark here.
PS: That's a great avatar pic. Like it!
Last edited by Captain_Slow; 06-24-2015 at 09:52 PM.
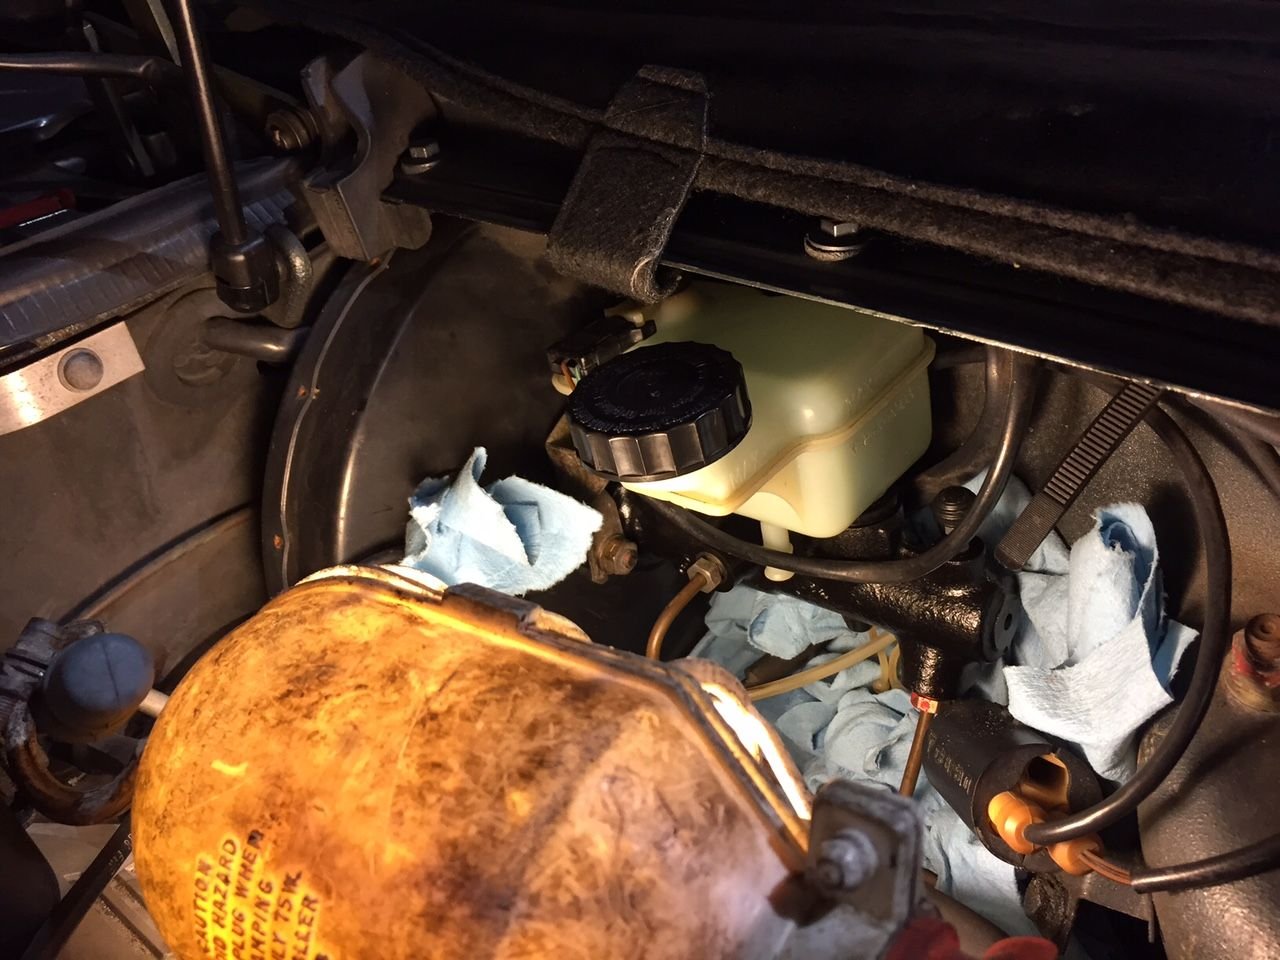
The "sucking the fluid out of the reservoir" didn't go as planned. Thought I'd share why, how I got around it, and what I did to remove the reservoir and loosen all the hardware before stopping for the day.
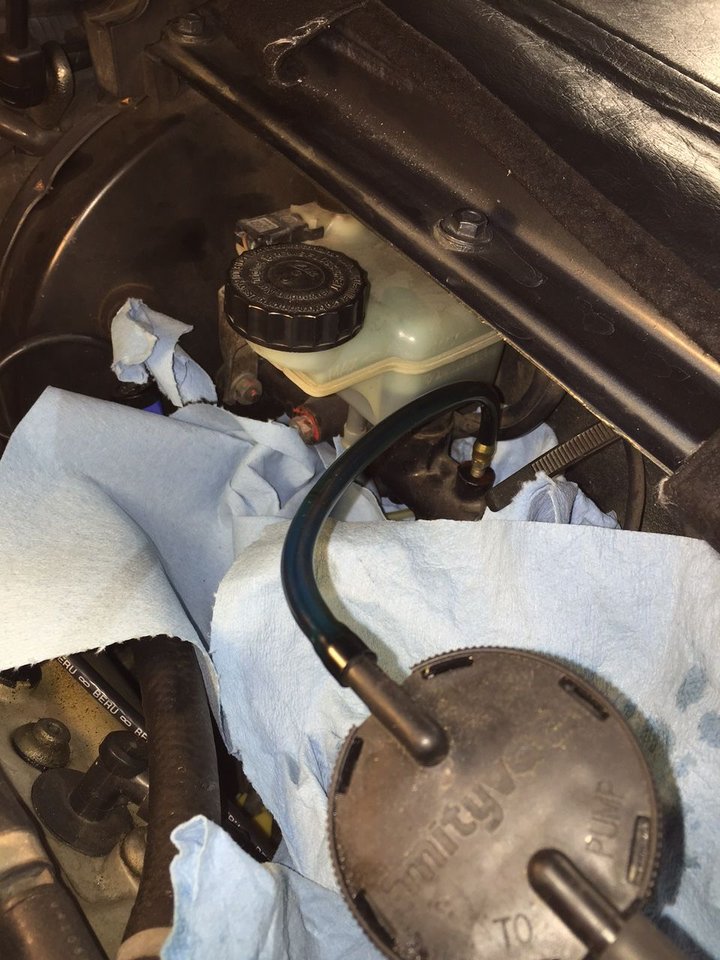
First I loosened the filler cap (leaving it loosely in place to prevent debris falling in). I attached a clear hose to my MityVac and tried to shove it down the brake fluid reservoir filler neck. Not possible. So I thought the bleeder on the MC might work. I cracked it open and fluid slowly flowed. So I attached the hose on the MityVac to the bleeder, opened the bleeder and pumped the MityVac a few times to create vacuum...and watched the fluid flow and the level in the reservoir drop. When the catch bottle was near full I pumped the MityVac to restore vacuum and pulled the hose off...not a drop of fluid anywhere.
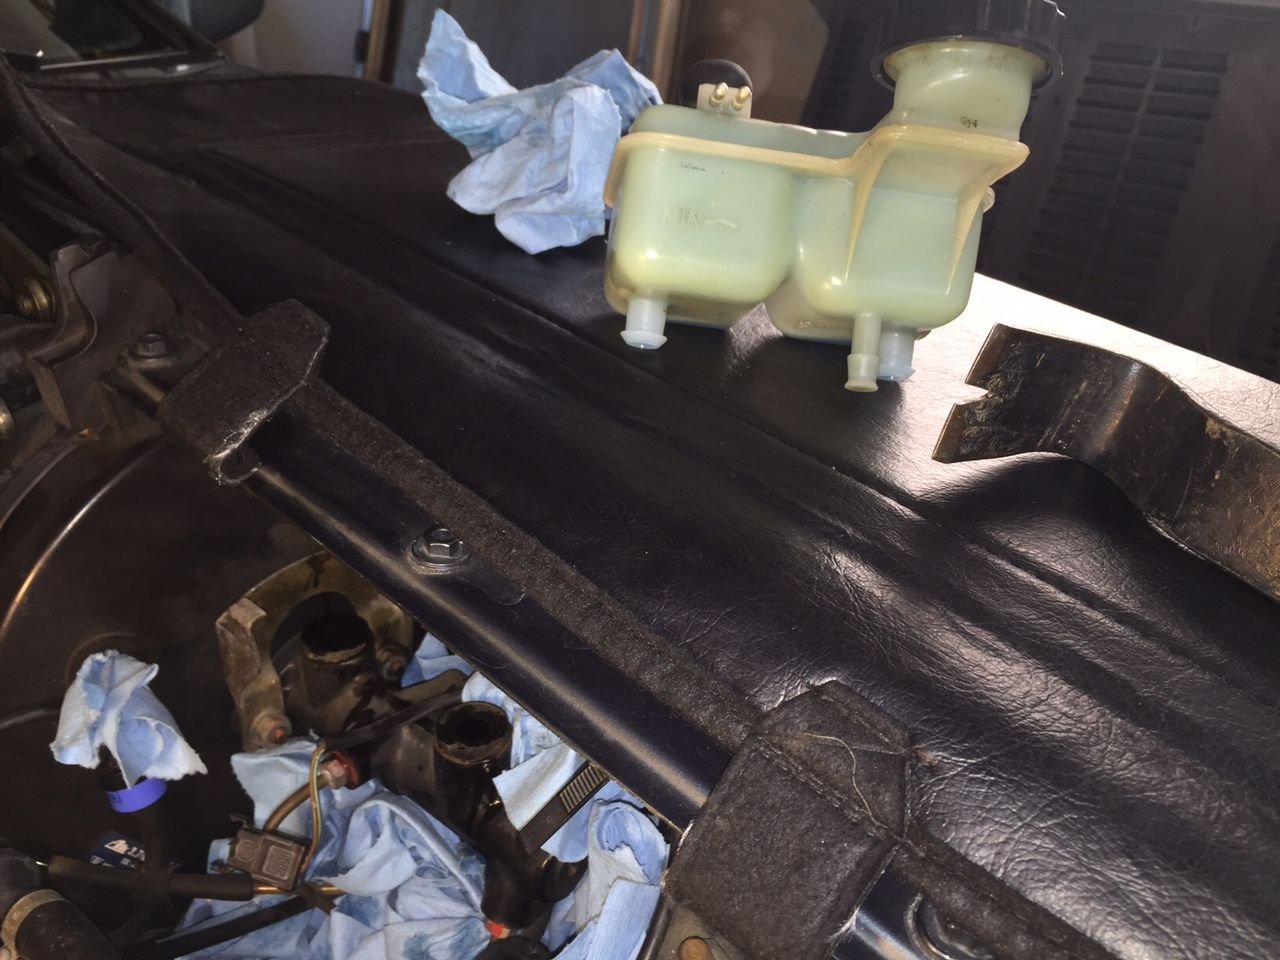
Then I used a flat "demolition bar", placing the "fork" of the sharply angled portion shown in the photo between the two reservoir ports on the MC. Leveraging on the MC itself I was able to apply well controlled upward force while wiggling the reservoir a bit...then pop. It was out.
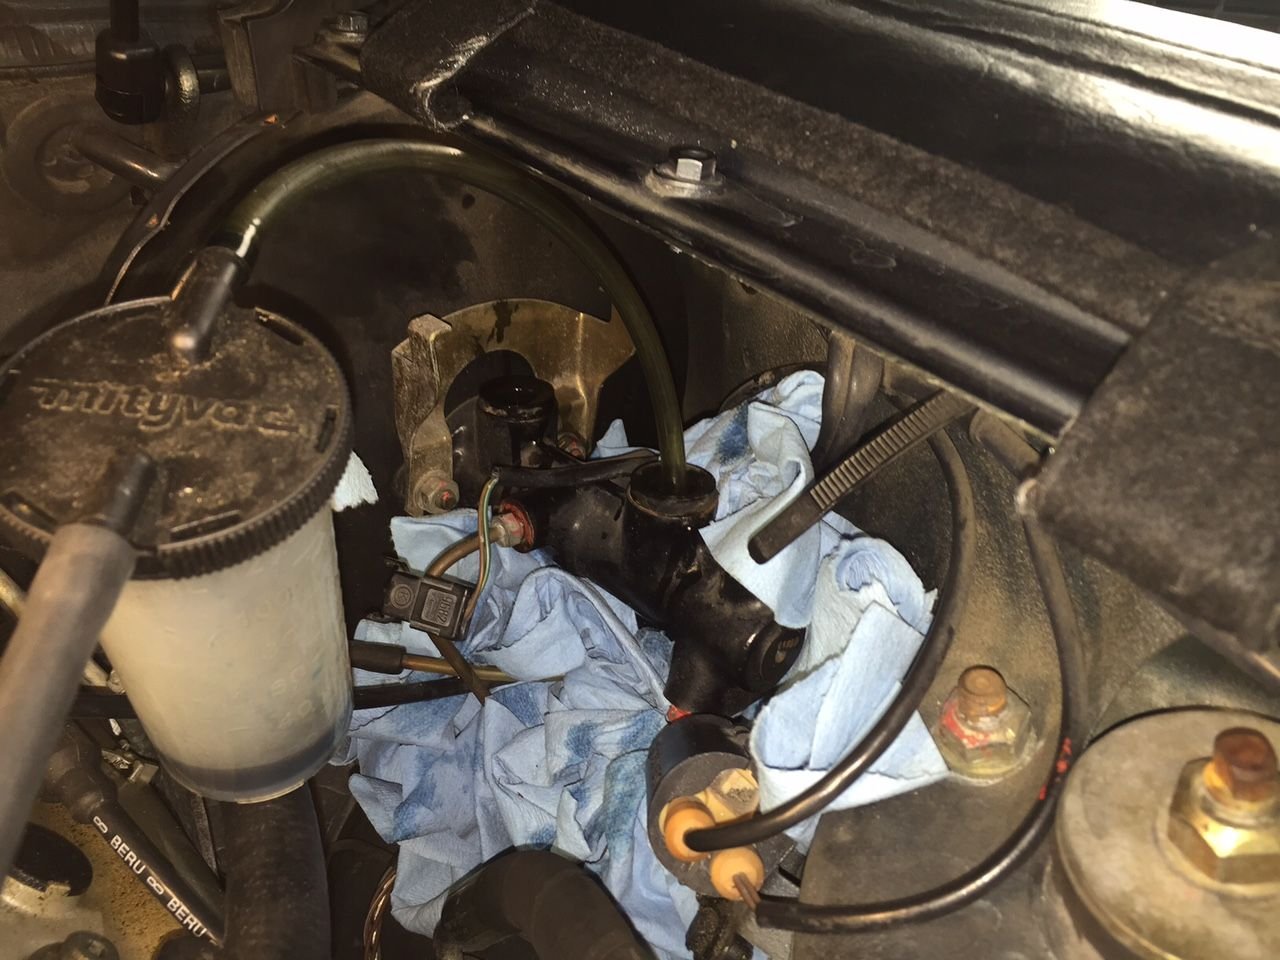
Sucked remaining fluid out of the MC before disconnecting the brake lines.
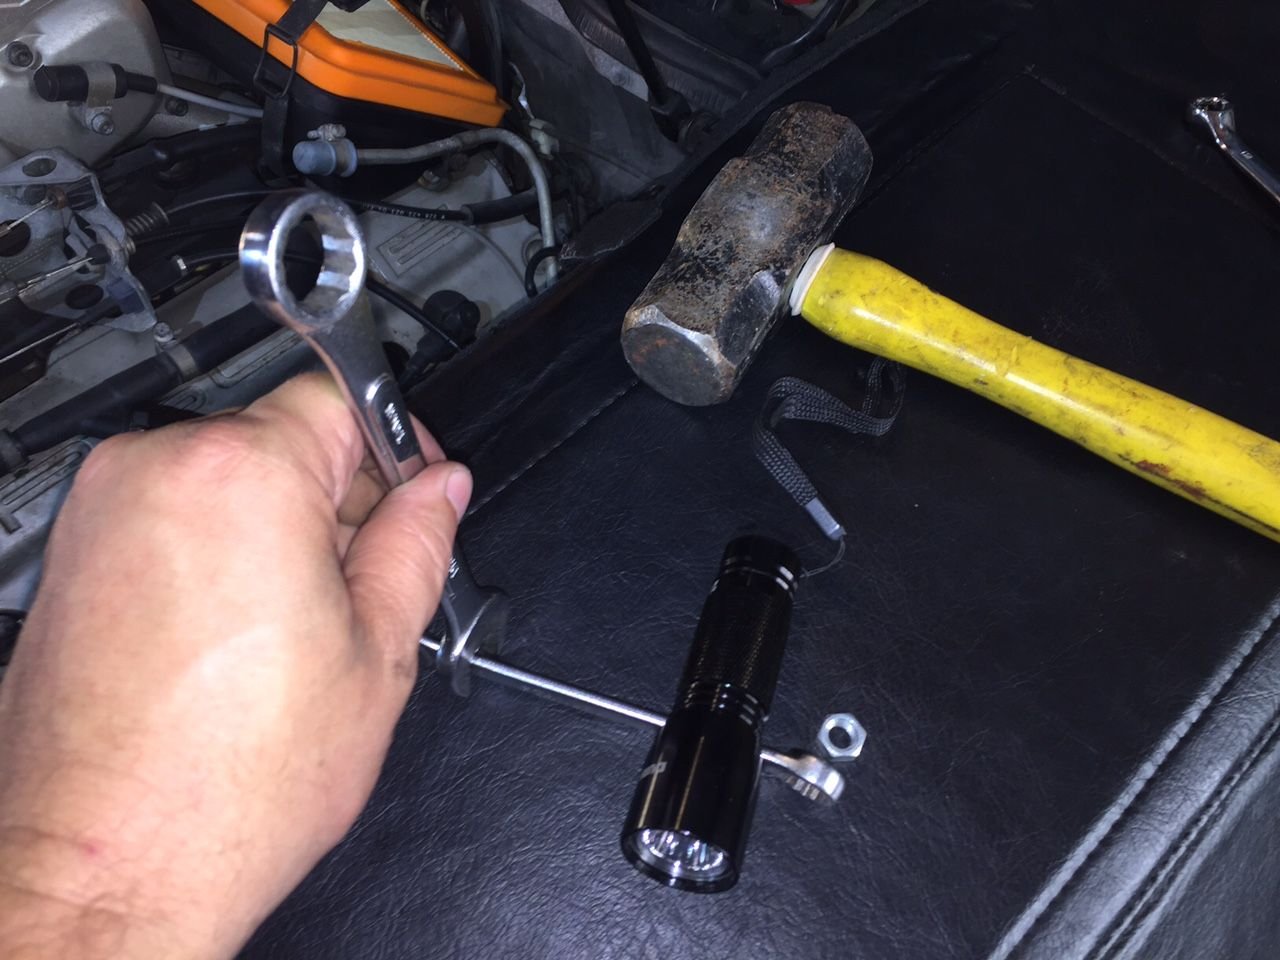
The MC is held to the booster by two nuts. The inboard nut is easy to reach and loosen with a 13 mm wrench. The outboard nut is in a tight space. It didn't look like I could use an elbow and socket in the space available. So I got creative. Imagine the flashlight in the photo is the barrel of the MC, and the nut represents the outboard nut that's so hard to reach. Two taps from the "MC Hammer" (couldn't resist) on boxed end of the larger wrench in my hand loosed the nut. Then working a 13 mm stubby from above and below freed it to a little more than finger tight.
Last edited by Captain_Slow; 06-27-2015 at 10:35 AM.
Installing the new MC was easy. I followed Stan's advice and applied a thin coating of DC-111 on the large O-ring between the MC and booster, and thin coating near the top of the grommets and on the barbed pipes of the reservoir (very thin coating). The reservoir installed very easily.
The pic shows current status...no fluid added yet.
Now I'm faced with bleeding the MC and trying to not push air downstream toward the ABS module. There's likely a little bit of air near the mouth of each line coming in to the MC. Some questions:
1. What's the technique for tightening the line fittings without over tightening? special torque wrench, feel?
2. Can the MC be bled sufficiently by filling reservoir, opening the bleeder, and applying vacuum with Mity_Vac to help increase flow and draw out air? I'd repeat this step over a period of days, using lots of cheap DOT4 until no more bubbles, then ATE Blue. Plan to jack up driver side of car to improve angles for bubbles to exit the lines into the MC and rise to the bleeder valve. Wishful thinking?
Last edited by Captain_Slow; 04-14-2017 at 11:54 AM.
NOTE you may feel like being in a hurry here BUT take your time, slower is better.
From here this is how I would proceed.
NOTE Only use the ATE fluid.
NOTE mixing the fluids could induce seal swell and damage the new parts.
This is done via gravity. no pressure bleeder.
Fill the MC with ATE, Wait for 20 mins till the fluid works into the MC.
then one at a time, open each line about a half a turn .
Wait ,.....you will see fluid and bubbles start issuing from each bleeder ,
once the fluid is clear move to the next line.
NOTE start at the rear of the MC and move to the front.
Once you have the lines bled then open the tip and let the air out.
Get a helper to operate the foot pedal and then do the lines sequence again.
This will be to bleed the MC.
pump a few times slowly,
hold down,
then crack the line nut.
You should have minimum bubbles but possibly a few.
When the line is clear fluid move to the next, then do the tip bleeder.
Once done,
then move to the ABS unit and do the line nuts there till you get blue fluid clear of bubbles.
Once done then do the wheels .
NOTE open the inner bleeder first till you get blue fluid,
then do the outer bleeder.
Follow this sequence ,
NOTE its opposite what has been done,
but its also pointed out in the WSM
LF, RF , LR, RR.
It seems like a lot of bleeding and you will use most of the litre of fluid ,
but the brakes should be high and hard when your done.
Caution .... NOTE ...before bleeding I would also suggest to replace the rear brake proportioning valve screwed into the ABS unit as these always are filled with corrosion
Finished up the MC bleeding today. Brakes feel great. Now the pedal feels firmer than in our 2013 Subaru Forester. Took it for a drive and it was one of those "feels like a new car" moments. Much better feel and modulation (fluid was likely leaking past worn seals). I did see evidence of corrosion grit looking into the MC through the forward reservoir port.
I didn't do the entire system bleed yet. I'll do that with a PowerBleeder just to put fresh fluid in the whole system. I followed all of Stan's steps relating to just the MC (didn't move on to the ABS unit lines). I figured why push air downstream when any reasonable air bubble would rather stay up high, very close to where the lines connect to MC. That's the only place where fluid may have purged upward leaving a very small air gap after reattaching the lines to the NEW MC. But I took Stan's "going slow is better" to the extreme. I did everything he suggested over a period of a week...like every other day. And from the very beginning I helped the air out by applying a slight vacuum to the bleeder at the tip of the MC. I figured creating a negative pressure at the "exit" was a good way to get those bubbles running to the door.
After each MC bleeding cycle, which included my wife holding the pedal down for those portions of the process (first round obvious air being pushed out), I snugged up the brake line fittings and the MC bleeder, added a little fluid to the reservoir, and walked away for a few days. Then repeated the process until there was only fluid - then waited another day and did it all one more time and got only fluid again. Done.
Relatively easy job. Sucking the fluid out of the reservoir before removing the old MC is not as easy as it sounds. Even a small hose attached to a Mity-Vac isn't going to fit through the reservoir neck. Instead, I attached the Mity-Vac hose to the MC bleeder and sucked almost all the fluid out through the bleeder. Worked great...better than I expected. Take care to avoid fluid getting on painted surfaces. Stuff lots of towels under the MC and use service covers and perhaps blue painters tape along the inside lip of the fender above the MC. Using gravity and working very slowly does pay off.
Great way to remove the MC reservoir w/o a mess!
Those Miti-Vac's do come in handy, used mine to vacuum bleed my son's Harley brakes last week.
Thanks for posting.


 06-24-2015 | 12:52 PM