When you click on links to various merchants on this site and make a purchase, this can result in this site earning a commission. Affiliate programs and affiliations include, but are not limited to, the eBay Partner Network.
Andy,
I tried PB blaster overnight. I have been dribbling it in above the spring perch where it appears Blaster could run down on top of the threaded sleeve. I tried spraying some up between the collar and shock body...that was a great way to apply Blaster to my hand.
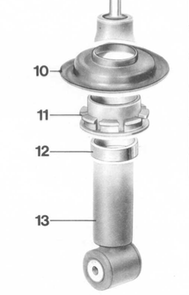
Is there a diagram that shows a cross-section of the adjuster anatomy?
The inside ring is on the load path from the chassis to the wheels. From shock tower to spring to lower spring plate to adjuster collar to inside ring to lower half of shock to lower control arm to wheel.
I'm not sure what would happen if the threads were disengaged, but I would guess a big kaboom. At the least, if the spring plate came to rest on the inside ring, the adjuster would fall loose. I think.
I'm sure you're right and I'm wrong about adjuster coming off collar. If it had there would be nothing constraining the spring and its perch which would move downwards rapidly...
I think this must just be common situation of adjuster seized on collar, so the whole thing rotates round shock with no movement on threads.
It doesn't show the three nubs on the shock that the inner ring rests upon (and too easily rotates upon). I wish I'd seen the struts disassembled, but I had a shop do what they called the "widow-maker" stuff. Next time, I'll ask, with false innocence, if they would please move the adjustor a half-inch up or whatever.
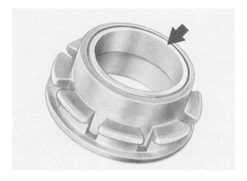
Here are the pair of 165K mile front shock threaded rings and adjusting collars from the '91 GT I've been working on - As off the car on the left, and bead blasted to within an inch of its life on the right. (The car was in Amarillo for 8 years, then Chicago from 1999 to 2014...) Perhaps I should have tried to rotate these while they were still in situ, but I'd guess they would have been well and truly stuck together. Even cleaned up these things have galvanically welded themselves together.
Much easier to just get a pair of replacement rings and adjuster collars from 928Intl and be done with it:
That one on the left looks like it spent a few decades on the bottom of the ocean. I agree, even expected galvanic corrosion will easily bind these together. CLR might work better than PB Blaster. I may put this off a year and enjoy my car this summer. Raising the rear to 165 from 154 caused the front to drop from 155/153 to 151/150. Dropping the rear should raise the front a few mills.
Well, it would be an interesting experiment to throw the assembly into a 400F oven. Delta-alpha X delta-T X diameter. If the diameter is 2 inches, the threads should open up 0.005 inches, perhaps enough to overcome the corrosion products. Use your barbecue C-wrench on the adjuster, and your .... I have no idea how to counter-hold the inner ring. Never mind.
Rob - the inner ring is at the opposite end of the collar from mine, and Jon's. Is that where you normally find it? It would mean that our cars did indeed have low-rider PO's, as suggested. If I could find him, I'd make him fix my smashed plastic.
I have installed a couple of sets of front shocks (Boge and Bilsteins) on various cars and always just put the rings (beveled side down) flush with the bottom of the adjusting collar, with a light coat of superlube on the threads. Once settled with stock springs this will be close to 180 mm in front, or a bit higher- always easier to adjust the height down than up, in my limited experience.
I don't have access to them right now, but I have a feeling that there's something in the WSM to effect that initially the adjuster nut should be set flush with the top of the collar. Can anyone please check this? That would fit with Rob Edward's data point that setting the bottoms flush results in 180mm. I set new springs/shocks with the adjuster flush at top and had to dial in a few turns to raise them to 175.
This is about what I have in my car. The ride height is more than an inch low (fender height). It would take more than ten turns (1/2 inch) to get it right (I'm guessing at the tpi).
In Rob's photo, the adjuster is upside down, right? So it is not what the WSM suggests as a good starting position. OMG! is the WSM wrong?
Quite possible...especially when it's the kind of thing that is the inverse of what it should be. It also might explain why all of our adjusters are set like the WSM illustration. Mine look exactly like that illustration...using a small mirror to look up from the bottom I see about an inch of exposed threads.
Ivan,
I find it odd that your car, Curt's, and mine are all experiencing the same symptom (adjuster collars apparently seized on the threaded sleeves) -- and all are set very low (150-ish) in front.
I think in my case just the springs settling after 300>k miles ;-)
Maybe the most informative part of those pictures is the really short length of the inner threaded part that sits on the shock tube. You'd know right away if in fact the adjusting collar was below the little ring, you could easily see it inside the spring. Meanwhile, when you do reassemble, remember to slather the pieces with nevr-seeze, including the whole inside of the outer collar, plus the part where the spring plate sits.
On adjusting rear and the effects on front height-- the measuring points for the front are actually behind the tire, so lifting the rear usually moves the front measuring pads up too. Assumes that you adjust the same side to side. You need to go drive the car some after each adjustment too. Adjusting is an iterative process with driving between adjustments and measurement to get the suspension to actually move.


 03-30-2015 | 11:37 AM