When you click on links to various merchants on this site and make a purchase, this can result in this site earning a commission. Affiliate programs and affiliations include, but are not limited to, the eBay Partner Network.
Thanks Docmirror. That is exactly the question I had - Can I pull it with a gear puller and if so, how to do it (2 vs 3 jaw) without damaging it (thin metal washer and a plastic piece are right behind it)? Hopefully I can do it without damaging the rear guide washer so I don't have to wait for a new one to arrive. I was surprised that Dwayne's write-up is so cavalier toward removing that gear - it makes it sound as if it just slides right off whereas removal of the other gears is discussed in detail.
Well, sometimes that gear falls off in your hand, other times - not so much. Mine was stuck on too and I just started pulling on it, and warped the inner washer a bit. a few quality minutes with a hammer and a bit of filing and I was back in business. The trick is to pull enough to get at the back side of the gear, and then re-grab the gear so the inner washer isn't beat to hell. Then take the washer off and dress it up a bit.
Have a tube of anti-seize before assembly, and use it on that gear, and the tension pivot shaft, and all the water pump and thermostat bolts as well as the tensioner bolts.
Are you thinking of doing your crank seal? Hard to know what it's doing with all the stuff in the way.
When you've worked on a spotlessly clean 928 its really irksome to work on one covered in 30-years of leaks. And it takes twice as long.
The above is what I have always posted in answer to the cleaning question.
P21S Total Auto Wash is a citrus-based cleaner. Dilute it 50/50 with water. Spray it on. Let it sit for a bit and then paper-towel wipe and/or agitate with a brush then wipe off. It still takes a while to do; I've not found good substitutes for elbow grease that aren't seriously messy.
When done, rinse with a spray of distilled and wipe more.
Brakekleen can be harsh on plastic, paint, harnesses, hoses, and your brain cells. And, as above, it 'goes away' really quickly. And it's not cheep either.
I use brakekleen on a toothbrush for stubborn areas or on cosmoline. That and a plastic fork (or similar plastic-like 'stick-thing') on a paper towel with the P21S will get you pretty far into nooks and crannies.
But, as above, there's no good substitute for patience and elbow grease. Clean everything you can get to as you take stuff apart and clean bits again before you put parts on. And take before and after pictures so you can feel good when you're done...
I had heard about P21S but had never used it until today. Thanks to your recommendation I bought the small 1000ml sprayer of it and started to use it on a very oil caked 330CI today. This stuff works damn good. I usually just use my Wurth Refill station with brake cleaner but I just ordered the 5 liter refill of the P21S.
On the gear removal, it -should- come off with minimal persuasion. But, there's a chance that the key is not level, perhaps due to movemnt while pulling the harmonic balancer off. On some really stubborn gears, I've discovered that a little tap with a brass drift and a small hammer is neede to square the key up with the nose of the crank.
Those belt-guide washers are cheap enough to be considered 'consumables', and should probably be part of the Care Package you request from your parts supplier. Meanwhile I've used a small tack-puller to get between the gear and that back washer to get it started moving. Might do as well with a right-angled screwdriver with the tip sharpened.
... P21S but had never used it until today...
Thanks for this recommendation, I'm impressed.
Glad it worked out. I've found that it works best, with the easiest cleanup, when it's diluted 1:1 (or 2:1) with water. That's for cleaning serious gunk. Sprayed straight, in fully concentrated form, it can take a lot of rinsing to get it all off.
You can get the exact same stuff under a different label for a bit cheaper.
I'll point BRB-83-911SC at this thread and he can chime-in with the alternate labeling...
You can get the exact same stuff under a different label for a bit cheaper.
I'll point BRB-83-911SC at this thread and he can chime-in with the alternate labeling...
I have used S100 Total Cycle Cleaner. It is citrus based, and was told it is the same as, or very similar to, P21S. Targeted for cleaning and degreasing motorcycles.
OK, just finished Chapter 21 of Dwayne's procedure (installing power steering pump and alternator after filling tensioner with gear oil). So I'm getting near the end. I did end up removing the radiator, so I'll have a couple of extra steps to reinstall it.
Next question:
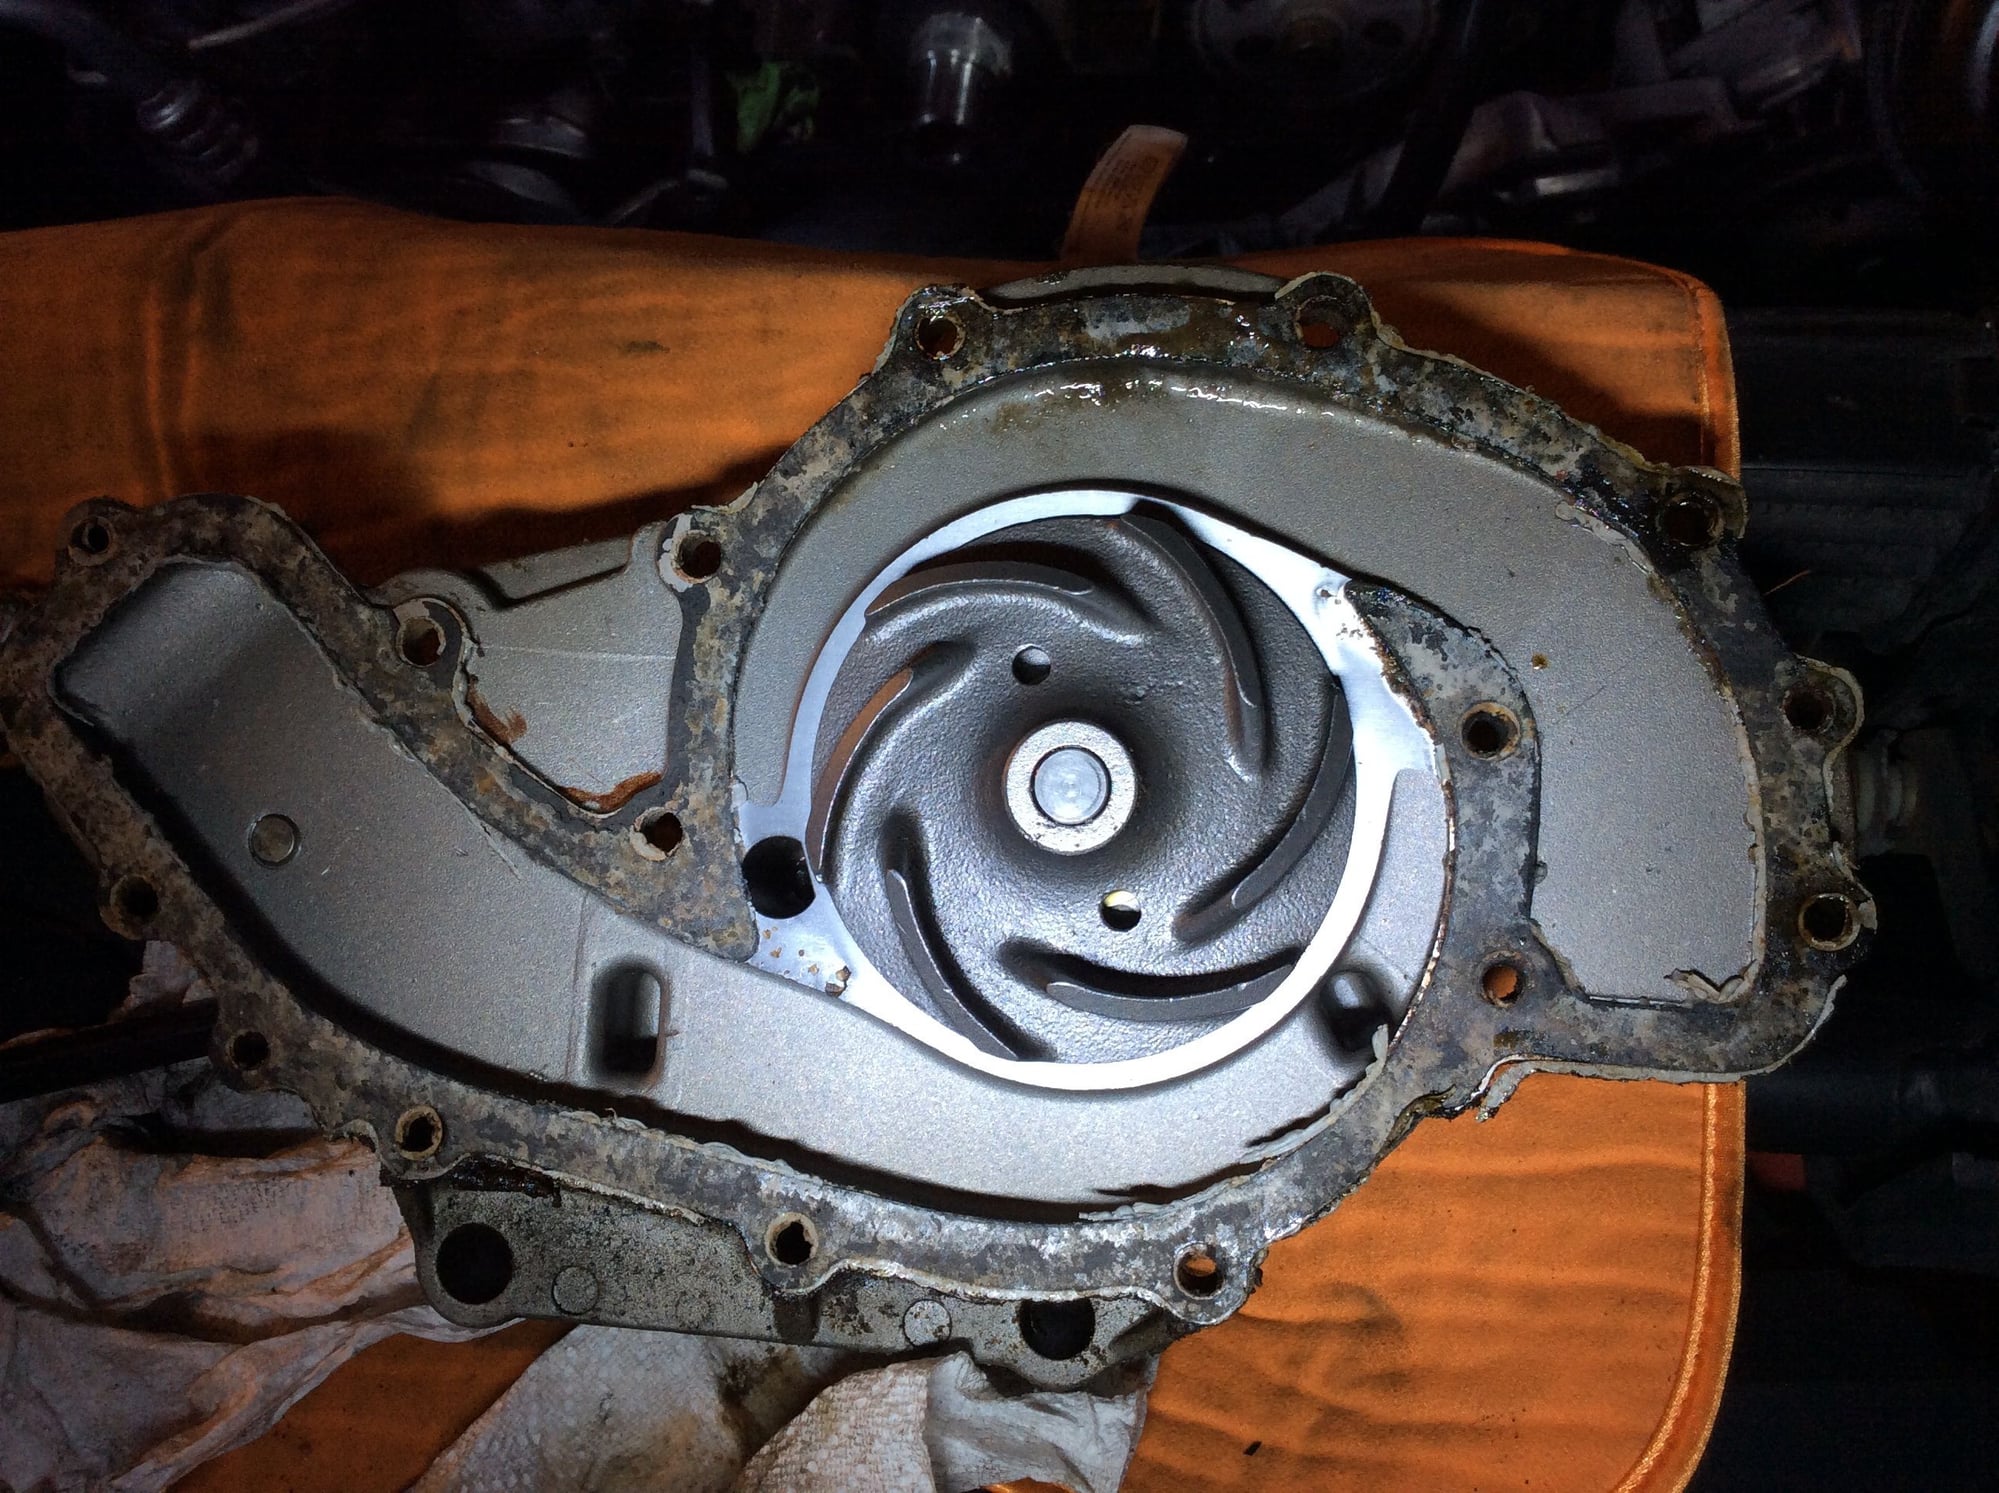
When I took off the water pump, I found sludge in it. See pics below. I cleaned out the recesses in the block. The procedure had me drain out the block and radiator. Should I do anything further or will filling it with fresh coolant on top of the above steps suffice in eliminating the sludge?
I expect to get this wrapped up this weekend with any luck!
Should I do anything further or will filling it with fresh coolant on top of the above steps suffice in eliminating the sludge?
Yuck.
1. I would pull the block drains (if you've put them back in already) and pour water in to get rid of as much of that as possible.
2. Put it back together and ...
3. Read threads on flushing the cooling system.
Note that if stop-leak has contributed to that sludge you may soon be finding out what leak the stop-leak was stopping.
Yuck.
Note that if stop-leak has contributed to that sludge you may soon be finding out what leak the stop-leak was stopping.
Yeah, I'll bet stop leak is what caused that sludge. Duh.
I'm hoping that if stop leak was used, the water pump or water pump gasket was the cause of the leak. The car was leaking from the front when I bought it, but I didn't get under there to locate the leak - I just assumed it was the water pump area and had planned to replace WP/TB as soon as I bought it. If not leaking from the water pump, I may be buying one of those fancy new radiators I've been reading about on here.
I sure am looking forward to actually driving this thing - hopefully by Saturday (tomorrow) night!
For those playing along at home, remember to pull the block galley drains as part of the initial fluids removal when doing the TB/WP project. The lowest drain spot in the block is the lower radiator hose until those plugs are removed. So with the plugs in, coolant drains to that point until you pull the water pump, at which time you get a(nother) bath in old coolant. Better to do this at the beginning, all at once, so only one bath and cleanup.
The galley drains are straight-threaded bolts with sealing washers, steel into aluminum. If your cooling system has been, um, undermaintained, galvanic action can cause the aluminum to tighten on the bolt threads. Use a 6-point socket on a long-handled wrench to reduce the risk of rounding the bolt heads, and hold the socket firmly onto the bolts as you pull on the wrench handle. A hard 'snap' pull may give you a fighting chance at breaking a corroded joint. The bolts are up just high enough that a conventional 8-9" long 1/2-inch drive ratchet isn't quite long enough. I use an extending-handle ratchet, or a long breaker bar for at least the first break-free pull. If the old bolts are corroded at all, get new ones with your parts order. You'll want new sealing washers regardless. I like Teflon thread-sealing paste for the threads on assembly, and on the sealing faces of the washer and the bolt. Then 15 lbs/ft of torque will seal them fine, and make them much easier to remove for future coolant changes.
Then 15 lbs/ft of torque will seal them fine, and make them much easier to remove for future coolant changes.
The above is something I've been meaning to post about for a while...
I have come to the determination that the torque spec in the WSM for the block drain plugs is WRONG. The WSM indicates 35 Nm or 26 ft-lbs.
After several 'issues'(*) with the block drains I did some tests and discovered that 26 Nm (not ft-lbs - that would be 19 ft-lbs) is totally sufficient for sealing (with a new crush ring.)
* A long, long time ago, I torqued the block plugs on my '89 with a small torque wrench. Before I got to 35 Nm I saw that the crush ring was so crushed that it was bulging to the point of 'popping off' the plug. At that point I started doing the block drains by feel.
Two years ago, I had a 928 in for a belt job. The owner had very correctly flushed his coolant two years prior and used a torque wrench on the plug. He stripped one out.
After I put a Timesert in the block (which was a lot of fun...) I used my torque wrenches to determine the actual torque needed to seal the drains.
It's 26Nm not 26 ft-lbs.
Hmm, goes into my notes and onto my torque chart. Important info, thanks Dave.
I'd strongly recommend against this procedure. Plastic brushes and gas don't mix at all. Plastic will build a static charge and spark, igniting you, your car, and most likely your garage. I know this from experience; my grandfather darned near burned off his arm using gas and a plastic brush to clean his tractor.

 11-13-2014, 12:41 PM