
TB/WP change quick questions
 11-04-2014, 04:13 AM
#16
Rennlist Member
Join Date: Jan 2003
Location: Peachtree Corners, Georgia
Posts: 833
Likes: 0
Received 42 Likes
on
29 Posts
I've always been a big fan of the citrus degreaser.
Dr. Bob mentioned DEP, but I think he meant ZEP (at least that's what mine says).
You can dilute it to varying degrees based on the different specific cleaning tasks.
There is only one other suggestion I wanted to add from my experience:
I made up a short hose and tapped off of the spigot on my hot water heater.
Our HWH is located in the room right next to the garage, so it was very handy.
I found that the really hot water did a MUCH better job of the rinsing.
And that, in turn, allowed me to use much less, which made a smaller mess.
I even made a special little orifice nozzle that sprayed a small controllable stream.
And with a simple in-line ball valve to turn it on/off, and throttle the flow rate.
I plan to use the exact same set up for the upcoming TB job on my other car.
 11-04-2014, 09:04 AM
#17
Three Wheelin'
+1
At first I laid a very large tarp on the garage floor then drove the car over it. When it was time for cleaning I placed the kiddie pool to catch the droppings but also raised the outer edges of the tarp to protect the garage from flying chunks of grease
At first I laid a very large tarp on the garage floor then drove the car over it. When it was time for cleaning I placed the kiddie pool to catch the droppings but also raised the outer edges of the tarp to protect the garage from flying chunks of grease
11-04-2014, 01:01 PM
#18
Chronic Tool Dropper
Lifetime Rennlist
Member
Lifetime Rennlist
Member

I've always been a big fan of the citrus degreaser.
Dr. Bob mentioned DEP, but I think he meant ZEP (at least that's what mine says).
You can dilute it to varying degrees based on the different specific cleaning tasks.
There is only one other suggestion I wanted to add from my experience:
I made up a short hose and tapped off of the spigot on my hot water heater.
Our HWH is located in the room right next to the garage, so it was very handy.
I found that the really hot water did a MUCH better job of the rinsing.
And that, in turn, allowed me to use much less, which made a smaller mess.
I even made a special little orifice nozzle that sprayed a small controllable stream.
And with a simple in-line ball valve to turn it on/off, and throttle the flow rate.
I plan to use the exact same set up for the upcoming TB job on my other car.
For those that still use low-boiling flammable solvents in the garage for cleaning, like gasoline or Brake-Clean, the water heater mention reminded me about fire and explosion hazards in the garage. Fumes from those solvents WILL ignite. In fact, acetone fumes burn with an almost-invisible blue flame along the floor. Gas has a similar flame but shows oxygen-starvation as yellow/orange when the mixture is too rich. Get it just right, and there's an explosion similar to what pushes on pistons inside the engine. And remember, --FLAME INHALATION IS FATAL--. Ultimate failure mode is slow suffocation, as the seared cells in your lungs can't swap oxygen and carbon dioxide between air and blood anymore. There's time to say a Hail Mary if you remember. It's quite ugly.
11-10-2014, 11:42 AM
#19
Rennlist Member
Thread Starter
After not doing anything on the car all week, I got back after it this weekend. A few notes:
1. If you are doing the work on a 4-post lift like I am, the first few chapters involve a lot of "loosen one bolt from above and then the next bolt from below". At first I was simply lifting the car up whenever I needed to go underneath, which gets a little tedious. Once the alternator was removed,d Dwayne's write-up recommends resting it on a bucket to take the stress off the wiring. That stopped my lifting the car to walk underneath. My 4 post lift doesn't have any safety locks below about 2 feet. Since the only thing holding the car up at that point is hydraulic pressure (and my lift will leak down over a 24 hour period), be sure to put jackstands under the lift for the lift to rest on. This is important to keep the car from settling down onto the bucket holding the alternator, and more importantly, from settling down onto you if you are shimmying under the lift runner to get under the car. I put one jackstand under the front crossbar of the lift and one under the back.
2. Again, for 4 post lift users, rather than resting the alternator on a bucket to keep the weight off the wiring, it is probably better to use a bungee cord to hang the alternator from some part of the underneath of the car. That way you can raise and lower the lift as you see fit (e.g. - for easier cleaning under the car).
3. I spent at least 3 hours just cleaning the front of the engine, and lo and behold, the engine seems to be made of shiny silver colored metal! Shocking as all I saw in the engine bay before was black grime. I went to a couple of local hardware stores and bought the best degreaser at each, plus an assortment of cleaning brushes. I bought 6 different brushes, which I thought was overkill. Turns out it wasn't - the small wire brushes get bent and wear out rather quickly. Used a squirt bottle of degreaser and a squirt bottle of rinsing water that I kept hot. Degreaser - scrub - degreaser - scrub - rinse water. The cleaning brushes get clogged up with the grime, so I filled a large plastic cup (like a Big Gulp) half full with degreaser and would keep the brushes in that and swap for a fresh brush often (kind of like what you do with paint brushes and paint thinner).
4. The 27 mm retaining bolt for the crank is a MF'er to get loose. I used my 1/2" breaker bar with a 2 foot long extension pipe. I had to put my left leg on the garage wall to brace myself to push on the extension bar because I couldn't get it to budge on my own (I'm 6 foot tall and weigh 250 lbs BTW). I didn't have a 27 mm deep socket, but I did have a regular 27 mm, so I put a 3" extension on that to get to the bolt. The extension sheared off at the socket. So, I had another 1/2" drive 3" extension and put that on. That extension broke on the end where the breaker bar fit into it. Keep in mind these are 1/2" drive tools. Back to the hardware store to buy a 27 mm deep socket, which they didn't have except for in a set for $60, so I bought an impact extension set for $20. The 3" extension did the trick on that one.
So, that's where I'm at - in the middle of Chapter 7. So, lots of effort to make it one chapter further along, albeit with a much cleaner engine to work on now. Although I think I'm working on top of the engine for awhile now, I'm going to get underneath to do some more cleaning this week.
One more question - reading ahead, I see that the Oil Pump Seal and O-ring are common leakage points. Even though I haven't inspected them, I think I should just order those two parts and plan to do them. I don't want to be back in there again for 5+ years, so even if they aren't leaking (doubtful), it's probably a good idea to replace them. Dwayne covers the O-ring replacement, which looks easy. How hard is the Oil Pump Seal to replace, and is it a good idea to just leave it alone if it is not leaking? (I'm thinking about the RMS on a 996 - if it ain't leaking, then leave it alone as your replacement seal can just as easily start leaking).
Thanks to everyone for all of the cleaning advice - very helpful!
1. If you are doing the work on a 4-post lift like I am, the first few chapters involve a lot of "loosen one bolt from above and then the next bolt from below". At first I was simply lifting the car up whenever I needed to go underneath, which gets a little tedious. Once the alternator was removed,d Dwayne's write-up recommends resting it on a bucket to take the stress off the wiring. That stopped my lifting the car to walk underneath. My 4 post lift doesn't have any safety locks below about 2 feet. Since the only thing holding the car up at that point is hydraulic pressure (and my lift will leak down over a 24 hour period), be sure to put jackstands under the lift for the lift to rest on. This is important to keep the car from settling down onto the bucket holding the alternator, and more importantly, from settling down onto you if you are shimmying under the lift runner to get under the car. I put one jackstand under the front crossbar of the lift and one under the back.
2. Again, for 4 post lift users, rather than resting the alternator on a bucket to keep the weight off the wiring, it is probably better to use a bungee cord to hang the alternator from some part of the underneath of the car. That way you can raise and lower the lift as you see fit (e.g. - for easier cleaning under the car).
3. I spent at least 3 hours just cleaning the front of the engine, and lo and behold, the engine seems to be made of shiny silver colored metal!
Shocking as all I saw in the engine bay before was black grime. I went to a couple of local hardware stores and bought the best degreaser at each, plus an assortment of cleaning brushes. I bought 6 different brushes, which I thought was overkill. Turns out it wasn't - the small wire brushes get bent and wear out rather quickly. Used a squirt bottle of degreaser and a squirt bottle of rinsing water that I kept hot. Degreaser - scrub - degreaser - scrub - rinse water. The cleaning brushes get clogged up with the grime, so I filled a large plastic cup (like a Big Gulp) half full with degreaser and would keep the brushes in that and swap for a fresh brush often (kind of like what you do with paint brushes and paint thinner).4. The 27 mm retaining bolt for the crank is a MF'er to get loose. I used my 1/2" breaker bar with a 2 foot long extension pipe. I had to put my left leg on the garage wall to brace myself to push on the extension bar because I couldn't get it to budge on my own (I'm 6 foot tall and weigh 250 lbs BTW). I didn't have a 27 mm deep socket, but I did have a regular 27 mm, so I put a 3" extension on that to get to the bolt. The extension sheared off at the socket. So, I had another 1/2" drive 3" extension and put that on. That extension broke on the end where the breaker bar fit into it. Keep in mind these are 1/2" drive tools. Back to the hardware store to buy a 27 mm deep socket, which they didn't have except for in a set for $60, so I bought an impact extension set for $20. The 3" extension did the trick on that one.
So, that's where I'm at - in the middle of Chapter 7. So, lots of effort to make it one chapter further along, albeit with a much cleaner engine to work on now. Although I think I'm working on top of the engine for awhile now, I'm going to get underneath to do some more cleaning this week.
One more question - reading ahead, I see that the Oil Pump Seal and O-ring are common leakage points. Even though I haven't inspected them, I think I should just order those two parts and plan to do them. I don't want to be back in there again for 5+ years, so even if they aren't leaking (doubtful), it's probably a good idea to replace them. Dwayne covers the O-ring replacement, which looks easy. How hard is the Oil Pump Seal to replace, and is it a good idea to just leave it alone if it is not leaking? (I'm thinking about the RMS on a 996 - if it ain't leaking, then leave it alone as your replacement seal can just as easily start leaking).
Thanks to everyone for all of the cleaning advice - very helpful!
11-10-2014, 11:58 AM
#20
Rennlist Member
, I see that the Oil Pump Seal and O-ring are common leakage points. Even though I haven't inspected them, I think I should just order those two parts and plan to do them. I don't want to be back in there again for 5+ years, so even if they aren't leaking (doubtful), it's probably a good idea to replace them. Dwayne covers the O-ring replacement, which looks easy. How hard is the Oil Pump Seal to replace, and is it a good idea to just leave it alone if it is not leaking?
11-10-2014, 12:40 PM
#21
Rennlist Member
2. Again, for 4 post lift users, rather than resting the alternator on a bucket to keep the weight off the wiring, it is probably better to use a bungee cord to hang the alternator from some part of the underneath of the car. That way you can raise and lower the lift as you see fit (e.g. - for easier cleaning under the car).
Here's our S4, radiator is out but doesn't need to be. The 8" (200mm) bolt is supporting the alternator, PS pump and the support casting.
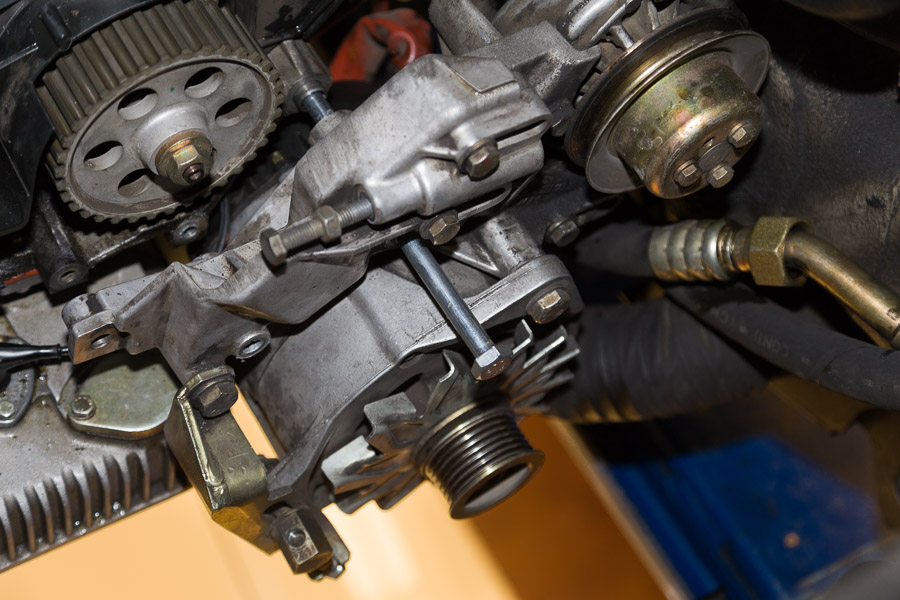
You need a 3/4" breaker bar, a 27mm or 1-1/16" (26.99 mm) x 3/4" deep socket, and a 2-3' extension pipe. No problem.
11-10-2014, 03:38 PM
#22
Rennlist Member
Thread Starter
Jim:
Thanks for the tip on using the long 10 mm bolt to hang the PS pump and alternator from a long bolt! Definitely going to get that set up tonight.
As I am going through this, 2 thoughts come to mind: 1. Thank God for Dwayne, and 2. A thread dedicated solely to "improvements" or "corrections" to Dwayne's TB/WP procedure would be good. The tip you just gave me would be exactly what I'm thinking of.
11-10-2014, 11:37 PM
#23
Rennlist Member
 , indeed. GREAT IDEA. Thanks.
Got a pic of the special little orifice nozzle?
11-11-2014, 10:31 AM
#25
Burning Brakes
Jeff,
I'm glad Jim Corenman is following this thread. He helped me so much with my TB/WP, and is so knowledgeable and kind.
A couple of suggestions:
1) If you don't remove the radiator, I would recommend taping a piece of cardboard to the radiator, to protect the vanes.
2) If you've removed the Power Steering Reservoir, I would spend the $20 and get a replacement, and replace the supply hoses while you are in there.
3) This thread HERE is an excellent write-up on how to remove the oil pump. It is cumbersome to remove, and I modified his instructions but putting bolts in two holes, then wedging out. Roger sells the inexpensive oil pump rebuild kit.
11-12-2014, 12:40 PM
#26
Rennlist Member
Thread Starter
Scott:
Yes, it is great to have the expertise and camaraderie of Rennlist when tackling a project like this.
Great idea on the cardboard, not only to protect the radiator vanes from damage, but also to protect finger skin from the vanes - they are kind of like a cheese grater when you bump your hand against the vanes.
Feel like I'm OK on the PS reservoir - I got it cleaned up pretty well.
I've already ordered the oil pump kit from Roger - it should arrive this week.
Looking forward to your visit on Tuesday - hopefully your schedule still allows it. Just let me know your arrival time - probably best to meet here at the Kansas City Automotive Museum (15095 W. 116th Street, Olathe, KS 66062).
Thanks again to everyone for all of the help!
11-12-2014, 07:52 PM
#28
Nordschleife Master

I used 3mm (1/8") ply cut to size to protect the AC condenser, rather than cardboard. I've reused it a few times.
11-13-2014, 04:55 AM
#29
Rennlist Member
Thread Starter
Ok, I removed the radiator tonight based on your recommendations. It does give a lot more working room. Plus, the fan shroud retainer tabs are sharp!
I removed the water pump. Next up is removing the oil pump gear, which calls for a 2 arm pulley puller, which I'll pick up tomorrow. I took a stab at removing the crank gear, but it seems stuck. Any recommendations for getting that gear off the crank?
I removed the water pump. Next up is removing the oil pump gear, which calls for a 2 arm pulley puller, which I'll pick up tomorrow. I took a stab at removing the crank gear, but it seems stuck. Any recommendations for getting that gear off the crank?
11-13-2014, 12:08 PM
#30
Shameful Thread Killer
Rennlist Member
Rennlist Member
Ok, I removed the radiator tonight based on your recommendations. It does give a lot more working room. Plus, the fan shroud retainer tabs are sharp!
I removed the water pump. Next up is removing the oil pump gear, which calls for a 2 arm pulley puller, which I'll pick up tomorrow. I took a stab at removing the crank gear, but it seems stuck. Any recommendations for getting that gear off the crank?
I removed the water pump. Next up is removing the oil pump gear, which calls for a 2 arm pulley puller, which I'll pick up tomorrow. I took a stab at removing the crank gear, but it seems stuck. Any recommendations for getting that gear off the crank?