
Help needed with install of light weight starter
 05-28-2014, 05:28 PM
#1
Three Wheelin'
Thread Starter
I finally got around installing the light weight starter I got from Roger last Christmas. The install went lickety split and I can here it spinning but it is not meshing with the flywheel. It just spins in mid air. I checked it while under the car and I can see the starter gear (pinion??) moving forward.
Don't know if any of these pics from my iphone will make a difference. Remember, these were taken with me lying on my back on the driveway (ignore the clutch line)
So what am I missing or did wrong?
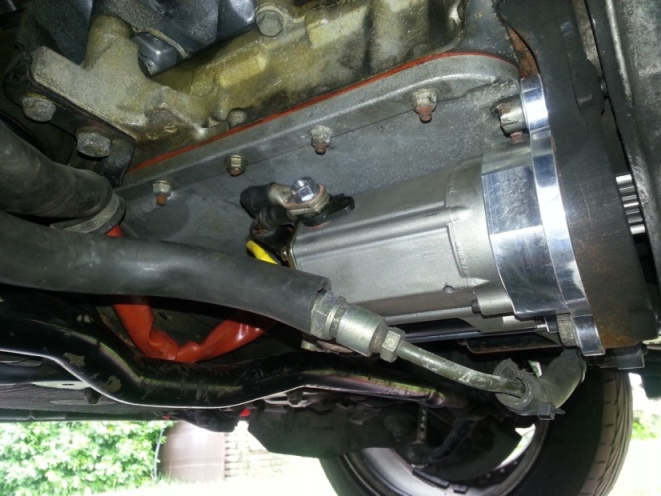
Don't know if any of these pics from my iphone will make a difference. Remember, these were taken with me lying on my back on the driveway (ignore the clutch line)
So what am I missing or did wrong?
Last edited by Koenig-Specials 928; 05-28-2014 at 05:31 PM. Reason: Rotate pict #3
 05-28-2014, 11:48 PM
#4
If I remember right, a reclocking was needed before installation per Ducman's suggestion. If in doubt, give Roger a quick call tomorrow. That's how he attained his "wonderful service" status....
05-29-2014, 01:26 AM
#5
Rennlist Member
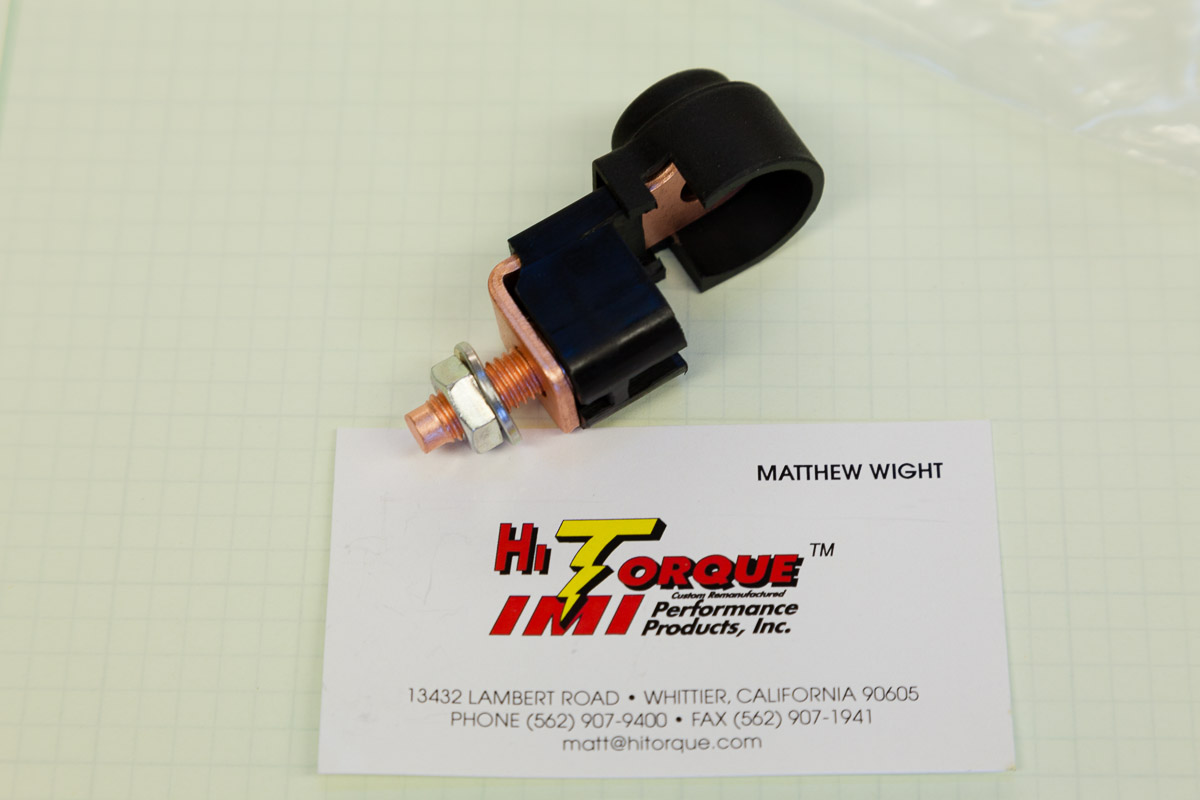
Yep, needs reclocking. And it also looks like the main 12v stud is too short for the nut to fully engage. My starter had that problem, nut only engaged a couple of threads with both of the heavy cable terminals in place. Roger referred me to the distributor who sent a right-angle adapter with a longer stud. It's not a perfect solution-- two connections are never better than one-- but definitely better than a battery cable hanging by a thread (literally).
Here's the original arrangement, only a couple of threads engaged. There was no chance for a lockwasherwasher so I tried a nylok, that was hopeless also. And the angle of the cables was less than ideal.
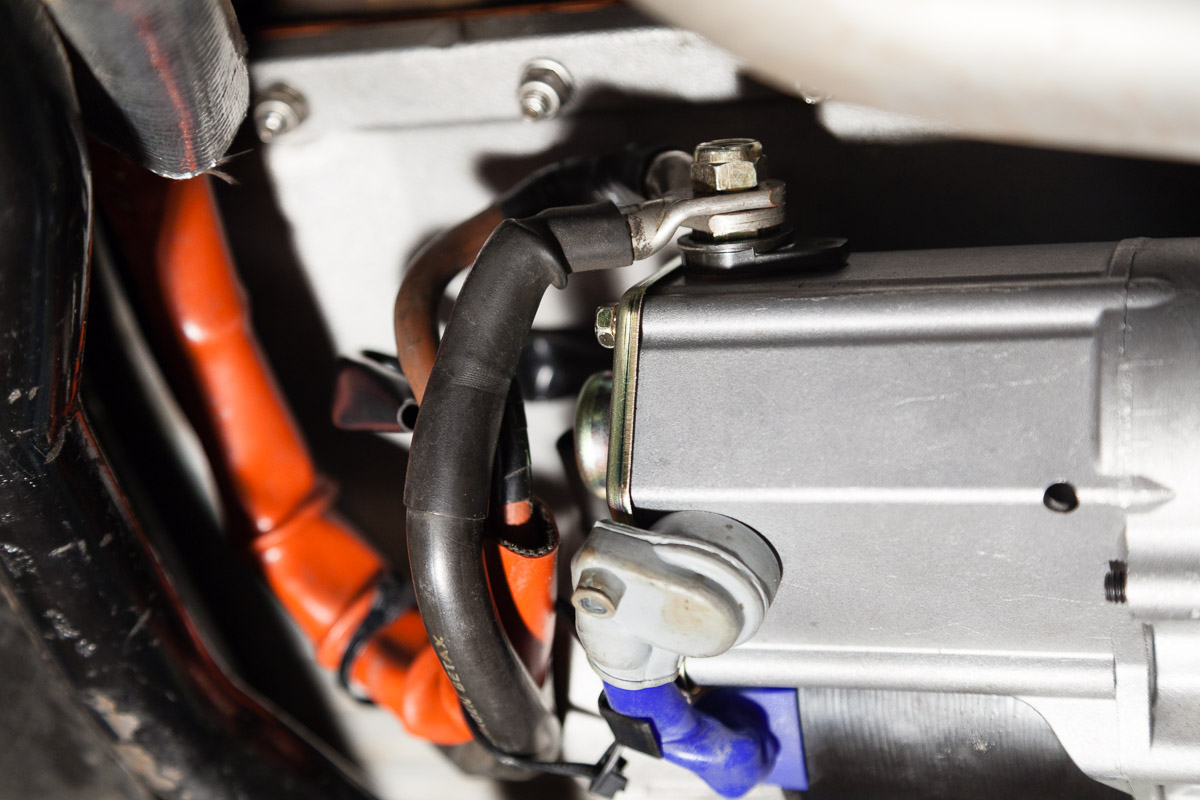
Here's the part that IMI sent (and a name and phone# that you might find useful):
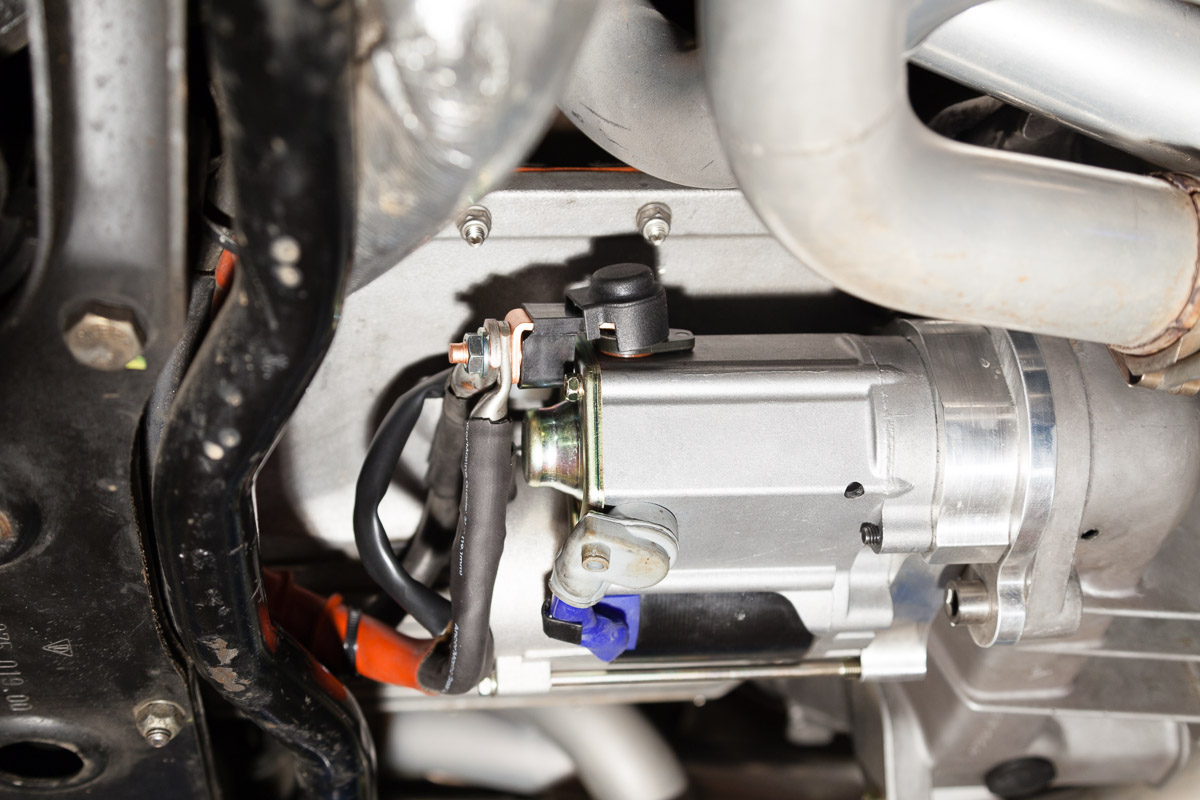
And here's the finished install. The plastic cap over the original stud doesn't sit flat but does protect it.
This was a year ago (March 2013) and it is disappointing that they are still clocked wrong and the stud issue is not resolved. But the starter does a good job.
Here's the original arrangement, only a couple of threads engaged. There was no chance for a lockwasherwasher so I tried a nylok, that was hopeless also. And the angle of the cables was less than ideal.
Here's the part that IMI sent (and a name and phone# that you might find useful):
And here's the finished install. The plastic cap over the original stud doesn't sit flat but does protect it.
This was a year ago (March 2013) and it is disappointing that they are still clocked wrong and the stud issue is not resolved. But the starter does a good job.
 05-29-2014, 01:32 AM
#6
Rennlist Member
And Fred, what is that hydraulic line hanging under your starter? Call GB and get one of his cosmic clutch hoses-- an insulated stainless hose that routes around the front of the starter, instead of under it.
05-29-2014, 09:30 AM
#7
Three Wheelin'
Thread Starter
Thanks everyone. As far as I know, Roger had it clocked before it was shipped out. I will print Jim's picture and compare it with my install today.
As far as the hydraulic line goes, I do have the flexible line to replace that one in the picture but I want to get one thing working at a time. After the starter works then I will deal with that replacement. Trying to keep it simple. Thanks for the picture to compare.
Fred
As far as the hydraulic line goes, I do have the flexible line to replace that one in the picture but I want to get one thing working at a time. After the starter works then I will deal with that replacement. Trying to keep it simple. Thanks for the picture to compare.
Fred
Trending Topics
05-29-2014, 10:45 AM
#8
Rennlist Member
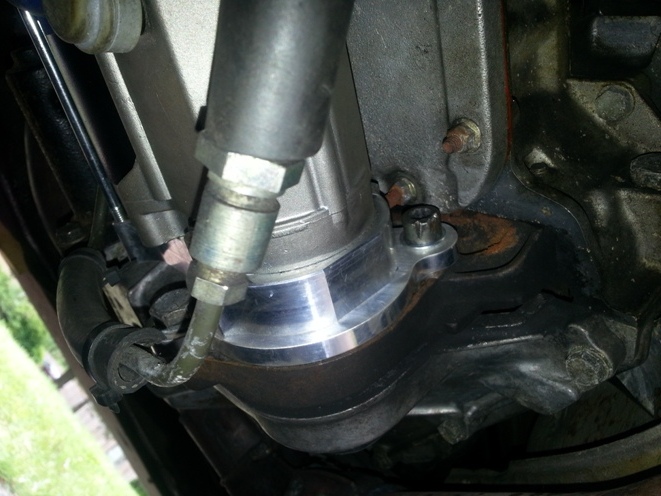
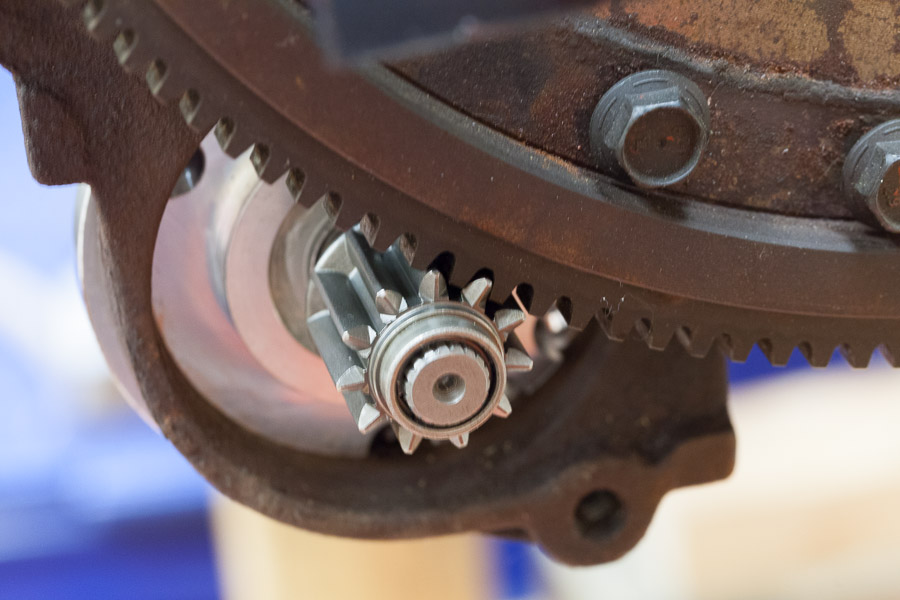
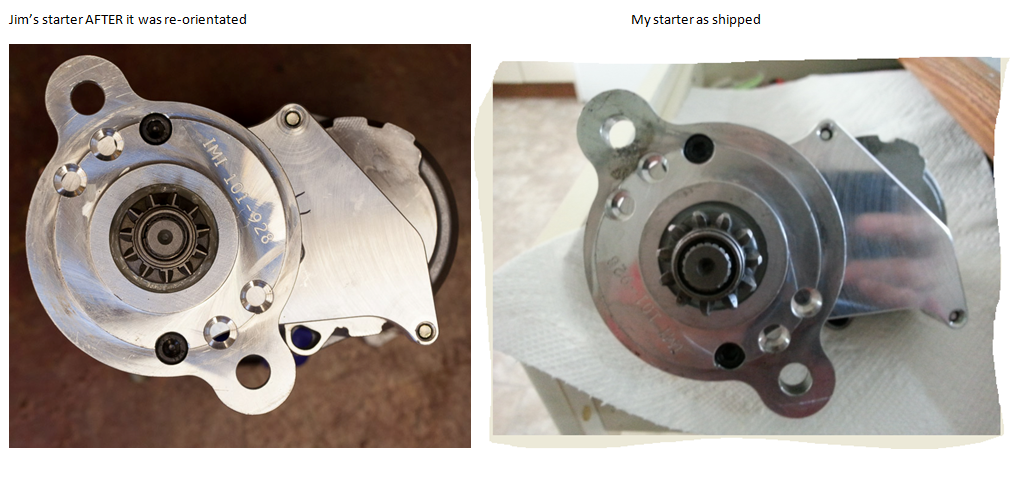
I found some more pictures which might help (Feb 2013). There are two "clocking" issues: One is that the mounting plate can be indexed at three different positions with different sets of holes in the bracket; the other is that the mounting plate is not symmetric.
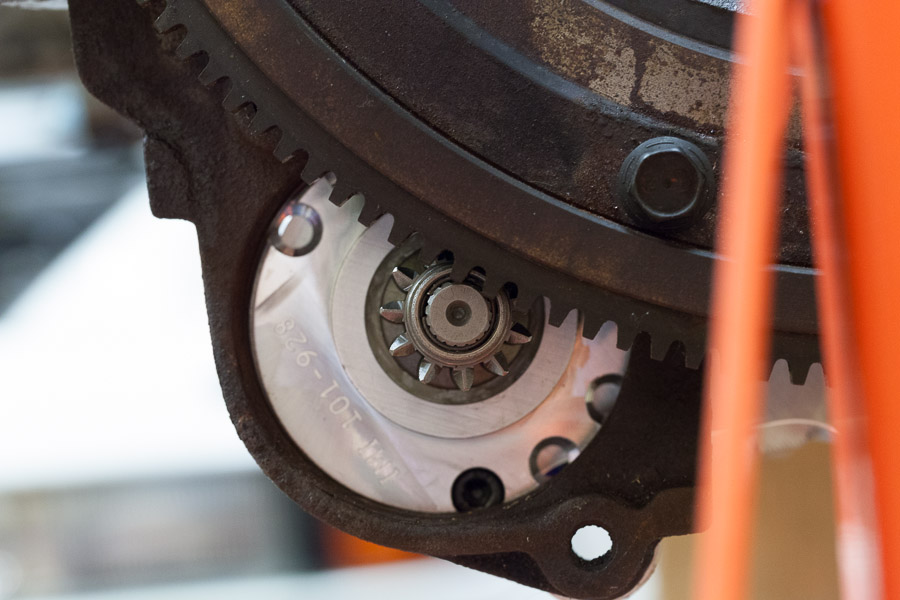
Here is how it was supplied, with the pinion overlapping the ring gear. This is mounted on a block on a stand with the stock steel starter-bracket, without a bellhousing. Note where the part# is showing on the mounting plate, and the three index positions.
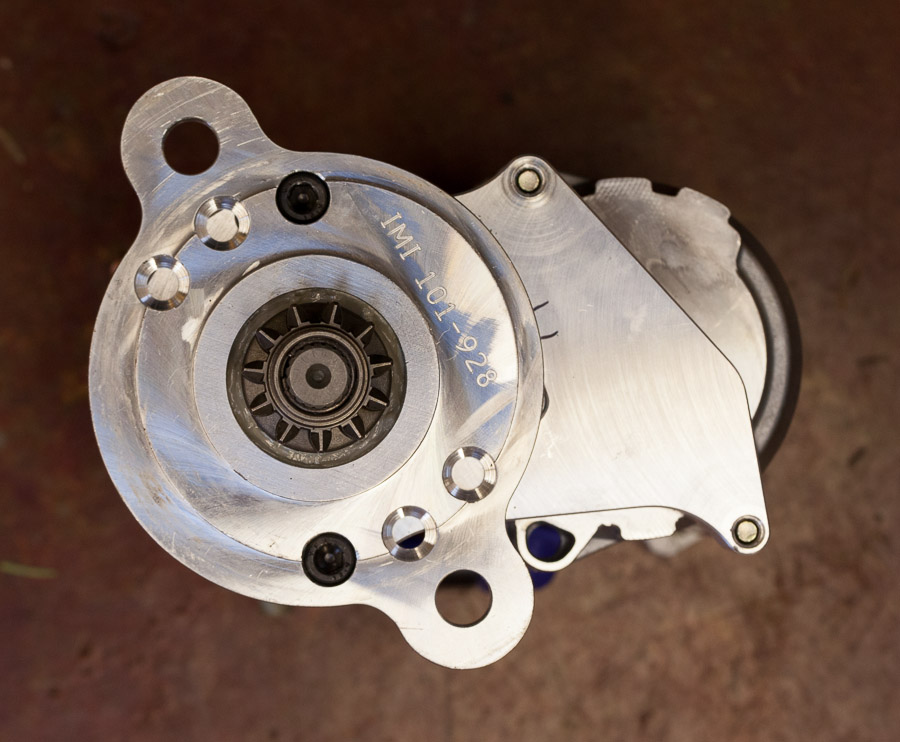
Here's a view of the business-end of the starter in the same orientation, Note that the gear is not centered in the larger mounting bracket: I believe that this gear is larger in diameter than stock, and to fit with the same geometry as the stock starter it needs to be mounted off-center in the bore. The side with the part# is wider.
I removed the two black socket-head screws and rotated it 180-deg to the position shown here:
And here is how it fits with the mounting plate rotated (with the part# hidden behind the flywheel):
I also found more detail on the battery stud. The stud length was 11.4mm, each of the two battery-cable lugs is 3.5mm thick, and the supplied flanged nut was 8.6mm thick (including the attached washer). With the two factory cable lugs and the supplied flanged nut, there was only minimal engagement of the threads.
This was not safe and it was not used that way.
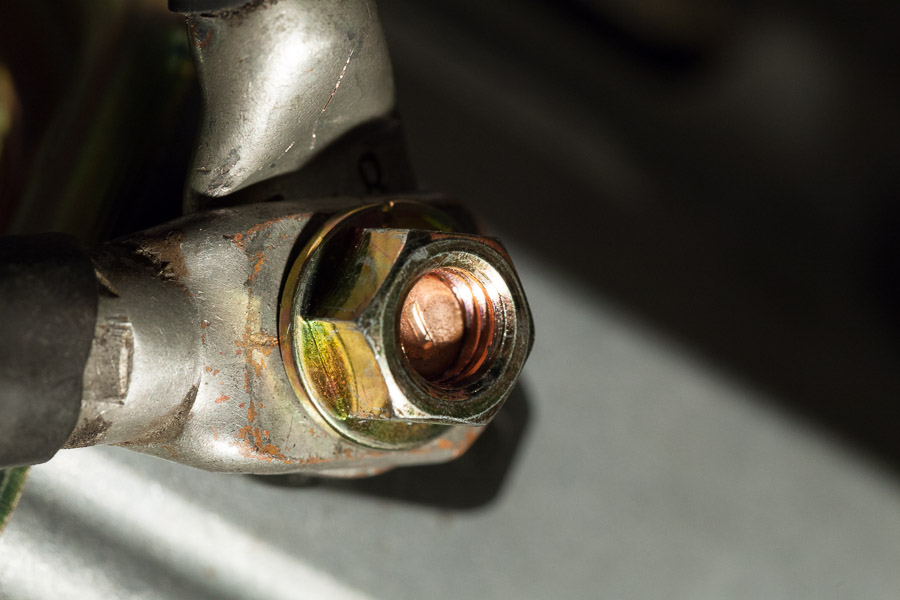
I tried the nylok shown in port#5 above, still not adequate (no washer, and the nylok did not engage) and finally fit the IMI-supplied right-angle adapter shown above.
Here is how it was supplied, with the pinion overlapping the ring gear. This is mounted on a block on a stand with the stock steel starter-bracket, without a bellhousing. Note where the part# is showing on the mounting plate, and the three index positions.
Here's a view of the business-end of the starter in the same orientation, Note that the gear is not centered in the larger mounting bracket: I believe that this gear is larger in diameter than stock, and to fit with the same geometry as the stock starter it needs to be mounted off-center in the bore. The side with the part# is wider.
I removed the two black socket-head screws and rotated it 180-deg to the position shown here:
And here is how it fits with the mounting plate rotated (with the part# hidden behind the flywheel):
I also found more detail on the battery stud. The stud length was 11.4mm, each of the two battery-cable lugs is 3.5mm thick, and the supplied flanged nut was 8.6mm thick (including the attached washer). With the two factory cable lugs and the supplied flanged nut, there was only minimal engagement of the threads.
This was not safe and it was not used that way.
I tried the nylok shown in port#5 above, still not adequate (no washer, and the nylok did not engage) and finally fit the IMI-supplied right-angle adapter shown above.
Last edited by jcorenman; 05-29-2014 at 01:23 PM. Reason: added post#5 reference for clarity
05-29-2014, 12:50 PM
#9
Three Wheelin'
Thread Starter
Thanks so much Jim. So this is what I found. The starter was installed correctly as per your 3rd picture but as you can see it is clocked incorrectly. The one on the right is mine the way it was shipped. I will follow your advise and try and clock it properly.
Last edited by Koenig-Specials 928; 05-29-2014 at 12:51 PM. Reason: spelling
05-29-2014, 01:19 PM
#10
Three Wheelin'
Thread Starter
Found Joy.
Thank you Ducman, Alex and Jim. You were on the money.
It was shipped clocked incorrectly.
Hopefully these pictures will be helpful to others in the future.
The starter sounds strong and much different.
Love it
Thank you Ducman, Alex and Jim. You were on the money.
It was shipped clocked incorrectly.
Hopefully these pictures will be helpful to others in the future.
The starter sounds strong and much different.
Love it
 05-29-2014, 03:37 PM
#12
Basic Sponsor
Rennlist
Site Sponsor
Rennlist
Site Sponsor
I am so sorry for the trouble - we took a lot of time to work with IMI to establish a setup that worked out of the box and initially all was good. Somewhere along the road they forgot the setup and have been supplying the starter incorrectly clocked. Very frustrating to say the least.
Thanks to Jim and others for helping get it straight - I will have another "conversation" with IMI to try and reset the parameters so this does not happen again - fingers crossed.
Thanks to Jim and others for helping get it straight - I will have another "conversation" with IMI to try and reset the parameters so this does not happen again - fingers crossed.
__________________

Does it have the "Do It Yourself" manual transmission, or the superior "Fully Equipped by Porsche" Automatic Transmission? George Layton March 2014
928 Owners are ".....a secret sect of quietly assured Porsche pragmatists who in near anonymity appreciate the prodigious, easy going prowess of the 928."
Does it have the "Do It Yourself" manual transmission, or the superior "Fully Equipped by Porsche" Automatic Transmission?
George Layton March 2014928 Owners are ".....a secret sect of quietly assured Porsche pragmatists who in near anonymity appreciate the prodigious, easy going prowess of the 928."
05-29-2014, 03:48 PM
#13
Former Sponsor

I am so sorry for the trouble - we took a lot of time to work with IMI to establish a setup that worked out of the box and initially all was good. Somewhere along the road they forgot the setup and have been supplying the starter incorrectly clocked. Very frustrating to say the least.
Thanks to Jim and others for helping get it straight - I will have another "conversation" with IMI to try and reset the parameters so this does not happen again - fingers crossed.
Thanks to Jim and others for helping get it straight - I will have another "conversation" with IMI to try and reset the parameters so this does not happen again - fingers crossed.
These starters are designed to hang in the middle of the engine and the adaptor needs to be clocked 180 degrees from their previous model starters.
I gave up complaining about it to Roger. As concerned about shipping high quality pieces as he is, I'm sure he has talked to them multiple times about this problem and is banging his head on the wall, right now. I now check each starter and correct the problem, before I ship the starter, to any of my clients. Since I'm usually clearancing the starter for use with my pan spacer, it is a simple thing to do, at the same time.
05-29-2014, 03:53 PM
#14
Administrator - "Tyson"
Lifetime Rennlist
Member
Lifetime Rennlist
Member
How much lighter is it?
I need to shave 31lbs off my 79
I need to shave 31lbs off my 79
05-29-2014, 04:13 PM
#15
Former Sponsor
11 versus 16 lbs.
Five pounds....granted in the lowest spot you could find, so not as much help for road racing.
The real beauty is:
1. While Bosch rebuilt stuff is generally quite good, I've had an abnormal amount of these starters not work properly....to the point where I tell people that they may have problems. I got so frustrated with this problem about 6 months ago, that I gave up on one vehicle and installed a used factory starter!
2. This "new" starter is fantastic soiunding. Sounds like a "real starter" not one from a Toyota.
3. Hangs in the middle, directly under the crankshaft. Allows room for headers, pan spacers.
4. Interferes so badly with that stupid stock clutch line, that people really need my "re-routed clutch line kit", which increases my sales.