

Seat Restoration
 08-30-2013, 10:47 PM
#1
Nordschleife Master
Thread Starter
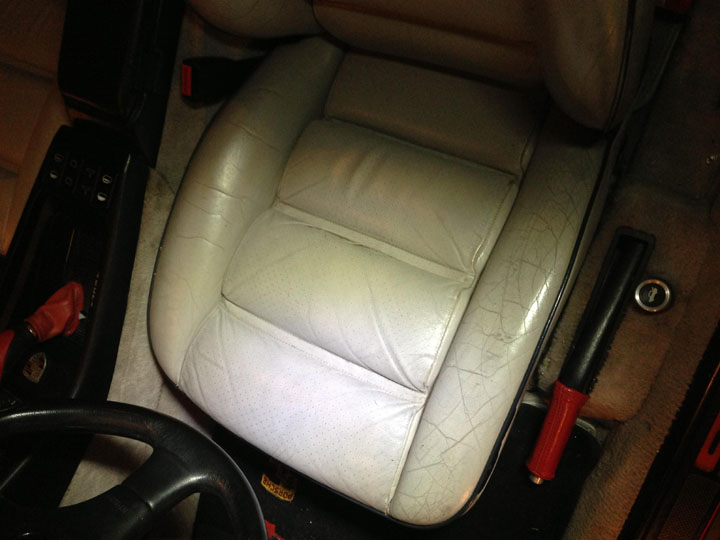
So far it came out so good, that I thought I had to post it. I had the numerous cracks, as seen on the driver's seat, on both sides from when I had got the car five years ago. I would condition the leather frequently, so as to keep it soft and from tearing, but it looked a bit to worn. I decided to do something about it.
Sorry about the quality of the images. My teenagers left my SLR in the rain - a Nikon D 100 - Nice ! The pics were taken on my daughter's iPhone.
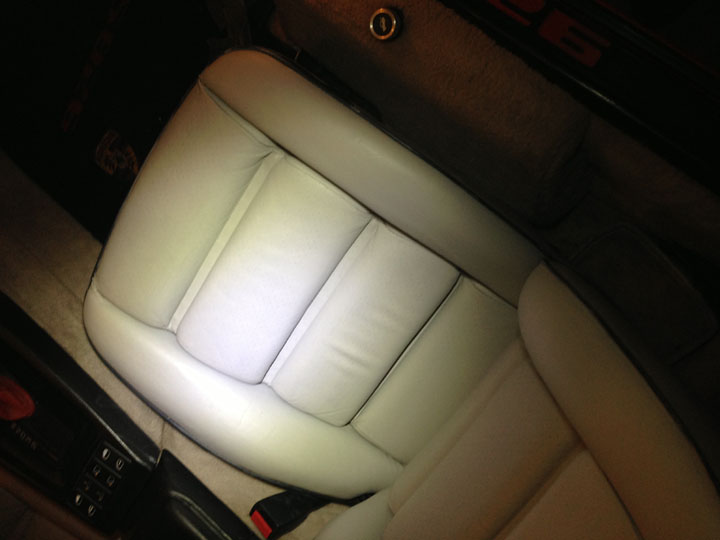
I first scrubbed/cleaned with a Magic Eraser sponge type thing by Mr Clean purchased at walmart. Wet the sponge a little and scrub. Slightly abrasive, and with whatever cleaner Mr. Clean provides. It really cleans well. I let completely dry, and then I began with the quality products from Joanne Price at ColorPlus .com. I began with the leather conditioner called Color-Plus Soffener. It comes in a 16 oz.can, and I brushed it on liberally. It really is a remarkable product. I had applied it to a significant crease I had on the rear quarter leather from sun damaged, and it loosened it up almost completely so I was able to deal with it by re-setting it. After the conditioner completely soaked in and dried, I applied their Flex-Fill to the cracks. Allowed it to completely dry, and the used the Magic Eraser again by wetting it. It was like fine grit sanding with wet sandpaper. The cracks were now filled with the flexible Flex-Fill material. Then I re-colored the seats with their Surflex colorant and finishing product. The color I picked from their menu. What you see on the passenger seat is after two coats simply painting it on with a 2" brush. She does give written instructions if you should chose to spray it on. She was even nice enough to communicate with me by email and phone for questions and instructions, and had even sent me some white colorant for free in case what she had sent was to dark so that I could lighten it.
I think the result is very good so far, and I will proceed to the the other 3 seats shortly.
Sorry about the quality of the images. My teenagers left my SLR in the rain - a Nikon D 100 - Nice ! The pics were taken on my daughter's iPhone.
I first scrubbed/cleaned with a Magic Eraser sponge type thing by Mr Clean purchased at walmart. Wet the sponge a little and scrub. Slightly abrasive, and with whatever cleaner Mr. Clean provides. It really cleans well. I let completely dry, and then I began with the quality products from Joanne Price at ColorPlus .com. I began with the leather conditioner called Color-Plus Soffener. It comes in a 16 oz.can, and I brushed it on liberally. It really is a remarkable product. I had applied it to a significant crease I had on the rear quarter leather from sun damaged, and it loosened it up almost completely so I was able to deal with it by re-setting it. After the conditioner completely soaked in and dried, I applied their Flex-Fill to the cracks. Allowed it to completely dry, and the used the Magic Eraser again by wetting it. It was like fine grit sanding with wet sandpaper. The cracks were now filled with the flexible Flex-Fill material. Then I re-colored the seats with their Surflex colorant and finishing product. The color I picked from their menu. What you see on the passenger seat is after two coats simply painting it on with a 2" brush. She does give written instructions if you should chose to spray it on. She was even nice enough to communicate with me by email and phone for questions and instructions, and had even sent me some white colorant for free in case what she had sent was to dark so that I could lighten it.
I think the result is very good so far, and I will proceed to the the other 3 seats shortly.
 08-30-2013, 10:57 PM
#2
Rennlist Member
Seriously? I mean "Wow!" Color me impressed!
My seats look like the before picture. Wrinkled and worn, but in ok shape. Now I know what they could actually look like with a little care.
I think Gary Knox told me about colorplus.com, so I may make that a project someday, not only for the 928, but also for the wife's car.
Great work!
My seats look like the before picture. Wrinkled and worn, but in ok shape. Now I know what they could actually look like with a little care.
I think Gary Knox told me about colorplus.com, so I may make that a project someday, not only for the 928, but also for the wife's car.
Great work!
08-30-2013, 11:03 PM
#3
Nordschleife Master
Thread Starter
Seriously? I mean "Wow!" Color me impressed!
My seats look like the before picture. Wrinkled and worn, but in ok shape. Now I know what they could actually look like with a little care.
I think Gary Knox told me about colorplus.com, so I may make that a project someday, not only for the 928, but also for the wife's car.
Great work!
My seats look like the before picture. Wrinkled and worn, but in ok shape. Now I know what they could actually look like with a little care.
I think Gary Knox told me about colorplus.com, so I may make that a project someday, not only for the 928, but also for the wife's car.
Great work!
My seat color is Silk Gray. Now it probably looks like the original color. The original color is very light. My inner door panel is this color, and it matches almost exactly. I will say, that when I scrubbed the driver's seat with the Magic Eraser, it begins to approach that color again. Now I have one spotless seat, and one very cracked and dirty one.
08-30-2013, 11:17 PM
#4
Rennlist Member
Join Date: Oct 2005
Location: Gatineau, Qu�bec, Canada
Posts: 5,186
Received 1,335 Likes
on
506 Posts
Looks realy good Craig. 
I would need to do this to my seats to remove the small cracks.
Not many but enought to bug me!
I did'nt care about those when I re-dyed the seats about 5 years ago but I should have.
+1 on Color Plus.
Great product and service from Joanne.
Great job Sir.
I would need to do this to my seats to remove the small cracks.
Not many but enought to bug me!
I did'nt care about those when I re-dyed the seats about 5 years ago but I should have.
+1 on Color Plus.
Great product and service from Joanne.
Great job Sir.
08-30-2013, 11:26 PM
#5
Very nice results!
I used several Leatherique products about 18 months ago to restore both front and rear seats. My front seats had some deep cracks that held up nice for about a year after treatment but now have cracked all the way through. The team at Leatherique forewarned me that my seats had some serious problems which was a nice honest opinion that turned out truer than I wanted.
I did dye the entire interior and all surfaces look incredible - actually new. Dyeing was time consuming but not as difficult as I had expected and the results were outstanding.
08-30-2013, 11:33 PM
#6
Nordschleife Master
Thread Starter
I'm impressed with the formulation of their Flex-Fill and the Surflex colorant. I had gotten both on my fingers, and they were actually rubbery. Though when sanding off the excess Flex-Fill it felt hard and did not want to lift off the face of the leather easily.
08-30-2013, 11:36 PM
#7
Nordschleife Master
Thread Starter
Looks realy good Craig.
I would need to do this to my seats to remove the small cracks.
Not many but enought to bug me!
I did'nt care about those when I re-dyed the seats about 5 years ago but I should have.
+1 on Color Plus.
Great product and service from Joanne.
Great job Sir.
I would need to do this to my seats to remove the small cracks.
Not many but enought to bug me!
I did'nt care about those when I re-dyed the seats about 5 years ago but I should have.
+1 on Color Plus.
Great product and service from Joanne.
Great job Sir.
Those cracks had been driving me crazy for some time now. I got the idea to look into ColorPlus after some had commented on their products when he painted his rear panels, and his picture looked great.
Trending Topics
08-30-2013, 11:55 PM
#8
Banned

Looks Good.
I'm afraid it's a bit late for mine.
I'm afraid it's a bit late for mine.
08-31-2013, 12:06 AM
#9
Nordschleife Master
Thread Starter
Thanks Denny.
You know you good probably fix that up right. Get a piece of leather with the little holes and adhese it with a soft/flexible adhesive over that rectangle that is torn after adhesing a flat piece of leather as the base. Then apply the Flex-Fill to the border/perimeter of it to make look 'whole'. Fix the rest of the creases and give a good re-color
You know you good probably fix that up right. Get a piece of leather with the little holes and adhese it with a soft/flexible adhesive over that rectangle that is torn after adhesing a flat piece of leather as the base. Then apply the Flex-Fill to the border/perimeter of it to make look 'whole'. Fix the rest of the creases and give a good re-color
08-31-2013, 12:46 AM
#12
Nordschleife Master
Thread Starter