

High Compression SC motor on E85
 07-16-2013 | 11:42 AM
#46

Advanced
Joined: Apr 2012
Posts: 99
Likes: 0
From: Norway
Of course it's your engine and choice. But I do have first hand experience with that problem on a 9,5:1 engine running E85 on approx 18psi boost.
As always there are many factors in tuning, and you may or may not have the same problem. But on the second engine we used a different gap, and thats been holding for 3 years 12500 miles and sometimes on E85 and sometimes og gasoline, on the same psi pressure from a Garrett GT4082 on a 3.0 V6 engine with identical internal parts...
 07-16-2013 | 01:33 PM
#47

Thread Starter
Rennlist Member
Joined: Dec 2001
Posts: 25,152
Likes: 87
As I said, its the rings witch can be the problem, and not the pistons.
Of course it's your engine and choice. But I do have first hand experience with that problem on a 9,5:1 engine running E85 on approx 18psi boost.
As always there are many factors in tuning, and you may or may not have the same problem. But on the second engine we used a different gap, and thats been holding for 3 years 12500 miles and sometimes on E85 and sometimes og gasoline, on the same psi pressure from a Garrett GT4082 on a 3.0 V6 engine with identical internal parts...
How much did you increase the ring gap to? The chevy guys play around with ring tension and gap all the time.
07-16-2013 | 02:30 PM
#48
Advanced
Joined: Apr 2012
Posts: 99
Likes: 0
From: Norway
I do not remember the numbers, but I belive it was twice the gap as our book stated for the original NA engine. And the engine was a Alfa Romeo 12v V6 from a Alfa 164 with forged H-beams and otherwise original internals.
We never messured the bhp on this engine, but with same rods and pistons, but shorter stroke so it got to be 2,7 instead of 3,0 and somewhere around 6,6:1 of compression we messured 527 bhp on 5900 rpm and 740 nm on 4900 rpm. Done with a Garrett T04Z turbo with approx 24psi on max bhp and 30psi on max torq.
Our next project now is a high rev high comp 3,0 with Jenvey ITB's for my -85 GTV6. But that's totally of topic
07-16-2013 | 02:34 PM
#49
Advanced
Joined: Apr 2012
Posts: 99
Likes: 0
From: Norway
I do not remember the numbers, but I belive it was twice the gap as our book stated for the original NA engine. And the engine was a Alfa Romeo 12v V6 from a Alfa 164 with forged H-beams and otherwise original internals.
We never messured the bhp on this engine, but with same rods and pistons, but shorter stroke so it got to be 2,7 instead of 3,0 and somewhere around 6,6:1 of compression we messured 527 bhp on 5900 rpm and 740 nm on 4900 rpm. Done with a Garrett T04Z turbo with approx 24psi on max bhp and 30psi on max torq.
Our next project now is a high rev high comp 3,0 with Jenvey ITB's for my -85 GTV6. But that's totally of topic
We never messured the bhp on this engine, but with same rods and pistons, but shorter stroke so it got to be 2,7 instead of 3,0 and somewhere around 6,6:1 of compression we messured 527 bhp on 5900 rpm and 740 nm on 4900 rpm. Done with a Garrett T04Z turbo with approx 24psi on max bhp and 30psi on max torq.
Our next project now is a high rev high comp 3,0 with Jenvey ITB's for my -85 GTV6. But that's totally of topic
07-23-2013 | 08:31 PM
#50
Thread Starter
Rennlist Member
Joined: Dec 2001
Posts: 25,152
Likes: 87
I have stuck a borescope down into the spark plug hole, as well as into the exhaust and intake ports, and I can clearly see that the piston is near the valve, but of course not touching it.
The next step I will take is to get the other set of heads I have that will actually be for this motor. (I won't use my "good" heads that SLC motorsports Screwed up, packed wrong so UPS Fed ex lost them, and then I had Todd and then Neil in OC fix - those will be for a another engine) I have told myself that all of this could easily blow up or come apart somehow, so all parts are used or cheap, except for the piston rings, which will be new.
The heads are the thinner 87 heads, and I will reseal the valves and clean up the parts some. From what I understand I can shim the 85/86 valves to provide enough tension to hold those valves steady until about 7400rpm, which will be plenty for me.
I will take these 87 heads and put these Cams that our good friend from Kansas has offered. I will immediately put those cams to good use. I think I will also steal the set of 32 lifters I bought for the 89 heads.
The more difficult step will be to find an intake combination that will work the best with the boost but also be able to fill the cylinder properly at the lower rpms. I Have S4 and S3 intakes, but plan to modify either to make them more direct from the A/A intercooler.
02-10-2014 | 05:01 PM
#51
Thread Starter
Rennlist Member
Joined: Dec 2001
Posts: 25,152
Likes: 87
https://rennlist.com/forums/928-foru...-s3-block.html
Last weekend I went through the lapping process for the alusil bores. I have some pictures, but they seem not not be on my phone. I guess I took them on the real camera.
Here is the finished block:
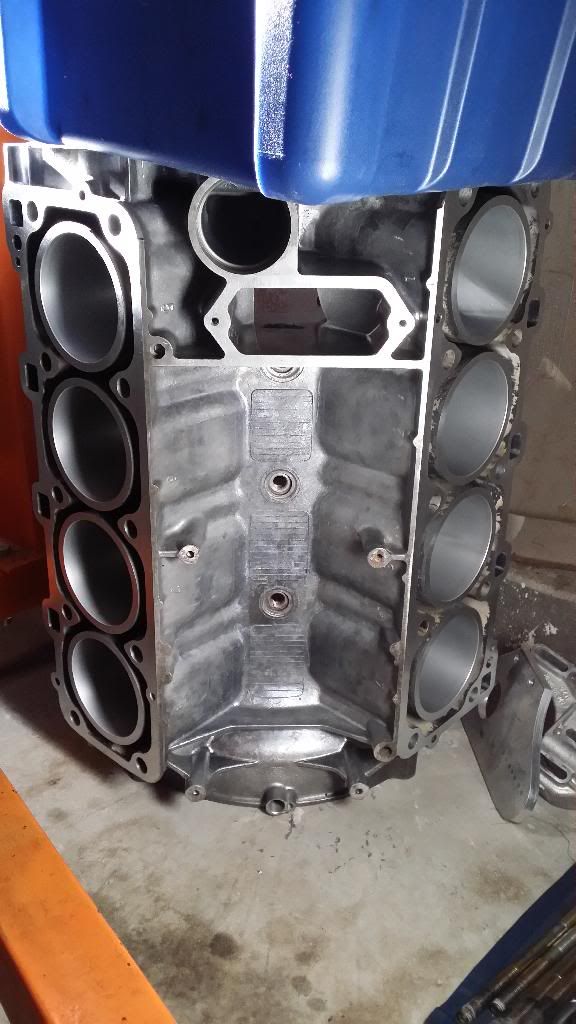
Just the goodson lapping paste and a used engine hone and the felt pads from Goodson and its looking ready to assemble (after hours of cleaning)
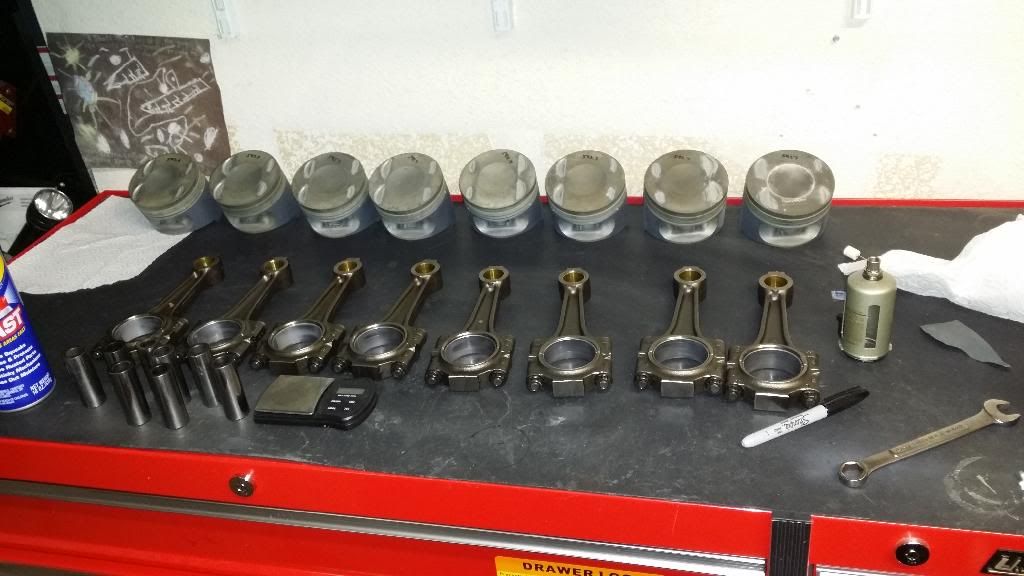
I have also cleaned up the pistons to remove any hot-spots in the very small but still sharp valve reliefs. I did not change the depth of the reliefs as I do not feel its needed for this valve lift.
I used Powerkote DFL-1 on the skirts and baked it for 1hr at 300degrees. Even if its just a sacrificial surface treatment, it will allow everything to wear together. I was going to coat the piston crowns but I think the e85 will just take it off if its just water based and sprayed on anyway.
Here is the funny bit:
I am using new coated rob bearings I bought 5 years ago.
I am using used Main bearings from another low mile engine I disassembled.
I took rods out of a 86.5 engine that turned out to have cast rods. Since the crank and pistons are from the same rotating assembly, I think I may have to match the weight of the rods to the original set of rods (the earlier "forged" type) so its a bit better in balance. I am not sure.
I am using (ready for this, close your eyes) used piston rings from the low mile motor that the cast rods came out of. They look unused have have no wear on the face of the rings. The engine was clearly rebuilt because the oil ring pack is what was sold WAY after the engine was originally built.
No, I would not normally do this. I have a set of new rings from Roger I bought in 2011, but I just can't bear to use them on this ragged test motor. Everything could blow up very easily, and its not too to waste these parts. They get more expensive every year.
I will assemble the short block soon, and start in on one ofthe S4 head sets I have that I can use without much work.
Last weekend I went through the lapping process for the alusil bores. I have some pictures, but they seem not not be on my phone. I guess I took them on the real camera.
Here is the finished block:

Just the goodson lapping paste and a used engine hone and the felt pads from Goodson and its looking ready to assemble (after hours of cleaning)
I have also cleaned up the pistons to remove any hot-spots in the very small but still sharp valve reliefs. I did not change the depth of the reliefs as I do not feel its needed for this valve lift.
I used Powerkote DFL-1 on the skirts and baked it for 1hr at 300degrees. Even if its just a sacrificial surface treatment, it will allow everything to wear together. I was going to coat the piston crowns but I think the e85 will just take it off if its just water based and sprayed on anyway.
Here is the funny bit:
I am using new coated rob bearings I bought 5 years ago.
I am using used Main bearings from another low mile engine I disassembled.
I took rods out of a 86.5 engine that turned out to have cast rods. Since the crank and pistons are from the same rotating assembly, I think I may have to match the weight of the rods to the original set of rods (the earlier "forged" type) so its a bit better in balance. I am not sure.
I am using (ready for this, close your eyes) used piston rings from the low mile motor that the cast rods came out of. They look unused have have no wear on the face of the rings. The engine was clearly rebuilt because the oil ring pack is what was sold WAY after the engine was originally built.
No, I would not normally do this. I have a set of new rings from Roger I bought in 2011, but I just can't bear to use them on this ragged test motor. Everything could blow up very easily, and its not too to waste these parts. They get more expensive every year.
I will assemble the short block soon, and start in on one ofthe S4 head sets I have that I can use without much work.
02-10-2014 | 05:05 PM
#52
Thread Starter
Rennlist Member
Joined: Dec 2001
Posts: 25,152
Likes: 87
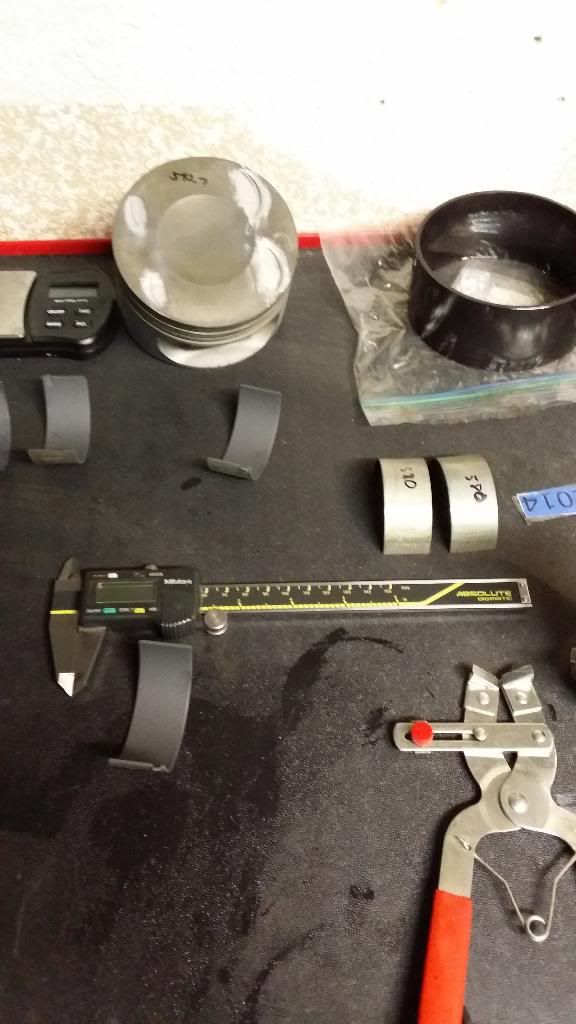
And the used rings come to about perfect on the ring end gap in the lapped cylinders. I may have to be watchful on the break in. I will have to have a very good base tune to get it running right away on the microsquirt, so its not sitting idling for a long time.


 02-11-2014 | 07:10 PM
#58
Thread Starter
Rennlist Member
Joined: Dec 2001
Posts: 25,152
Likes: 87
Loving the new avatar pic by the way.

The Big Welded Table I made
 so I can focus
  is now full of 4l80e parts, but the engine is going together on the stand as I don't see many roadblocks.
 The only possibility was to use ARP rod bolts instead of the stockers.
Question:
Before I commit with the orange crap between the girdle and block, should I put some better port for oil pressure sensing?
02-11-2014 | 08:17 PM
#59
Thread Starter
Rennlist Member
Joined: Dec 2001
Posts: 25,152
Likes: 87
The biggest hurdle is the intake. The plan is the S3 intake with a different route in through throttle bodies.
Its made from Mg, and the stuff I can buy to modify is Al. Those weld, but not with the tools I Have.
Does anyone have links on whether its okay to have an intake tube change shape 3 inches from the valve?
Also - is there ANY possibility its easy to add some piston squirters to the main webs?
Its made from Mg, and the stuff I can buy to modify is Al. Those weld, but not with the tools I Have.
Does anyone have links on whether its okay to have an intake tube change shape 3 inches from the valve?
Also - is there ANY possibility its easy to add some piston squirters to the main webs?
Last edited by BC; 02-11-2014 at 08:36 PM.
02-16-2014 | 09:36 PM
#60
Thread Starter
Rennlist Member
Joined: Dec 2001
Posts: 25,152
Likes: 87
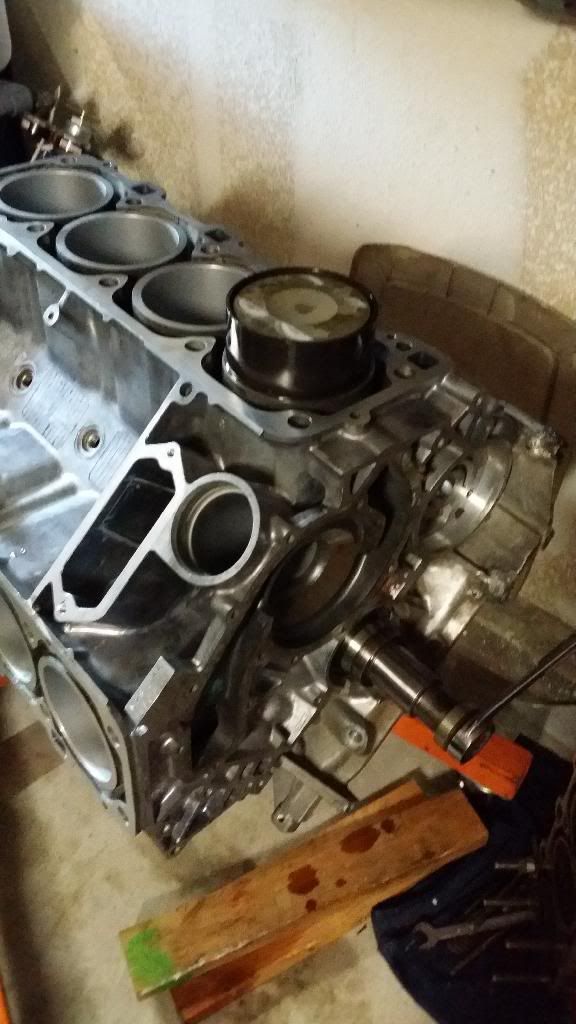
Couple Updates. Measured all clearances on mains without crank in with Dial Bore Gauge. I remember how fun this is! A day of measuring before you can put the crank in. Well, at least I know what the clearances on all bearings are.
I took quite a while get good reads on the journals so I can understand the rod journal clearances. I was having a problem at first because the new Fowler OD mics are a bit confusing with a mechanical digit readout and then all the lines on the thumb wheel.... Finally I felt I got a good set of numbers and went after the rods with the new coated bearings I bought....5 years ago.
With some hope and prayer that there was going to be enough clearance, I found .0025-.0028 at the least on the all the rods with the new bearings and the nuts torqued to 75nm. The rod big ends are not concentric. I am not sure if that is good or bad or indifferent, but this is still just a used part (most) rat motor for testing purposes on e85 and boost.
Anyway, now that everything is measured a couple dozen times, I feel confident enough to assemble what I can until some small parts come from 928intl like new nuts and piston pin clips (I had four new ones from a prior build)
I did not wish to re-balance everything so I am keeping everything as even as I can. All types of rods are about the same, with a gram here and there as a delta. Same for the pistons after they were coated and the valve pockets smoothed for hot spot removal.
Back when I was measuring the rod ID with the bearings to get clearances, I tried finding the "looser" bearings by thickness, but just can't seem to suss that out even after repeated measurements. They are all basically the same thickness depending on the time of day and temperature.
Other than some microscopic clean up of the back of the bearing shells, I don't see much how I will open them up more than the sub 3 thousands I am getting. I may try that on 2 and 6. For the time being, I have just done the front two pistons because that is what I had pin clips for this weekend.
That one above is a crappier pic than I thought it would be.
Greg had suggested Torco assembly lube. Man, this stuff is seriously sticky and thick. WAY more contact adhesion than the previous assembly lube I had. It just sort of stays in place here you want it. And it doesn't ooze out as badly. Good stuff. Thanks Greg.
Note: Yes, I am reusing parts normally someone would throw away from a previous engine disassemble. But they look good and measure out just fine. The items are things like mains and piston rings, and main nuts. I am getting new nuts for the rods, as well as as I mentioned, new rod bearings that have been coated by Calico Coatings many years ago.
I took quite a while get good reads on the journals so I can understand the rod journal clearances. I was having a problem at first because the new Fowler OD mics are a bit confusing with a mechanical digit readout and then all the lines on the thumb wheel.... Finally I felt I got a good set of numbers and went after the rods with the new coated bearings I bought....5 years ago.
With some hope and prayer that there was going to be enough clearance, I found .0025-.0028 at the least on the all the rods with the new bearings and the nuts torqued to 75nm. The rod big ends are not concentric. I am not sure if that is good or bad or indifferent, but this is still just a used part (most) rat motor for testing purposes on e85 and boost.
Anyway, now that everything is measured a couple dozen times, I feel confident enough to assemble what I can until some small parts come from 928intl like new nuts and piston pin clips (I had four new ones from a prior build)
I did not wish to re-balance everything so I am keeping everything as even as I can. All types of rods are about the same, with a gram here and there as a delta. Same for the pistons after they were coated and the valve pockets smoothed for hot spot removal.

Back when I was measuring the rod ID with the bearings to get clearances, I tried finding the "looser" bearings by thickness, but just can't seem to suss that out even after repeated measurements. They are all basically the same thickness depending on the time of day and temperature.

Other than some microscopic clean up of the back of the bearing shells, I don't see much how I will open them up more than the sub 3 thousands I am getting. I may try that on 2 and 6. For the time being, I have just done the front two pistons because that is what I had pin clips for this weekend.

That one above is a crappier pic than I thought it would be.
Greg had suggested Torco assembly lube. Man, this stuff is seriously sticky and thick. WAY more contact adhesion than the previous assembly lube I had. It just sort of stays in place here you want it. And it doesn't ooze out as badly. Good stuff. Thanks Greg.
Note: Yes, I am reusing parts normally someone would throw away from a previous engine disassemble. But they look good and measure out just fine. The items are things like mains and piston rings, and main nuts. I am getting new nuts for the rods, as well as as I mentioned, new rod bearings that have been coated by Calico Coatings many years ago.