When you click on links to various merchants on this site and make a purchase, this can result in this site earning a commission. Affiliate programs and affiliations include, but are not limited to, the eBay Partner Network.
Brian,
Just a glance at your CE panel show that you have a fuse in #13 that maybe shouldn't be there. Before you go any further, please remove the defrost relay and verify all the relay numbers that are currently in your CE panel per Stan's previous post. It appears to me also that you have some relays out of position and/or some wrong relays in the correct position.
Yes, I was surprisingly upbeat about finding the "no power" issue.
The hot wire to the battery is fine. The issue is between the starter and the alternator.
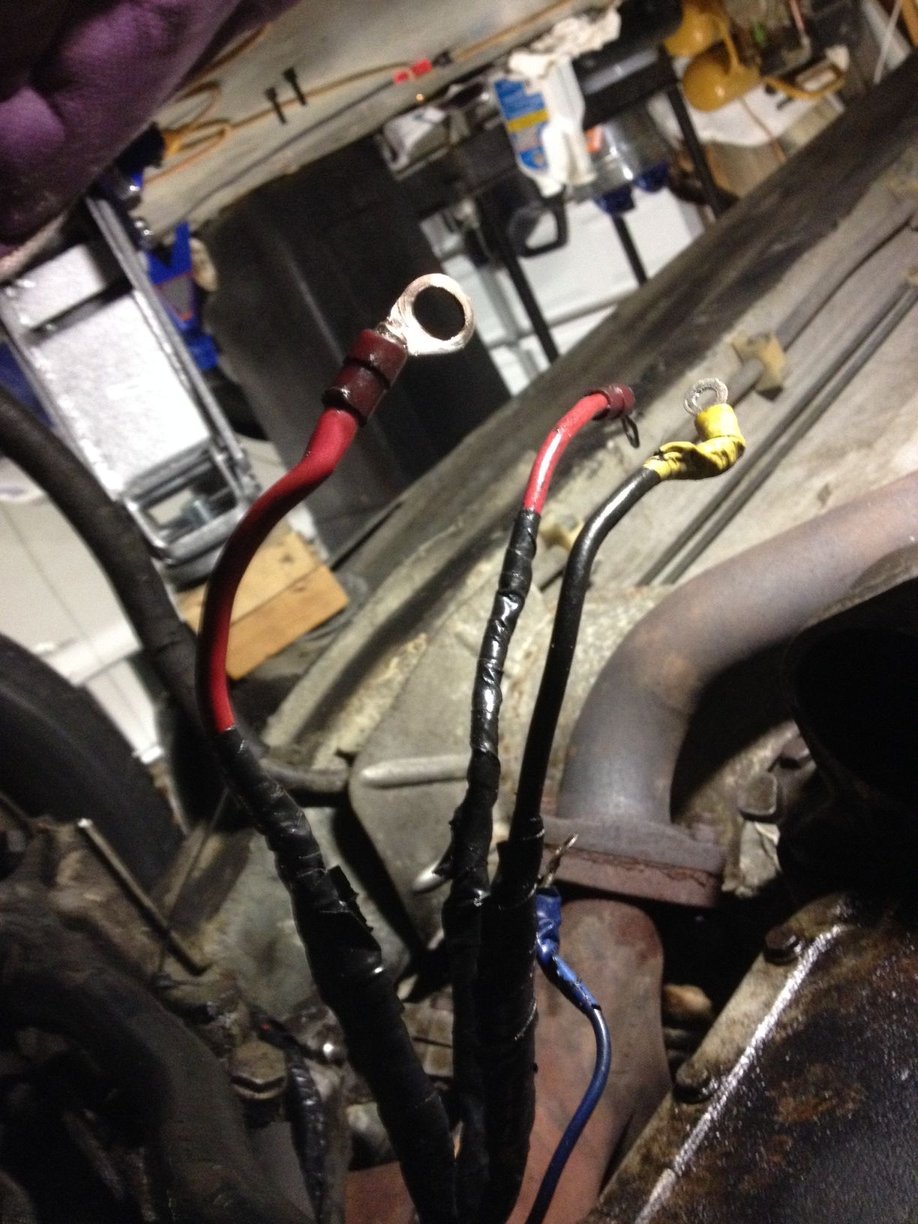
The bad news is that after I cleaned everything up and fished it forward so I could actually work on it, I ran down to the Auto Zone and picked up a few 8 ga butt crimp connectors and dove right in. I could not find my shrink tubing so I used a rubberized electrical tape to cover the 4-5" of exposed wire per lead and hooked it back up. The moment I hooked up the ground at the battery a big poof of smoke came from under the car. I mean big enough that after removing the ground I scrambled one of the 5 fire suppressors I have surrounding the car. Very dense smoke but no flame. I had to open the garage doors and crank up the fans to evacuate all the smoke.
If you are positive (no pun intended) that you connected the wires correctly the first time, since there were a couple melted off...I'd leave the starter disconnected next time. It may be shorted out internally (it looks pretty oil soaked)...and that could be why it fried the wires after hooking up the battery. I'd think it was the starter, since a positive wire grounded...usually melts closes to where it is being grounded.
I'd repair the wires again, properly - with the connectors shown or soldered and shrink tube, hook the battery up (with the starter disconnected)...and then crawl underneath and touch the wires, stroke lightly, to the appropriate terminals. If they spark sharply and hiss like melting metal or you see smoke, stop what you are doing...and from there...I'd replace the starter or have it checked by a mechanic/quality parts store tech.
Good luck.
Brian.
EDIT...The starter would have to be grounded/installed to the car to get this reaction.
Brian,
Just a glance at your CE panel show that you have a fuse in #13 that maybe shouldn't be there. Before you go any further, please remove the defrost relay and verify all the relay numbers that are currently in your CE panel per Stan's previous post. It appears to me also that you have some relays out of position and/or some wrong relays in the correct position.
Thanks for taking the time to look at this John. I appreciate everyone's help.
I'd repair the wires again, properly - with the connectors shown or soldered and shrink tube, hook the battery up (with the starter disconnected)...and then crawl underneath and touch the wires, stroke lightly, to the appropriate terminals. If they spark sharply and hiss like melting metal or you see smoke, stop what you are doing...and from there...I'd replace the starter or have it checked by a mechanic/quality parts store tech.
Good luck.
Brian.
EDIT...The starter would have to be grounded/installed to the car to get this reaction.
Solid advice and very helpful. I wish I had done this last night. Now I have 30 minutes of taking everything back off before really knowing where I am at. Retaining clamps, zip ties, insulator hoses. I just hope that all four wires are not melted together again. That will add another 30 minutes of cleaning before beginning the actual repair.
Thank you for your help
Brian, I am sure what you got will work, but when using split bolts, they are usually first wrapped in rubber splicing tape. It is inexpensive, and is in the same area in lowes as the electrical tape. I wrapped mine in splicing tape, then electrical tape. Maybe a round of splicing tape before your heat shrink?
Brian, I am sure what you got will work, but when using split bolts, they are usually first wrapped in rubber splicing tape. It is inexpensive, and is in the same area in lowes as the electrical tape. I wrapped mine in splicing tape, then electrical tape. Maybe a round of splicing tape before your heat shrink?
Thanks Ron. I will see if I can find some today if I get out of the office.
Solid advice and very helpful. I wish I had done this last night. Now I have 30 minutes of taking everything back off before really knowing where I am at. Retaining clamps, zip ties, insulator hoses. I just hope that all four wires are not melted together again. That will add another 30 minutes of cleaning before beginning the actual repair.
Thank you for your help
Brian,
I went back a few pages and saw that you have been working on this car for a while. So, maybe you have a test-light or DVM (digital volt multimeter). Instead of the touching the wire directly to the studs, as I suggested before...you could wire everything back together and connect the test light black/ground-lead to the stud on the starter and touch the red/positive-lead to the wires individually. If any of them light up the test light...you have a problem. Check each of the studs this way.
Now, I'm not sure how many of those are "hot" wires. So, one may be from the ignition switch and do absolutely nothing when testing...since no one is holding the key in the crank position.
I took off a little early today and removed the starter and the wiring. All of the wiring looked in great shape. No melting, no charing.... looked like when I installed it.
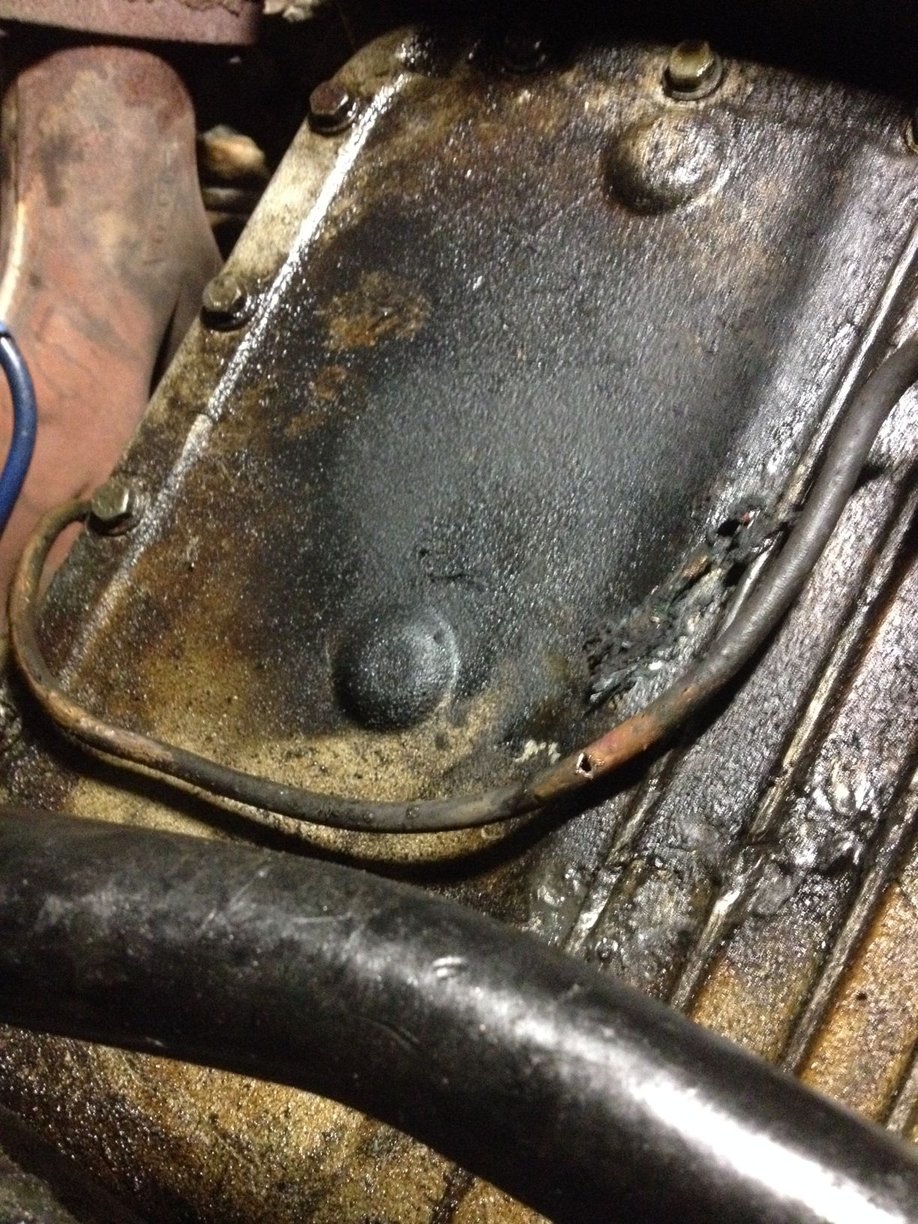
Everything looked very wet and greasy. My oil pan gasket is a mess but I could not imagine it leaking onto the main bolt of the starter.?.?.?
Then I found this......
It seams that I have a hole in the hard line from the clutch slave cylinder. The hole is directly above the main bolt for the starter.
I have two theories.
1. I am a dumbass and always in a hurry. In a rush (way back when) to remove the starter and clutch slave in order to drop the lower bell housing and service the main drive shaft, I removed the starter in such a way that drove that main bolt into the line and punctured the line. That might explain idling well in the garage and then cutting out 1 mile down the road after pressing in the clutch and soaking all the electrics a few times.
2. I am a dumbass and always in a hurry. In a rush to get the starter wired up I caused some type of electrical ignition that blew a hole in the fluid line and melted all the electrical.
I am hoping for theory number one. I have the starter removed and in the trunk for testing tomorrow. While I have avoided removing any parts from the inop 82Euro, that is next in line for fixing up, I will remove whatever I need to in order to fix this problem/issue. At a minimum the hard line will come off, the starter if needed and the whole front harness if it comes to that. I have two four day weekends coming up so I hope to either resolve this in a timely fashion and enjoy driving for a few months or just move on to the next problem or issue.
Thank to everybody that has offered ideas and guidance.
I'd think it happened after your last repair to the wires. Since you said there was a big puff of smoke from that area when you turned the key. There may have been an arch of voltage jumping from the main stud...since you repaired the wires and had good voltage now...and it had to go somewhere (if the starter is bad). It may have arched to the hard line, blowing a hole in it, causing the smoke.
Plus, wouldn't you have noticed the wet fluid the last time you were under there? Granted, hydraulic fluid is pretty flameable. But still, if the starter "is" in good working condition...there shouldn't have been any heat build up from just turning the key to the crank position...so hence...no ignition/arch should have taken place so quickly, unless the voltage has no where to go, in my opinion and based on info available.
Having that starter checked should tell you something...I would think.
Hey bud, that looks a lot like an electrical short to me....the stud or a wire from the starter would probably be the most likely. I would replace that line, I broke mine, and I silver brazed it back together....it worked for now....
Like I mentioned before, you need to get a DVM for checking out electrical issues. They are not that difficult to use, once you spend a little time with one and read the manual that comes along with them.
You’d be able to do a quick check on the continuity of that starter in question, by setting your DVM on ohms reading and touching one lead to the starter’s largest stud and the body of the starter. If you have any continuity at all…I’d run out and buy yourself a nice little aluminum boat…since you already have an anchor now.
Reading ohms, measuring the resistance in a wire or connection is as important as knowing voltages sometimes. Plus, once you learn how to measure resistance…you can apply this knowledge in everyday life. The other day I mentioned to my wife that I was looking at a new set of wheels and tires for the 928 and was thinking about buying them, however, by her reply, facial expressions and body languish…and the dishes thrown in my direction…and using my knowledge of her level of resistance…I decided this was a bad idea.
Now, if you already have a DVM and use it properly, I apologize for giving you info you already have.


 12-17-2014, 01:44 PM

 I mean big enough that after removing the ground I scrambled one of the 5 fire suppressors I have surrounding the car. Very dense smoke but no flame. I had to open the garage doors and crank up the fans to evacuate all the smoke.