
Bilsteins Have Landed
 08-24-2013, 03:32 AM
#61
Nordschleife Master
I recommend you buy some of them "lift bars" 
Before you get the car off the ground, while the weight of the car is keeping the springs compressed, use a rattle gun to remove the M12 lock nuts on the top of the shock rod, and replace them with regular nuts. This saves much frustration later on
Before you get the car off the ground, while the weight of the car is keeping the springs compressed, use a rattle gun to remove the M12 lock nuts on the top of the shock rod, and replace them with regular nuts. This saves much frustration later on
- Get the car off the ground,
- Undo the upper A-arm nuts in the engine bay (M14 - 22mm wrench/socket/gizmo - I have a long 72-tooth ratchet which does these nicely from underneath),
- Undo the lower M10 shock bolt and tap it out of the lower A-arm's bracket
- Then undo the 3x M10 nuts on the top side and remove the shocks/springs as an assembly.
- Stick the whole assembly in your spring compressor, compress a few mm, remove top nut (super easy now its not a lock nut) and release slowly.
- Put it all together (probably need new bump stops)
- Hang the shock from a couple of M10 nuts at the top and..
- Wiggle the other bits into place (with a mallet to persuade the lower end into the bracket on the lower A-arm).
- Tighten all the bits to spec.
 08-24-2013, 03:34 AM
#62
Rennlist Member
Follow the WSM loosen the upper a-arms from the motor side. You need a wrench with a good extension. As soon as these nuts are loose it's easy.
I use my shop press in combination with the spring compressors to take the tension of the springs. Quick and easy.
I use my shop press in combination with the spring compressors to take the tension of the springs. Quick and easy.
08-24-2013, 03:50 PM
#63
Addict
Lifetime Rennlist
Member
Lifetime Rennlist
Member
I thought I'd experienced them all until I put on the Koni's (medium setting) and found some of the heavier springs from a GTS (sport package). Simply amazing is all I can really say. I will not change to anything else and I've had a variation of shocks and springs on my car.
I'm guessing I would reuse my existing springs?
08-24-2013, 04:38 PM
#64
Basic Sponsor
Rennlist
Site Sponsor
Rennlist
Site Sponsor
Thread Starter
Bilstein's $928
Koni's $650
Koni's $650
__________________

Does it have the "Do It Yourself" manual transmission, or the superior "Fully Equipped by Porsche" Automatic Transmission? George Layton March 2014
928 Owners are ".....a secret sect of quietly assured Porsche pragmatists who in near anonymity appreciate the prodigious, easy going prowess of the 928."
Does it have the "Do It Yourself" manual transmission, or the superior "Fully Equipped by Porsche" Automatic Transmission?
George Layton March 2014928 Owners are ".....a secret sect of quietly assured Porsche pragmatists who in near anonymity appreciate the prodigious, easy going prowess of the 928."
08-31-2013, 09:44 AM
#66

Great news.......................pretty much the best shocks available for 928's
for a street car....stock springs with bilsteins.....good enough for sporting driving and trackdays too
For a race car.....get eibachs and cut -1.5 coils or 600lb front 400lbs rear springs......just about perfect and still ride decent on the street.....
Full race (not street legal)....would need to be revalved and run stiffer springs...which is what I am doing right now on my racers bilsteins
08-31-2013, 01:01 PM
#67
Inventor
Rennlist Member
Rennlist Member
I used the shop spring compressor which has four arms and a central single nut. (A proper version of the HF tool.) Works great with a air gun.
I have relearned how to drive my '88 with the rear shocks in. The grip is amazing with proper shocks. Stock springs seem to work fine.
09-20-2013, 06:55 PM
#68
Rennlist Member
Last week Sunday Erkka and myself changed my front shocks, and once again: many thanks to Erkka  for teaching and being patience with me (I must be one of the slowest working car persons on this planet).
So to not change the wheel alignment set-up (at least the bare minimum) hereby the procedure we followed. Before starting this replacement, I had measured the front ride height to be 152 mm which is very much lower than the recommended factory front height of 180 mm +/- 10 mm.
After having removed both belly pans and having put the front plenty high enough (always keep your own safety in mind, no car is worth dying for!) and front wheels removed, remove the following parts as per underneath WSM chapter 40-7 picture:
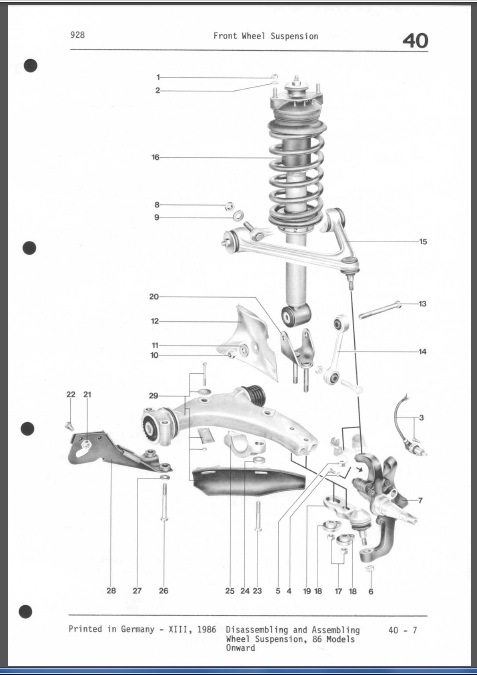
- Two times bolts nr. 21 & nuts nr. 22 (re-assembly: torque @ 46Nm)
- Two times bolts nr. 26 & washer nr. 27 (re-assembly: torque @ 85Nm)
- Remove Guard nr. 28
- Two times bolts nr. 23 & washer nr. 24 (re-assembly: screw in until only 2 threads are visible. Do not tighten to 120Nm until assembly is completed and springs have settled)
- Remove Bearing clamp nr. 25
- Remove bolt nr. 13 & nt nr. 10 and washer nr. 11 (re-assembly: torque @ 85Nm)
- Remove Air guide plate nr. 12
Then swing the whole lower control arm + break disk assembly out the way, as per underneath picture:
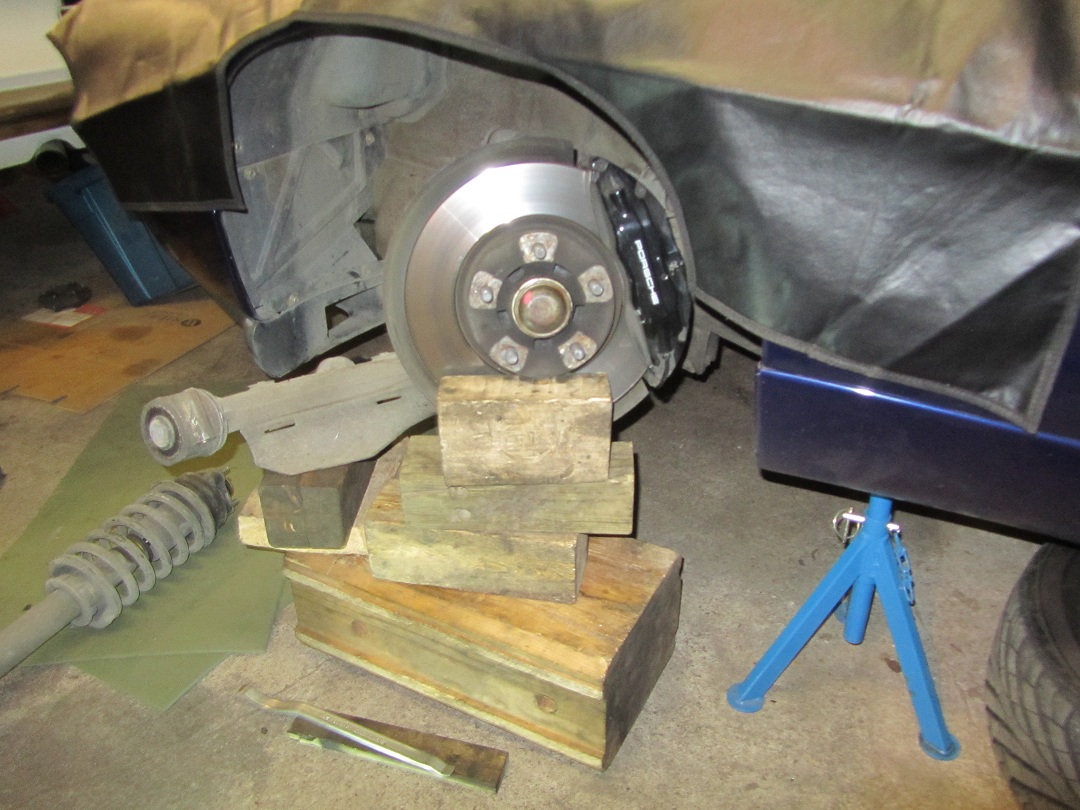
- Remove the three top-strut locknuts nr. 1 & washers nr. 2 (re-assembly: torque @ 46Nm)
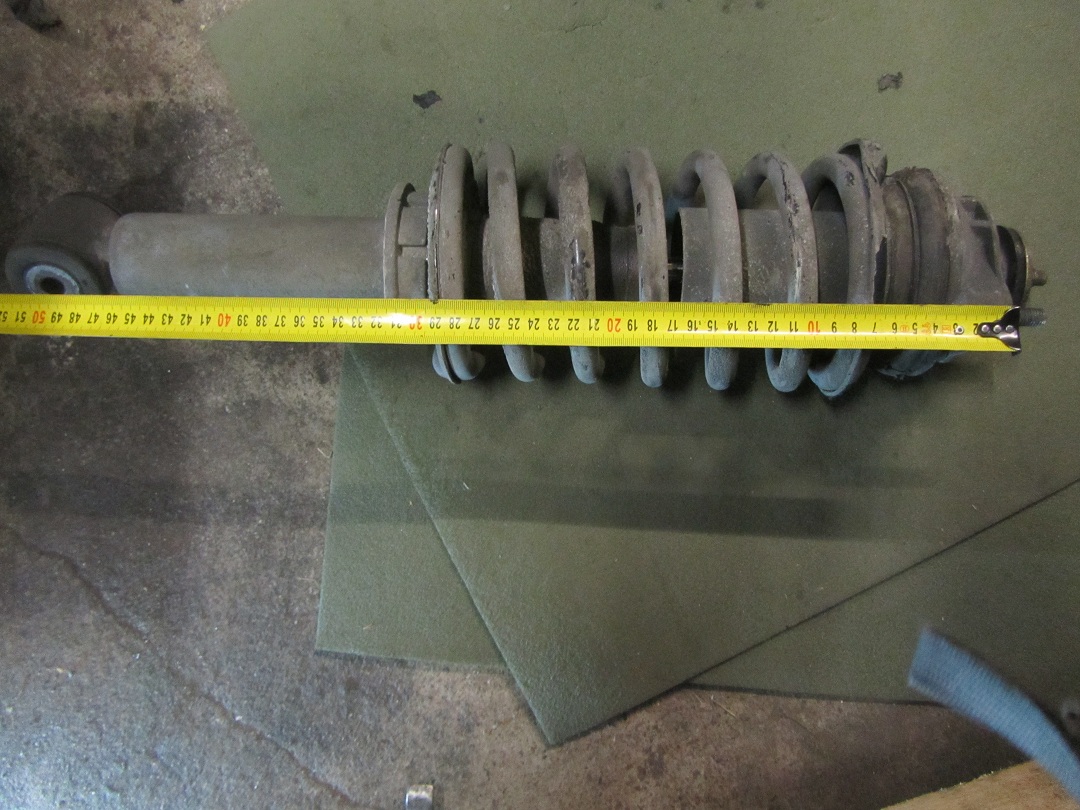
Now take out the whole old standard factory Boge shocks + springs, mine measured about 51 cm from top- to center of the bottom Boge shock:
Make absolutely sure to put a thin layer of silver = aluminum paste on the threads the adjuster nut moves on + the top of the adjuster nut itself. I forgot to do the top of the adjuster nut on one of the new New Bilstein shock assembly...ouch!!! I explain at the end why the "ouch!!! and what to do if this happens to you too (better to not forget, it saves much time and grief!).
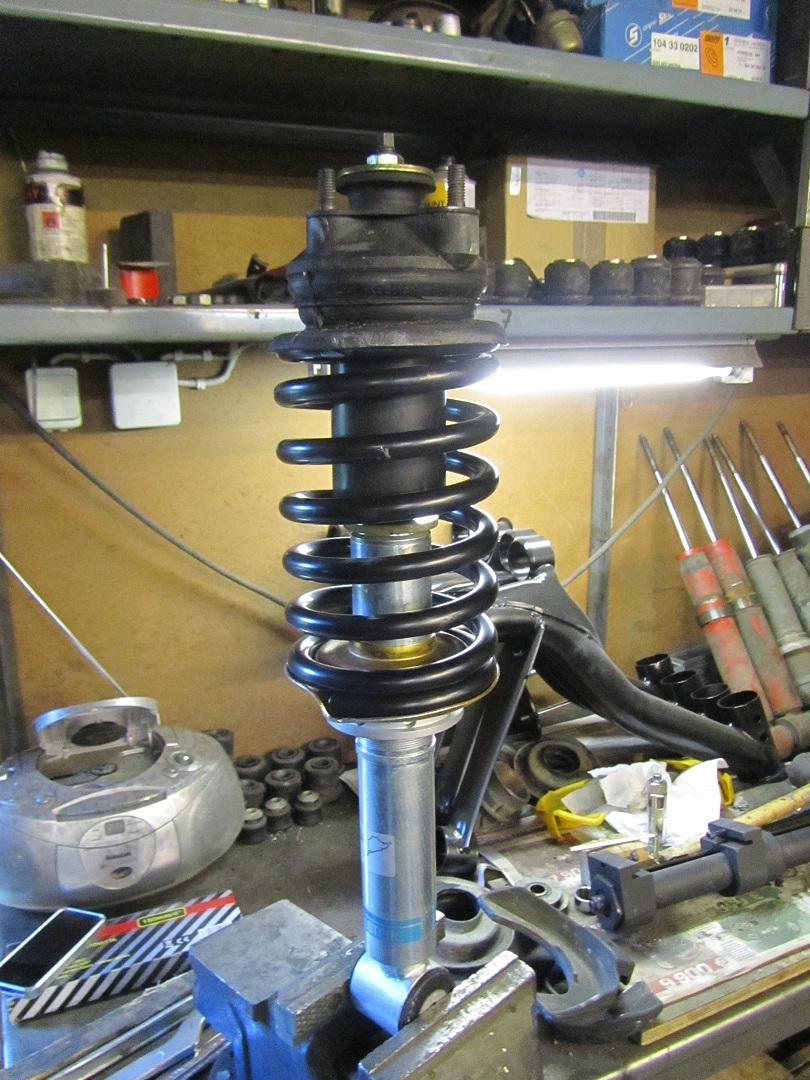
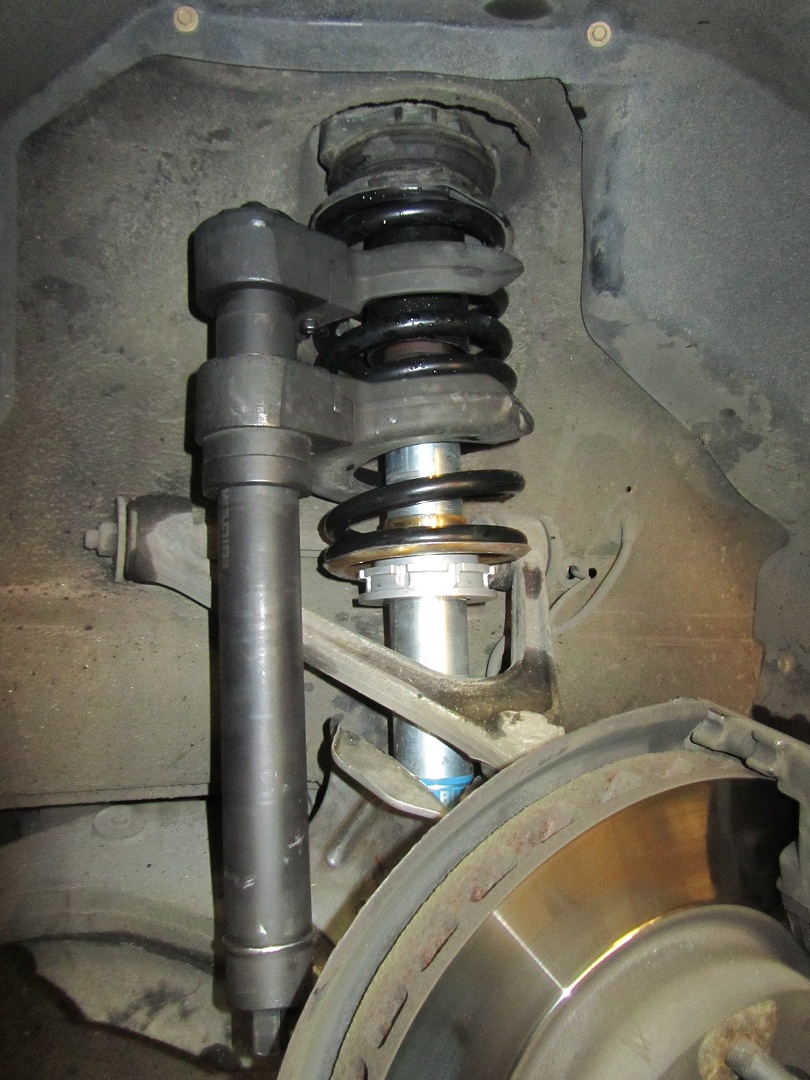
New Bilstein shock assembly ready to go back in:
After driving and settling, I measured with 12 threads on both side from the bottom a ride height of around 20 cm. My final adjustment was to 4 threads on the drivers side and 2.5 threads on the passenger side, and after again driving and settling today it gave me a measured ride height of 175 mm driver side and 178 mm passenger side (= fine with me, given uneven concrete surface, etc.). Again I used the proven measuring "method a la Erkka":
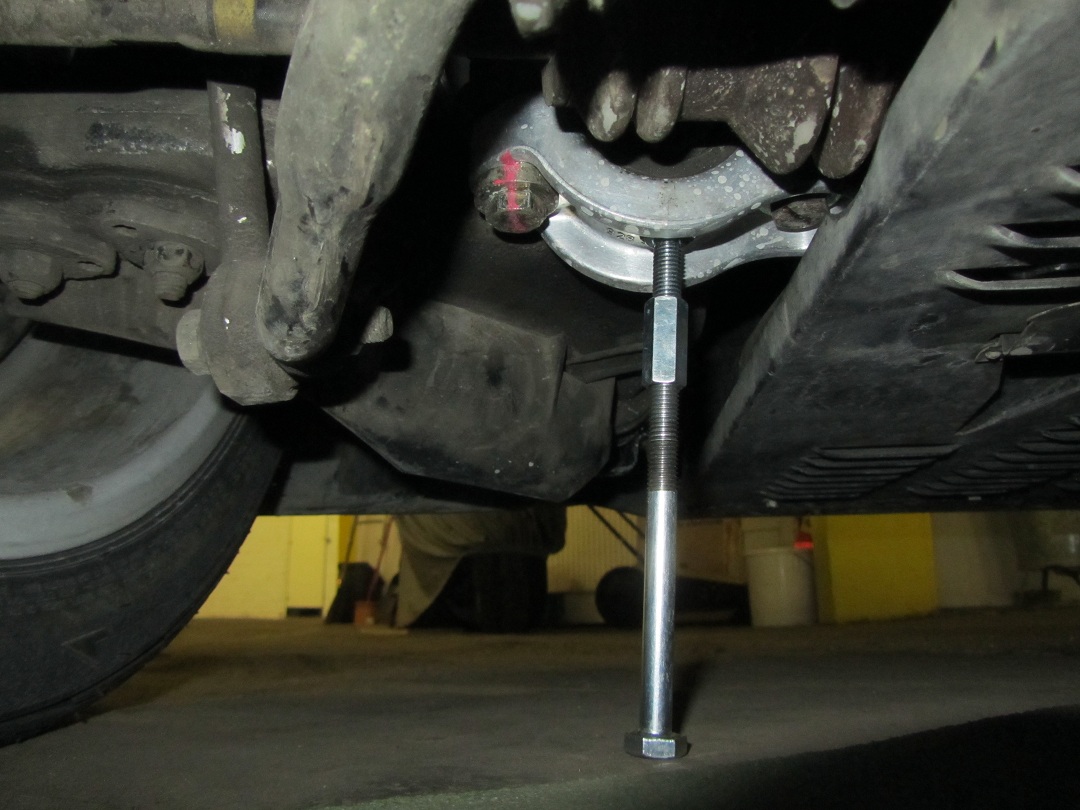
"Ouch!!!": when, like me, you forget to put a thin layer of silver = aluminum paste as described above, it will be near impossible to move the adjuster nut (which will be a gym workout by itself, as due to the lack of paste you now have a huge friction of the aluminum adjuster nut on the steel bottom plate with the spring + car weight on top) and NOT having the springs move too. My spring moved = not good!
What to do: use your sturdy spring compressor to compress the spring "in-situ" as per underneath picture, and turn the adjuster nut all the way down till the final stop position.
Now it should be easy enough to move the spring back into the correct position, and then turn the adjuster nut back upwards to your required thread position. When turning the adjuster nut back upwards the spring can not move anywhere. When done remove your sturdy spring compressor.
With now Bilsteins all around the overall difference in ride is great: super tight and no "bouncing" anywhere while still being very comfortable. I can really recommend doing this change!
for teaching and being patience with me (I must be one of the slowest working car persons on this planet).So to not change the wheel alignment set-up (at least the bare minimum) hereby the procedure we followed. Before starting this replacement, I had measured the front ride height to be 152 mm which is very much lower than the recommended factory front height of 180 mm +/- 10 mm.
After having removed both belly pans and having put the front plenty high enough (always keep your own safety in mind, no car is worth dying for!) and front wheels removed, remove the following parts as per underneath WSM chapter 40-7 picture:
- Two times bolts nr. 21 & nuts nr. 22 (re-assembly: torque @ 46Nm)
- Two times bolts nr. 26 & washer nr. 27 (re-assembly: torque @ 85Nm)
- Remove Guard nr. 28
- Two times bolts nr. 23 & washer nr. 24 (re-assembly: screw in until only 2 threads are visible. Do not tighten to 120Nm until assembly is completed and springs have settled)
- Remove Bearing clamp nr. 25
- Remove bolt nr. 13 & nt nr. 10 and washer nr. 11 (re-assembly: torque @ 85Nm)
- Remove Air guide plate nr. 12
Then swing the whole lower control arm + break disk assembly out the way, as per underneath picture:
- Remove the three top-strut locknuts nr. 1 & washers nr. 2 (re-assembly: torque @ 46Nm)
Now take out the whole old standard factory Boge shocks + springs, mine measured about 51 cm from top- to center of the bottom Boge shock:
Make absolutely sure to put a thin layer of silver = aluminum paste on the threads the adjuster nut moves on + the top of the adjuster nut itself. I forgot to do the top of the adjuster nut on one of the new New Bilstein shock assembly...ouch!!!
I explain at the end why the "ouch!!! and what to do if this happens to you too (better to not forget, it saves much time and grief!).New Bilstein shock assembly ready to go back in:
After driving and settling, I measured with 12 threads on both side from the bottom a ride height of around 20 cm. My final adjustment was to 4 threads on the drivers side and 2.5 threads on the passenger side, and after again driving and settling today it gave me a measured ride height of 175 mm driver side and 178 mm passenger side (= fine with me, given uneven concrete surface, etc.). Again I used the proven measuring "method a la Erkka":
"Ouch!!!": when, like me, you forget
to put a thin layer of silver = aluminum paste as described above, it will be near impossible to move the adjuster nut (which will be a gym workout by itself, as due to the lack of paste you now have a huge friction of the aluminum adjuster nut on the steel bottom plate with the spring + car weight on top) and NOT having the springs move too. My spring moved = not good!What to do: use your sturdy spring compressor to compress the spring "in-situ" as per underneath picture, and turn the adjuster nut all the way down till the final stop position.
Now it should be easy enough to move the spring back into the correct position, and then turn the adjuster nut back upwards to your required thread position. When turning the adjuster nut back upwards the spring can not move anywhere. When done remove your sturdy spring compressor.
With now Bilsteins all around the overall difference in ride is great: super tight and no "bouncing" anywhere while still being very comfortable. I can really recommend doing this change!
09-20-2013, 07:17 PM
#69
Team Owner
Glad you like the Bilstiens a few thoughts,
instead of using just the aluminum paste mix some grease into it as well,
then coat the threads and the spring perches where they sit on the collars.
NOTE the grease makes the perches easy to adjust with the car jacked up
NOTE since you removed the LCAs you will need a front end alignment
instead of using just the aluminum paste mix some grease into it as well,
then coat the threads and the spring perches where they sit on the collars.
NOTE the grease makes the perches easy to adjust with the car jacked up
NOTE since you removed the LCAs you will need a front end alignment
