
Rear a/c evaporator
 04-30-2012, 03:41 PM
#1
Rennlist Member
Thread Starter
Aside from replacement, has any one found a solution to leaky rear evaporator?
Mine appears to be leaking from where the copper tubes go into the coil. I put some dye in the system, and it showed up on every one. I initially narrowed it down by the evergreen scent of the dye - which I could not detect anywhere else.
What's wierd is that there's no dirt accumulation anywhere on the part - the whole thing is remarkably clean.
My local radiator guy says there's really no way to fix it reliably, and the idea of applying a vacuum to suck in some sort of epoxy likely won't work b/c there's no way to clean those areas.
He has offered to braise those spots, but no guarantees.
 04-30-2012, 03:53 PM
#2
Three Wheelin'
Join Date: Mar 2010
Location: Colorado Springs, CO USA
Posts: 1,307
Likes: 0
Received 3 Likes
on
3 Posts
Yes. I soldered mine using Muggy Weld Superalloy 1.
https://rennlist.com/forums/928-foru...c-leaks-2.html
https://rennlist.com/forums/928-foru...c-leaks-2.html
04-30-2012, 05:08 PM
#3
Unless you can make the solder or braze points oil free, you won't get a good bond. The coil runs at 20-40 psi when the system is running, however when the system is off on a hot day the static system pressure can easily read 100 psi.
The most practical solution if the coil has numerous leaks to locate a good used one.
The most practical solution if the coil has numerous leaks to locate a good used one.
04-30-2012, 05:36 PM
#5
Addict
Rennlist Member
Rennlist Member
There are some old threads discussing the technique of using some kind of sealant (Loctite or some such) and sucking it into the leak points (joints at tubing) with vacuum.
I'm almost sure I remember I comprehensive post on this many years ago, but I can't find it. The best I can find now is:
The technique is also mentioned�but not in any detail�in Wally's 928 HVAC write-up ("The 928 HVAC System: Basic Operation and Troubleshooting").
I'd like to find the detailed post again (or have somebody describe the exact sealant used and procedure), as I probably need to do this on my car, too.
I'm almost sure I remember I comprehensive post on this many years ago, but I can't find it. The best I can find now is:
- Rear A/C Smell (which references a post by WallyP)
- AC Issues, front warm rear cold, starting at post #33
The technique is also mentioned�but not in any detail�in Wally's 928 HVAC write-up ("The 928 HVAC System: Basic Operation and Troubleshooting").
I'd like to find the detailed post again (or have somebody describe the exact sealant used and procedure), as I probably need to do this on my car, too.
04-30-2012, 05:52 PM
#6
Three Wheelin'
Join Date: Mar 2010
Location: Colorado Springs, CO USA
Posts: 1,307
Likes: 0
Received 3 Likes
on
3 Posts
Unless you're suggesting trying to seal to the evaporator without removing it... that I would say is a bad idea. It should be pulled, cleaned, soldered, pressure tested (at least a little), and then reinstalled with a new expansion valve. Once you've done enough work to gain access to the evaporator squid, it's hardly any more work to remove the unit entirely from the vehicle. (again, we're talking rear evaporator here, not front)
04-30-2012, 05:59 PM
#7
True, but why would this be difficult? There are many good degreasers out there. I used brake cleaner, which, I have learned since, may have been a bad choice, as heating some types of brake cleaner can produce toxic fumes, but carb cleaner and electric motor cleaner work well.
Unless you're suggesting trying to seal to the evaporator without removing it... that I would say is a bad idea. It should be pulled, cleaned, soldered, pressure tested (at least a little), and then reinstalled with a new expansion valve. Once you've done enough work to gain access to the evaporator squid, it's hardly any more work to remove the unit entirely from the vehicle. (again, we're talking rear evaporator here, not front)
Unless you're suggesting trying to seal to the evaporator without removing it... that I would say is a bad idea. It should be pulled, cleaned, soldered, pressure tested (at least a little), and then reinstalled with a new expansion valve. Once you've done enough work to gain access to the evaporator squid, it's hardly any more work to remove the unit entirely from the vehicle. (again, we're talking rear evaporator here, not front)
"Unless you're suggesting trying to seal to the evaporator without removing it". No.
"new expansion valve", only if its defective or leaking, usually its the o-rings.
Trending Topics
04-30-2012, 10:40 PM
#8
Rennlist Member
Thread Starter
The evap is already out of the car at the radiator place.
WRT using the vacuum sealant method... no way to clean the oil out of places you can't get to, i.e. the leaking passages or the inside of the evaporator.
Here's a pic before removal. You can see the greenish-yellow dye around the copper tube joint. Every one was like this:
WRT using the vacuum sealant method... no way to clean the oil out of places you can't get to, i.e. the leaking passages or the inside of the evaporator.
Here's a pic before removal. You can see the greenish-yellow dye around the copper tube joint. Every one was like this:
04-30-2012, 10:47 PM
#9
Three Wheelin'
Join Date: Mar 2010
Location: Colorado Springs, CO USA
Posts: 1,307
Likes: 0
Received 3 Likes
on
3 Posts
As to replacing the expansion valve, no, you don't have to, but a lot or people recommend replacing them anytime the system is opened, since they clog so easily, and since they're not very expensive. I also replaced mine because they were original and not R134a compatible, and I was planning to switch the system to R134a.
04-30-2012, 10:49 PM
#10
Three Wheelin'
Join Date: Mar 2010
Location: Colorado Springs, CO USA
Posts: 1,307
Likes: 0
Received 3 Likes
on
3 Posts
George, that looks like the same symptoms I had with mine: leaking at the Al/Cu joints.
Here's what it looked like after soldering (also in the thread I linked above):
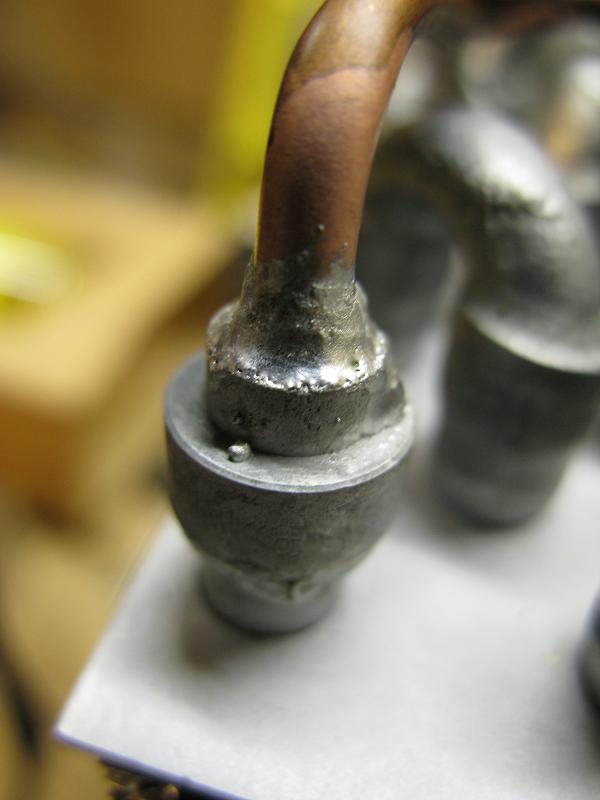
Here's what it looked like after soldering (also in the thread I linked above):
05-06-2012, 12:08 PM
#11
Three Wheelin'
Join Date: Sep 2007
Location: Ridgecrest, California
Posts: 1,363
Likes: 0
Received 143 Likes
on
28 Posts
Hello SQLGuy,
Looks like I'm in need of the same repair for the rear evaporator on Idaho '88. I removed the evaporator yesterday and found a whole lot of refrigerant oil in the bottom of the plastic tub underneath the evaporator. The front had a lot of oil on it too so it's hard to tell where exactly the leak is coming from but I suspect it's coming from the Al/Cu fittings. I'm going to try a pressurized air leak test today to verify.
I'm interested in your Muggy Weld repair option and was wondering how long your system has been charged, continuously (i.e., how long has it been since it was last charged)? Have you inspected the fittings recently for evidence of leakage? What size rods did you use - the 1/8" or the 3/16"? Thanks for sharing your solution.
05-06-2012, 02:52 PM
#12
Rennlist Member
I have a friend who has repaired these by locating the leak, then applying a vacuum to the evaporator, and using epoxy at/around the leak. The vacuum pulls some epoxy in to the leak and it seals! Lasted for several years, as far as I know.
Gary-
Gary-
05-11-2012, 12:13 PM
#13
Rennlist Member
Thread Starter
Great tips, all.
I took it to my radiator guy and he said he'd try, but with the caveat that it might not work and would be ruined. He thought there might also be some epoxy in there that may start oozing out with the heat.
Well, he was right. The heat deformed the cooper a bit and epoxy started oozing out. So, I got a used one from 928Intl, which fortunatley, held 29"hg for well over an hour and appears to be working.
I looks like the low heat Muggy Weld or epoxy solution is the way to go.
05-11-2012, 03:10 PM
#14
Race Car
Careful. Just because it will hold vacuum, doesn't mean it won't leak. On a properly charged system at rest, there can be over 90 psi of pressure in the evaporator. The only way to know it is not leaking is to pressurize it to ~90psi using nitrogen.
Dan
'91 928GT S/C 475hp/460lb.ft
Dan
'91 928GT S/C
475hp/460lb.ft
