
Steering Rack Rebuild question
 12-10-2011, 06:08 PM
#1
Intermediate
Thread Starter
Join Date: Jan 2010
Location: Vernon, BC Canada
Posts: 47
Likes: 0
Received 0 Likes
on
0 Posts
Hey everyone, I'm stuck on my steering rack rebuild. The picture below shows all the parts (on the white sheet) of the rebuild kit from Roger at 928sRus:
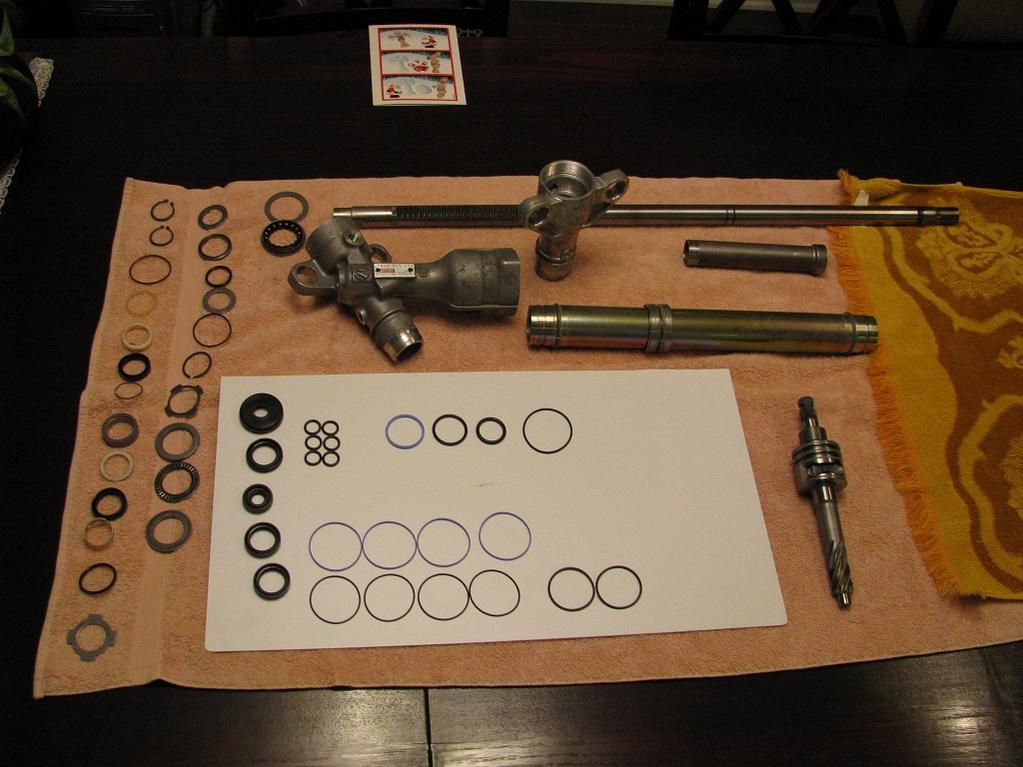
I can't figure out where the blue Teflon band (in the top row) goes, and the black O-ring 2 spots to the right of it. (I believe the O-ring is #13, see below.)
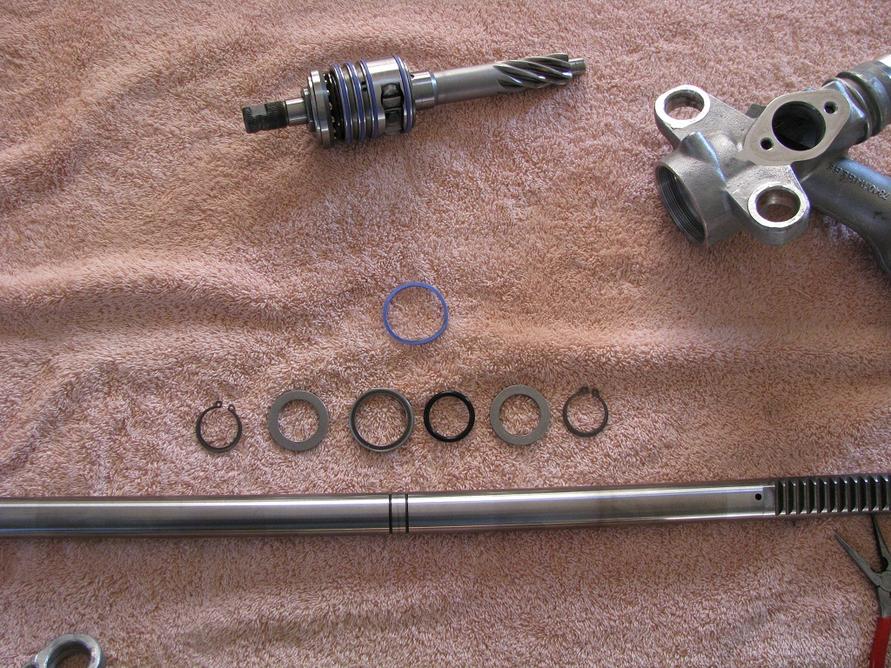
This picture shows the what I think is the ordering of the parts on the shaft between the 2 circlips:
According to the next diagram, these parts (left to right) are:
Circlip #11, washer #12, seal assembly (Teflon band #16, O-ring #15, race #14) , O-ring #13, washer #12, circlip #11. (By the way, #16 and #15 are not included in the rebuild kit.)

The issue is, that series of parts won't fit in the space between the 2 circlips. And, of course, I don't know where the Teflon ring mentioned above goes.
Any help, as always, is greatly appreciated.
G.
I can't figure out where the blue Teflon band (in the top row) goes, and the black O-ring 2 spots to the right of it. (I believe the O-ring is #13, see below.)
This picture shows the what I think is the ordering of the parts on the shaft between the 2 circlips:
According to the next diagram, these parts (left to right) are:
Circlip #11, washer #12, seal assembly (Teflon band #16, O-ring #15, race #14) , O-ring #13, washer #12, circlip #11. (By the way, #16 and #15 are not included in the rebuild kit.)
The issue is, that series of parts won't fit in the space between the 2 circlips. And, of course, I don't know where the Teflon ring mentioned above goes.
Any help, as always, is greatly appreciated.
G.
 12-12-2011, 12:36 PM
#4
Intermediate
Thread Starter
Join Date: Jan 2010
Location: Vernon, BC Canada
Posts: 47
Likes: 0
Received 0 Likes
on
0 Posts
I believe I have this figured out. The difficulty was with #16, as it appears it's outside diameter is somewhat larger than the original. (I am going to attempt final assembly this evening.)
The ordering is as follows:
Teflon band #16, O-ring #15, race #14 , O-ring #13.
#15 fits inside the groove on the race, #16 fits over that, and #13 actually fits inside the race itself.
Incorrect, they are included.
I can't figure out where the blue Teflon band (in the top row) goes, and the black O-ring 2 spots to the right of it. (I believe the O-ring is #13, see below.)
Teflon band #16, O-ring #15, race #14 , O-ring #13.
#15 fits inside the groove on the race, #16 fits over that, and #13 actually fits inside the race itself.
(By the way, #16 and #15 are not included in the rebuild kit.)
12-12-2011, 02:23 PM
#5
Craic Head
Lifetime Rennlist
Member
Lifetime Rennlist
Member
Gary,
Nice job of cleaning and arranging the job there.
One thing I would say in case you haven't done this before is to make sure that you get the center tube #22 completely seated in the two end pieces (1 and 27 I think).
The first time I did mine I must not have worked it in all the way and although the threaded ring (7) seemed tightened down if I had looked in the hole where the banjo bolt for the hard hydraulic line goes before putting it on I would have seen that an O-ring was visible and it shouldn't have been (should be in beyond the hole).
When I did it the O-ring had caught on the teeth of the center rod (3) and pinched just a little bit of it.
This ended up causing it to leak (not right away, almost a year later) and required me to completely remove the rack to replace that O-ring.
Good luck on the reassembly!
12-12-2011, 06:29 PM
#6
Intermediate
Thread Starter
Join Date: Jan 2010
Location: Vernon, BC Canada
Posts: 47
Likes: 0
Received 0 Likes
on
0 Posts
One thing I would say in case you haven't done this before is to make sure that you get the center tube #22 completely seated in the two end pieces (1 and 27 I think).
As you've done this before, can you identify what part #8.1 is?
Trending Topics
 12-12-2011, 11:21 PM
#9
Craic Head
Lifetime Rennlist
Member
Lifetime Rennlist
Member
Gary,
I think 3.1 is one of the sweeper seals. You may have to destroy the old one to get it out but be careful not to scratch anything as you dig it out. The old one is probably stuck in the end piece (1) so you may not know it would come out.
If I'm right it corresponds to #10 from the other end of the rack (same part, reverse angle) which goes into #27 IIRC.
#7 needs to be seated all the way in with all of that other stuff in there before it in order for it all to seal correctly.
12-14-2011, 01:08 AM
#11
Intermediate
Thread Starter
Join Date: Jan 2010
Location: Vernon, BC Canada
Posts: 47
Likes: 0
Received 0 Likes
on
0 Posts
#7 needs to be seated all the way in with all of that other stuff in there before it in order for it all to seal correctly.
Thanks again for all the great advice Mike.
Too bad you hadnt joined awhile ago.
I hosted a rack rebuilding party down here.
I hosted a rack rebuilding party down here.
(Of course, I didn't have the car with the leaking steering rack then
 )
12-14-2011, 12:28 PM
)
12-14-2011, 12:28 PM
#12

Sorry, I can't help with part 3.1: I don't remember, but FWIW it does not show up in any of the pictures that I took when I rebuilt my steering rack.
Did you replace part #26 (the plastic washer/bushing/bearing at the right end of the rack assembly), and did you find a source for it? Although this is a wear item, it is not included in any of the rebuild kits that I was able to find. (Jeff/Speedtoys - I believe that wear of this part is likely the cause of radial play in the steel rack shaft.)
Also, how did you go about removing the threaded rings (parts numbered 19), and how will you torque them? (For that matter, what is the proper torque?) I had a real problem with the idea of using a hammer and drift punch, so I bought an "engine pin wrench" (tool pn BMW3031) from Sir Tools. It had to be modified slightly to fit, but worked very well.
You might want to consider replacing the hoses as well as the reservoir/filter also.
Bob
12-15-2011, 12:34 AM
#13
Intermediate
Thread Starter
Join Date: Jan 2010
Location: Vernon, BC Canada
Posts: 47
Likes: 0
Received 0 Likes
on
0 Posts
FWIW it does not show up in any of the pictures that I took when I rebuilt my steering rack.
Did you replace part #26 (the plastic washer/bushing/bearing at the right end of the rack assembly), and did you find a source for it?
Also, how did you go about removing the threaded rings (parts numbered 19), and how will you torque them?
01-02-2017, 01:39 PM
#14
Rennlist Member
Hi
Sorry to dig up an old thread but the OP had the same problem that I have with part #16... The outside diameter is larger on the replacement blue Teflon ring than the original white part so I can't see how it will fit within the central tube without sanding it down a little.
Has anyone else had this challenge?
I've PM'd the OP but thought I'd post on here also incase others had/have the same problem.
Thanks in advance
Ben