

LED Bulbs for GTS Gauge Illumination. Which one??
 10-15-2011, 05:25 PM
#31
Addict
Rennlist Member
Rennlist Member
Thread Starter
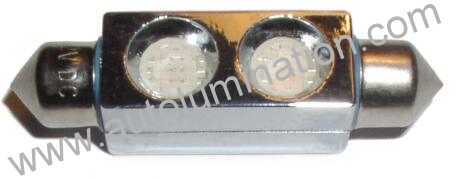
Bulbs came in the other day and while I havent gotten to the gauges yet, I did install new license plate bulbs.
They are 36mm festoon bulbs that are plug and play. Took all of about 5 minutes to do.
Pic is here
http://autolumination.com/images/aut..._smt_cw_wm.jpg
Located on this page
http://autolumination.com/festoon.htm
High Powered 9 Led SMT Festoon
10mm diameter - Direct drop-in replacement for all OEM bulbs
36mm = 1-3/8" Long 1-3/8" LONG (36MM) X 1" (24MM) WIDE Replaces: 3423 3425 6411 6418 6461 6423* 6486X C5W
$9.99 each
I wanted something that looked like a "new car", but not too "Ricer" or Blingy.
The plate illuminates with a nice crisp white now istead of an old dingy yellow that barely lit up the plate. Looks way better in person than the crappy Iphone pic shows.

The following users liked this post:
scoper (10-31-2021)
10-15-2011, 07:20 PM
#33
Chronic Tool Dropper
Lifetime Rennlist
Member
Lifetime Rennlist
Member

... And covered with an infrared-absorbing visible-light-distorting window tint film that flashes when the redlight cameras flash.
10-15-2011, 07:47 PM
#34
Addict
Rennlist Member
Rennlist Member
Thread Starter
Rich, Bob,
I installed switches to shut off the LED, Spin the plate over, shoot oil out, and announce an LED F-BOMB to the car I just passed. Here's a pic of switch setup.
It will be mounted in the same area as Jim Mayzurk Gauge setup, but camouflaged so not even the passenger will know it's there!!
I installed switches to shut off the LED, Spin the plate over, shoot oil out, and announce an LED F-BOMB to the car I just passed. Here's a pic of switch setup.
It will be mounted in the same area as Jim Mayzurk Gauge setup, but camouflaged so not even the passenger will know it's there!!
10-15-2011, 07:50 PM
#35
Drifting

Too bad these threads are so quickly hijacked with off topic content.
For the rear license plate illumination, you can purchase LED bulbs in 'Warm White' which better matches the color of incandescent bulbs.
For the rear license plate illumination, you can purchase LED bulbs in 'Warm White' which better matches the color of incandescent bulbs.

 T
10-16-2011, 06:02 PM
T
10-16-2011, 06:02 PM
#37
Addict
Rennlist Member
Rennlist Member
Thread Starter
Sean came over today. He had the Pod out, the instrument cluster taken apart and the LEDs installed all in under an hour and 15 minutes. He rigged up a 9volt battery tester and made sure that we had all the bulbs installed correctly. (polarity can be reversed)
Big difference in illumination, looked great!!
I've got Gold Team interiors to come fix a crack in the pod under the the ignition hole, then Sean will come back next weekend and get everything buttoned back up.
Learned a lot watching this one. I've had the pod off the 79 several times including the LED upgrade I did on it, but there are a few more steps to doing the later model cars w airbags.
Thx to Sean for making the "House Call" and making it look easy!!!
Looking forward to getting this all buttoned up next week and ready for 3rd Coast!!
10-17-2011, 06:45 PM
#38
Rennlist Member
Hi Chuck – This is great, thanks for keeping the LED conversion going.
I just re-read Ed's .pdf and Keith's write-up on interior LED conversion and plan on ordering all the bulbs tomorrow—to include exterior bulbs. From your other posts, I see you've done your brake lights too. Do you know the size/model number? And, have you done any other exterior lights; and if you have, do you know the size/model number? I’m also wondering about the red lights inside the door?
Based on Ed’s document, I think I understand what you meant about Sean using a 9v battery to test polarity and make sure the bulbs work. But I’m curious about the carbon film resistor stuff. Did he install resistors too—and if he did, is there any chance you took pictures? That section is TBA in Ed’s pdf.
And now piling on: did you find an “easy” solution for the brake light conversion screwing up the cruise control? I’m thinking leaving the incandescent bulb in the 3rd brake light is the way to go.
Thanks again – wish I could be there for 3rd coast this year to see the “light show”. / Bruce
10-17-2011, 07:28 PM
#39
Rennlist Member
did you find an �easy� solution for the brake light conversion screwing up the cruise control? I�m thinking leaving the incandescent bulb in the 3rd brake light is the way to go.
Bruce 93 GTS: Midnight Blue Metallic/Raspberry
Bruce 93 GTS: Midnight Blue Metallic/Raspberry
10-17-2011, 10:56 PM
#40
Addict
Rennlist Member
Rennlist Member
I just re-read Ed's .pdf and Keith's write-up on interior LED conversion and plan on ordering all the bulbs tomorrow—to include exterior bulbs. From your other posts, I see you've done your brake lights too. Do you know the size/model number? And, have you done any other exterior lights; and if you have, do you know the size/model number? I’m also wondering about the red lights inside the door?
Based on Ed’s document, I think I understand what you meant about Sean using a 9v battery to test polarity and make sure the bulbs work. But I’m curious about the carbon film resistor stuff. Did he install resistors too—and if he did, is there any chance you took pictures? That section is TBA in Ed’s pdf.
And now piling on: did you find an “easy” solution for the brake light conversion screwing up the cruise control? I’m thinking leaving the incandescent bulb in the 3rd brake light is the way to go.
These are for my '90 S4; I think they'd be appropriate for any '87 and later.
- Rear light assembly turn signals (2): Super Bright LEDs 1156-A45T (if amber needed) bulbs or 1156-R45T (if you've painted your turn signal lens area red) bulbs;
- Front turn signals (2): Super Bright LEDs 1157-A45T bulbs;
- Flasher relay for turn signals (1): Super Bright LEDs CF13GL-02;
- Turn signal load resistors (2; rear only): Super Bright LEDs RL-2525 (one in parallel with each of your rear turn signals if you discover that the turn signal indicator light in your instrument cluster doesn't light properly after converting to LEDs);
- Rear light assembly brake lights (2): Super Bright LEDs 1157-R45-T bulbs;
- CHMSL (center brake light) (1): Super Bright LEDs 1156-R45-T bulb (note: retain as incandescent bulb or add 6 Ω load resistor, e.g. Super Bright LEDs RL-650, somewhere to brake light circuit (in parallel to bulbs) to retain use of cruise control);
- Rear light assembly tail lights (4): Super Bright LEDs 67-R15 bulbs (note: these are just a little too bright relative to the adjacent dual brake/tail light; might want to cover with something or use series current limiting resistor to dim them slightly);
- Rear light assembly backup lights (2): Super Bright LEDs 1156-CW45-T bulbs;
- Front side markers (2): Super Bright LEDs 67-A15 bulbs;
- Rear side markers (2): Super Bright LEDs 67-R15 bulbs;
- Door edge markers (2): Super Bright LEDs BA9S-R-120-12V bulbs;
- Rear license plate light (2): Super Bright LEDs 3710-CWHP3 festoon bulbs (or, for a nice variation, try some other forward-firing red festoon bulbs in 36 mm to 42 mm, Autolumination lists some appropriate ones on their festoon bulb page; I'm actually using the red ones right now) (note: original bulb is 37 mm long, but the socket tabs can be bent to accommodate a variety of lengths; probably best to stay at or under 42 mm);
- Engine compartment light (1): Super Bright LEDs 1156-W2W-ARA bulb. (Important note: I've been notified that '94 uses a 37 mm festoon; I'm guessing that there was a transition from BA15S to festoon sometime; I'll look into it.)
FWIW, there are probably lots of perfectly suitable alternatives for the above. About the only ones that I have a fairly strong opinion about are the brake and turn signal (i.e., the 1156/1157 type) bulbs. I actually spent a lot of time evaluating a lot of different 1156/1157 LED bulbs (see the thread "Gauging interest in LED bulb shootout write-up"). I haven't yet got around to doing a complete write-up for that comparison (but would still like to), but I did reveal my favorite of the bunch in post #40 in that thread. IMHO, the brake lights (and other lights in the tail light assembly) are the most important lights of all, and it's prudent to use the best possible bulbs (as best as you can determine).
I can also recommend Borland's "light 'em all up" brake light modification (see the thread "S4/GT/GTS Brake Light Upgrade Mod")—I did this a few weeks ago myself. If you do that, you'll need (not counting the CHMSL) 6 brake light bulbs instead of 2, and omit the rear light assembly tail lights listed above.
You should also be aware of Borland's thread Side Marker Light Bulb Socket Modification. While I didn't do that myself, it looks like a nice piece of work that is worth considering.
The current-limiting resistors mentioned in my document are not involved in any of the above; they're only needed for the interior for pod switch backlighting bulbs and some other interior backlighting bulbs.
I currently am using an electronic solution to solve the "all LED brake lights / cruise control" problem. But... as you can read for yourself near the end (as of now) of Borland's "Cruise Control Mod for LED Brake Lights", I'm not going to share details of that circuit, because in retrospect, I think it trades off a little bit of safety (related to what happens with various failure modes) versus the more energy-wasting alternative of just using a load resistor or just keeping one incandescent brake bulb in the circuit. I'm going to revert to using a load resistor instead sometime soon.
You'll probably also find that you'll need to disable the bulb control module's warnings. There are a number of ways to do it; I elected to use a simple, reversible technique. Other techniques are covered in that same thread: Defeating the Bulb Control Module (note that that thread contains information related to various model years).
Since Autolumination doesn't provide clear identification (e.g., part numbers) for many/most of their bulbs, here's the festoon bulb (in 39 mm) I was talking about as a nice alternative in red for the license plate light bulbs:
Related threads that may be of interest:
- Defeating the Bulb Control Module (FWIW, I used the technique I documented in post #32 in that thread)
- S4/GT/GTS Brake Light Upgrade Mod
- Cruise Control Mod for LED Brake Lights (FWIW, I recommend a 6 W load resistor in parallel with the brake bulbs somewhere in the circuit)
- Side Marker Light Bulb Socket Modification
- Gauging interest in LED bulb shootout write-up
- (and... not a thread, but a separate write-up already referenced in post #8 in this thread) Converting Porsche 928 Interior Lighting to LEDs
Last edited by Ed Scherer; 06-29-2012 at 02:04 PM.
10-18-2011, 12:28 AM
#42
Addict
Rennlist Member
Rennlist Member
I'm not sure whom that question was directed to, but I know that the instrument clusters changed considerably in '89 with the introduction of the digital "information system display". I have little knowledge of the instrument clusters prior to '89; I believe there are other threads that discuss (at least) how to convert to LED backlighting for the gauges (which, IIRC, was among the differences).
10-18-2011, 02:32 AM
#43
Rennlist Member
Ed - Thank you! This is excellent; between your pdf and the list above, it's a one-stop shopping list. For cruise control, I've never used it, but would hate to loan the car to someone and forget to mention it.
I know ****-all about capacitors, relays, resistors, etc. and I didn’t see any pictures of how or what they look like when installed. But, I’m going to buy a soldering iron and the other stuff you mention in your .pdf and take the Ted Kennedy approach and drive off that bridge when I come to it. Hopefully this will all come together about the same time your dimmer hits the market.
Thanks again—couldn’t do this without you. / Bruce
Jim - I think I remember seeing the LED strip on Sean's car earlier this year when we went to the Texas Mile. I think he said he bought it at WalMart and the strip was just pressed in there(?)
I know ****-all about capacitors, relays, resistors, etc. and I didn’t see any pictures of how or what they look like when installed. But, I’m going to buy a soldering iron and the other stuff you mention in your .pdf and take the Ted Kennedy approach and drive off that bridge when I come to it. Hopefully this will all come together about the same time your dimmer hits the market.
Thanks again—couldn’t do this without you.
/ BruceJim - I think I remember seeing the LED strip on Sean's car earlier this year when we went to the Texas Mile. I think he said he bought it at WalMart and the strip was just pressed in there(?)
Last edited by NoVector; 10-18-2011 at 02:34 AM. Reason: Spelling--doh!
10-18-2011, 10:33 AM
#44
Addict
Rennlist Member
Rennlist Member
Thread Starter
Bruce,
Glad Ed and Jim Chimed in on this one as the only exterior LED mod I've done is the License plate bulbs.
Looks like Ed used a 39mm. I used a 36mm and it worked.
I did give Sean 2 for his 88 the other day and the 36mm were too short. Looks more like 39 or 41mm for that model year.
BUT, the prongs on all the license receptacles can be bent to accept bulbs that vary by several mm's.
Sean did it and it fit like a charm. Now if he could just fix his blown fuse to see how good they look!!