
Cam timing effects, 32V
 11-23-2011, 05:55 PM
#76

I got three engines to do before New years. Can we call roger now for early bird specials?
 11-24-2011, 07:07 PM
#77
Inventor
Rennlist Member
Rennlist Member
Thread Starter
One page BumpStick manual - PKBumpStick.pdf
To be used along with the 32V'r manuals - 32VrManual.pdf + 32VrManual_M.pdf
To be used along with the 32V'r manuals - 32VrManual.pdf + 32VrManual_M.pdf
11-25-2011, 02:26 AM
#79
Glenn - the 'alphas' are going fast - (EDIT: all sold)
Roger will have them in Dec. The only noticeable difference will be a brushed finish on the socket.
FYI: the 'sprocket' design provides a way of holding the socket firmly when installing or removing. It can also be used to (lightly) pry it off if it is tight. The two holes align with #1 and #6.
Ken, Just for clarification, does this mean I am in for an alpha set? Or do I need to order a set from Roger in Dec?
Hope you had a great Turkey Day, Glenn
11-25-2011, 02:06 PM
#80
Inventor
Rennlist Member
Rennlist Member
Thread Starter
Glenn - you are out. (The 1% who paid quickly are in.  )
)
I'm not certain what Roger's price will be. You may want to preorder from him now, as the next batch may be selling out!
)I'm not certain what Roger's price will be. You may want to preorder from him now, as the next batch may be selling out!
11-25-2011, 02:30 PM
#81
Inventor
Rennlist Member
Rennlist Member
Thread Starter
Tips for checking and adjusting when setting both banks with a 32V'r and BumpStick set.
Checking timing with 32V’r
1-4
Retard -2° for a cold engine
EG: target 0°
0 - 2 = -2°
5-8
No change, cold or hot
EG: target 0°
0 = 0°
Adjusting timing with 32V’r and BumpStick tools
1-4
Set to desired setting cold, advance +2° if hot
Retard -2° for a cold engine
Advance +2° to compensate for belt reaction when moving the cam
EG: target +2°
2 - 2 + 2 = +2°
EG: target 0°
0 - 2 + 2 = 0°
5-8
Set to desired setting
EG: target 0°
0 = 0°
After any adjustment
- Tighten the 32V'r clamp ring bolts
- Remove the 32V'r spacer
- Torque the cam bolt to spec (47ftlb/65nm)
- Make sure the belt is clear
- Remove the wrench used to turn the engine
- Unplug the EZF/K
- Spin the engine with the starter for a second or two
- Rotate the engine CW by hand, smoothly, to #1 0|T
- Remember to use checking specs when verifying, not adjustment specs
Spinning the engine settles the belt and give a true reading. Doing it by hand does not work as well.
Try and adjust in one movement. Advancing and retarding, back and forth, will load and unload the belt, changing the reading. If you've messed with it too much, lock it down, spin the engine with the starter to resettle, retry.
Last edited by PorKen; 11-26-2011 at 10:41 PM.
11-26-2011, 02:08 PM
#82
Basic Sponsor
Rennlist
Site Sponsor
Rennlist
Site Sponsor
I have 20 sets of the PKBumpsticks arriving mid December (thankyou Ken).
Some are already reserved - my price is $55 per set plus shipping.
Price increase to $65 after the design change. Those who ordered at $55 the price will be honored.
One day when I grow up I want to be as clever as Ken!!!
Some are already reserved - my price is $55 per set plus shipping.
Price increase to $65 after the design change. Those who ordered at $55 the price will be honored.
One day when I grow up I want to be as clever as Ken!!!
__________________

Does it have the "Do It Yourself" manual transmission, or the superior "Fully Equipped by Porsche" Automatic Transmission? George Layton March 2014
928 Owners are ".....a secret sect of quietly assured Porsche pragmatists who in near anonymity appreciate the prodigious, easy going prowess of the 928."
Does it have the "Do It Yourself" manual transmission, or the superior "Fully Equipped by Porsche" Automatic Transmission?
George Layton March 2014928 Owners are ".....a secret sect of quietly assured Porsche pragmatists who in near anonymity appreciate the prodigious, easy going prowess of the 928."
Last edited by ROG100; 12-01-2011 at 11:14 AM.
11-28-2011, 12:59 PM
#84
Rennlist Member
Can somebody put arrows on the #1 and #6 holes you refer to above? Are they in the cam gear itself or the bump stick socket? If as Ken says, the socket will fit only one way, what holes are you referring to?
TIA.
11-28-2011, 01:23 PM
#85
Inventor
Rennlist Member
Rennlist Member
Thread Starter
Steve - it's a little more clear in the updated stainless version (which you will receive shortly). There are similar holes on the 'sample' yellow zinc version.
In the pic below, the socket is pointing up, as if the engine were at #1 0|T. IE. when the small hole near the bolt hole is pointed up.
I decided to go to a beefier design, using thicker stainless steel, after more testing showed that mild steel was way too soft for heavy use. Stainless laser cuts very cleanly - they are going to look really nice!
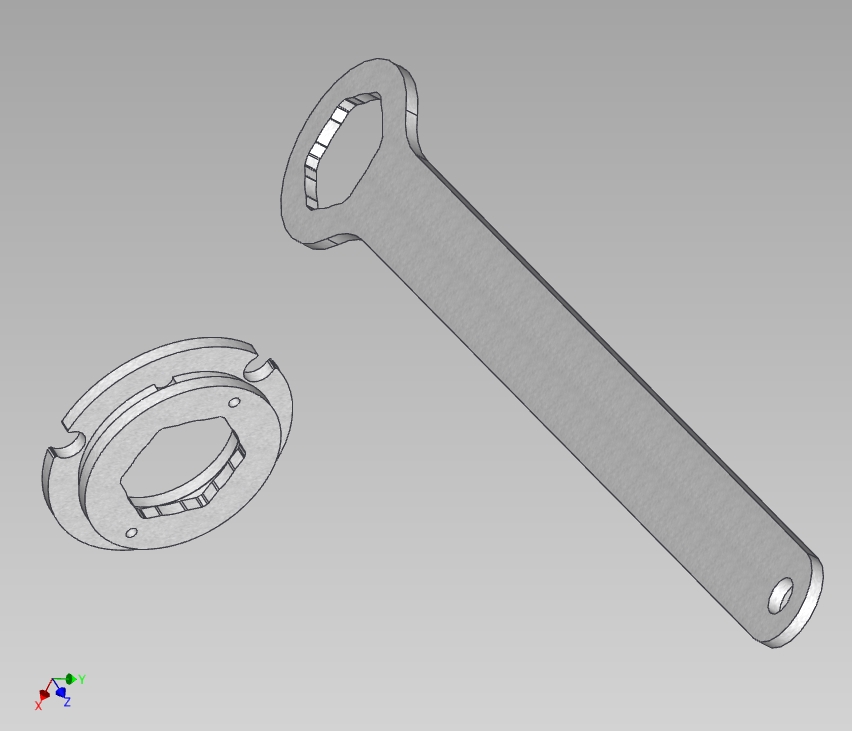
11-28-2011, 02:11 PM
#87
Inventor
Rennlist Member
Rennlist Member
Thread Starter
Cylinders #1 and #6. You want to check/adjust on #1.
With the balancer at TDC (0|T) on cylinder #1, the notch on the front of the cam gear will be pointing upwards.
With the balancer at TDC (0|T) on cylinder #1, the notch on the front of the cam gear will be pointing upwards.
12-01-2011, 03:53 AM
#88
Addict
Rennlist Member
Rennlist Member
For the record...I just installed a new Gates "Racing" belt 150 miles ago and set both sides to 0 degrees anticipating belt stretch of about 2 degrees on the 1-4 side once the new belt is broken in. On this new kind of belt, I suspect the jury is still out on how much stretch can be anticipated? Offhand, it appears that the 0, 0 settings have resulted in a noticable loss in torque. Is that possible?
Harvey
Harvey
12-01-2011, 01:46 PM
#90
Rennlist Member
Harvey,
Having spent several years presenting Kevlar's technical properties to people at the major rubber good companies (belts, hoses, tires - including Gates), I would expect ZERO stretch from the Kevlar belt over it's lifetime.
That's one of the reasons I'm quite interested in using it when I replace the belt in my '94 this winter.
Gary--