
Name that Vacuum line????
 06-27-2011, 09:47 PM
#1
Racer
Thread Starter
I was most of the way through the replacement of my CPS when one of the vacuum lines popped free. It connects to something under the intake, but I am not sure what?
Please see the attached photo. It's the Vacuum spider that has the four side ports (2 x 2), and then one conection at the bottom. This is the line that came out from under the intake.
Anyone know what the bottom vacuum line connects to under the intake
Please see the attached photo. It's the Vacuum spider that has the four side ports (2 x 2), and then one conection at the bottom. This is the line that came out from under the intake.
Anyone know what the bottom vacuum line connects to under the intake
 06-27-2011, 10:03 PM
#2
Archive Gatekeeper
Rennlist Member
Rennlist Member
Ugh, it connects to the rearward-facing nipples on the top of the lower intake plenum. You are going to have a real tough time getting that back on the nipple due to the impingement of the TPS and the vacuum hose that comes off the MAF elbow and runs up to the venturi next to the throttle quadrant. You might get lucky, or you might have to pull the MAF and MAF elbow to get some clearance.
S4+ vacuum diagram, sort of showing the connection. In real life the straight rubber connector slips over the nipple, not a 'U' shaped elbow like in the diagram below:

It's routed around the TPS switch like so:

S4+ vacuum diagram, sort of showing the connection. In real life the straight rubber connector slips over the nipple, not a 'U' shaped elbow like in the diagram below:
It's routed around the TPS switch like so:
06-27-2011, 10:16 PM
#3
Racer
Thread Starter
I know this is inappropriate, but I just had an engine-gasm staring at your engine block (grin). Its spectacular!
Thanks for the photo. I can see that this is going to be tricky to reinstall. I'll try to take some pictures of the side of the throttle body to help guide me for the reinstall. Any chance you have a better shot of that hose connection?
Thanks for the photo. I can see that this is going to be tricky to reinstall. I'll try to take some pictures of the side of the throttle body to help guide me for the reinstall. Any chance you have a better shot of that hose connection?
06-27-2011, 10:29 PM
#4
Archive Gatekeeper
Rennlist Member
Rennlist Member
Thanks, I like to use that picture whenever possible, to amortize its cost. 
I don't have a good pic here and can't find one in the archives, but I have a spare lower plenum at home, will shoot a pic later tonight.
I don't have a good pic here and can't find one in the archives, but I have a spare lower plenum at home, will shoot a pic later tonight.
06-27-2011, 11:03 PM
#6
Rennlist Member
Here is where you'll have to make your connection, the top of the throttle body under the intake manifold. It's the vacuum line on the left - in Dwayne's hand.
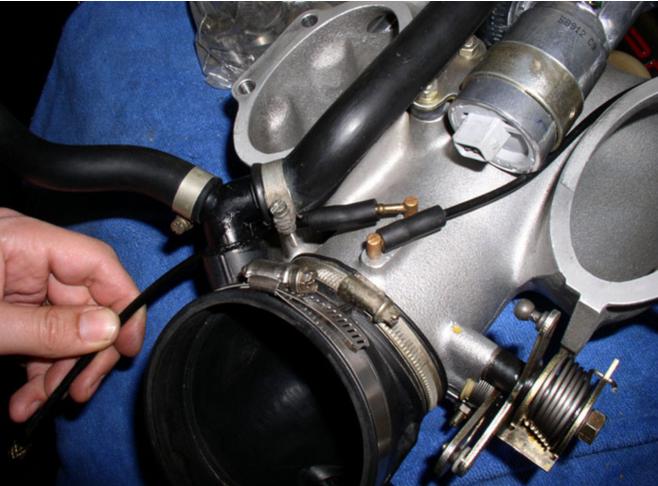
A good light, some long needle nose pliers and maybe a mirror ought to do it.
Jerome
A good light, some long needle nose pliers and maybe a mirror ought to do it.
Jerome
06-27-2011, 11:05 PM
#7
Archive Gatekeeper
Rennlist Member
Rennlist Member
Good call on Dwayne's writeup, shoulda thought of that. You might want to put some Ru-Glide, or some vaseline, or some K-Y jelly on the tip of the black vacuum hose connector, to make it easier to stick onto the metal nipple.
Yep, a few: This engine is in the GTS.
https://rennlist.com/forums/928-foru...r-society.html
https://rennlist.com/forums/928-foru...ly-thread.html
https://rennlist.com/forums/928-foru...pril-11-a.html
Do you have photo's of the finished assembly?
This engine is in the GTS. https://rennlist.com/forums/928-foru...r-society.html
https://rennlist.com/forums/928-foru...ly-thread.html
https://rennlist.com/forums/928-foru...pril-11-a.html
Trending Topics
06-28-2011, 01:04 AM
#9
Archive Gatekeeper
Rennlist Member
Rennlist Member
Greg Brown has a plating shop near his place that will take a car's worth of hardware, strip them, plate with yellow zinc and a chromate wash, for $95. I bet there is an analogous plating outfit in your area.
It helps if you degrease everything first, and anything with rust on it must be cleaned up, either by bead blasting, or with a wire wheel.

It helps if you degrease everything first, and anything with rust on it must be cleaned up, either by bead blasting, or with a wire wheel.
10-10-2011, 11:46 PM
#10
Race Car
Wow, in times of strained economics and cashflow..seems like even with a 100% markup that would be a decent product for a vendor. I guess shipping weight/costs would be a challenge, but still, good use for the last bits of dismantled cars..
10-11-2011, 12:28 AM
#11
Archive Gatekeeper
Rennlist Member
Rennlist Member
Mark Anderson must have a cubic yard of nuts and bolts from dismantled cars. My OCD is almost bad enough to think that figuring out every plated nut and bolt in every year car via PET, then assembling a kit to re-do the hardware on a whole car would be fun. Almost.
10-11-2011, 08:41 PM
#12
Three Wheelin'
Mattman - Now you know where it goes. I had the same problem when working on something near that vacuum line. Came uplugged very easily but not as easy to get in . It is possible however to get it back on without a tear down (or mental breakdown). I used this wrench set from Harbor Freight (#37909) and with a mirror, LED light and lots of straining, I was able to hook it back in. I removed the 90' bend and used a straight plug as pictured in Jerome's pic in post 6.
Edit: If you have an assistant, you can remove the hood easily to get a better angle at things. Just mark the hinge on the hood and unbolt. Weighs under 15 lbs I believe and makes this task quicker. Good luck!

. It is possible however to get it back on without a tear down (or mental breakdown). I used this wrench set from Harbor Freight (#37909) and with a mirror, LED light and lots of straining, I was able to hook it back in. I removed the 90' bend and used a straight plug as pictured in Jerome's pic in post 6. Edit: If you have an assistant, you can remove the hood easily to get a better angle at things. Just mark the hinge on the hood and unbolt. Weighs under 15 lbs I believe and makes this task quicker. Good luck!