

Tools & Technique for Upper Bellhousing Bolt Removal? - Success!
 08-20-2010, 02:18 PM
#16
Rennlist Member
Sometimes I start big at the ratchet, step down to 1/4 ust to get past obstructions, then back up to 3/8 or 1/2 . But you probably have done that too.
 08-20-2010, 02:23 PM
#17
Under the Lift
Lifetime Rennlist
Member
Lifetime Rennlist
Member
Thread Starter
08-20-2010, 02:47 PM
#18
Rennlist Member
I've used the interlocking wrench trick for years .... with success - the interlock area makes for a perfect 'universal' that allows the primary wrench to stay square on the head ..... a wood block tapped in behind the head keeps the wrench in place. I second the idea of soaking a cotton ball in Kroil - and squishing it down on the bolt head for a marinade. This works great on the hidden, upper barrel nut on 993 starters 
As every little bit helps, stick a floor jack ( & a 4x4 extension as you're on a hoist) under the front of the harmonic balancer or oil pan: a slight pressure here will minimize the strain on the one remaining top bolt ... and may ease its release.
As every little bit helps, stick a floor jack ( & a 4x4 extension as you're on a hoist) under the front of the harmonic balancer or oil pan: a slight pressure here will minimize the strain on the one remaining top bolt ... and may ease its release.
08-20-2010, 11:46 PM
#20
Under the Lift
Lifetime Rennlist
Member
Lifetime Rennlist
Member
Thread Starter
So, I broke a 3/8" u-joint trying to get at the bolt from the TT area. Got the socket seated but the side loading from the angle was too much for the u-joint. Not enough clearance around the bolt for 1/2" drive u-joint. From above I could not get the standard socket to stay seated. So, I broke out a set of rounded head bolt removal sockets. These aren't as nice as the ones Erkka shows. I have a nice Craftsman set but not up to 19mm. This one is from HF. The smaller HF ones are not very good and don't work nearly as well as the Craftsman set, but the larger 19mm one worked fine. The bolt is trash, but I'm happy.
I just tighten these with a wrench since I can't get a torque wrench down into that area. Guess I don't know my own strength. Note the antiseize.
This extending locking angle flex-head ratchet is one of those odd but handy tools. The extending handle allows you to use it in tight areas but extend it if you need extra torque. I use it quite a lot, like my favorite versatile tool, the twist ratchet. Anyway, it did the job with a pipe over the handle. I did have to remove the fuel damper and the rear intake of the supercharger manifold to get enough room for the wrench. With a stock manifold, I've done it without removing anything.
Normally a long box end combo with a 15 degree head angle or the flexhead Gearwrench combo, either with a larger boxend interlocked over the open end, will do the job.
Onward.
 08-21-2010, 12:54 AM
#23
Under the Lift
Lifetime Rennlist
Member
Lifetime Rennlist
Member
Thread Starter
This was one of those I-hope-I-don't-screw-this-up-good episodes. The socket went on OK, but after just breaking the bolt free, it was jammed between the firewall and the bellhousing. Took a bit more cussing to get it off. It shouldn't be this hard, but it often is.
 08-21-2010, 03:12 AM
#25
Bill,
Anti sieze noted, an excellent engineering practice, as you never know when you have to go back in.
Good to see that you got it out. I did not mention the Craftman round headed bolt-out sockets, as I knew you had a set from the time you removed the cam-tower allen headed set bolt.
You definately feel some job satisfaction when you achieve a good outcome from a difficult situation.
I like your extending locking angle flex-head ratchet, I will have to try and pick one up (buy I mean) to add to my collection.
As a last resort I have often removed difficult bolts that have been round headed by using a long chisel and located it on the outermost section of the bolt head and a good ball pane hammer. A sufficient lever can be obtained to brake it free with the shock load.
Tails 1990 928S4 Auto
08-21-2010, 04:42 AM
#26
Addict
Rennlist Member
Rennlist Member
Bill,
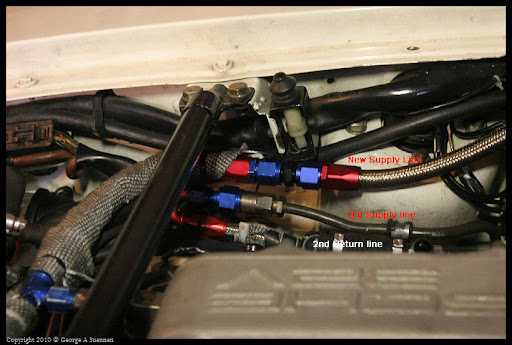
Glad you got the bolt out and thanks for coming by to help with the new fuel lines.
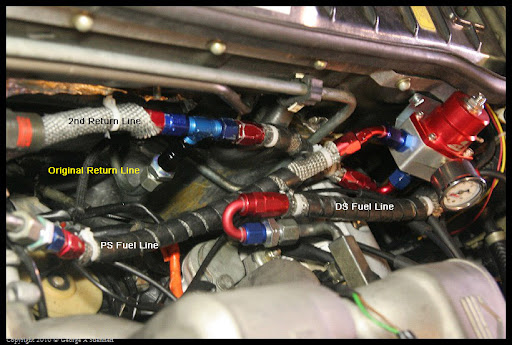
I finished making all the new fuel lines in the engine compartment:
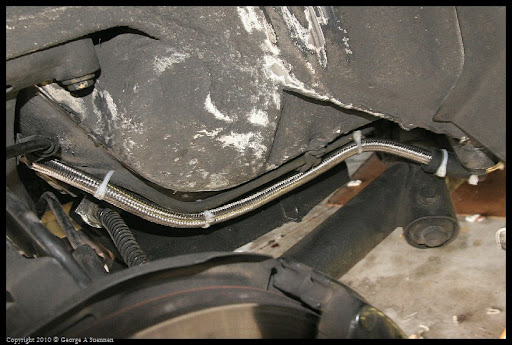
And here's a photo of the rear near the fuel cell:

(Sorry for any hijacking, but my web site is down, so I'm trying another way
to post photos)
Glad you got the bolt out and thanks for coming by to help with the new fuel lines.
I finished making all the new fuel lines in the engine compartment:
And here's a photo of the rear near the fuel cell:
(Sorry for any hijacking, but my web site is down, so I'm trying another way
to post photos)
Last edited by jorj7; 08-21-2010 at 03:08 PM.
08-21-2010, 04:56 AM
#27
Nordschleife Master
This is the sort of thing I love to run into, a chance to dig out the weird tools, my right angle impact adapter, or maybe extreme wrenches (kinda like Flank drive).
I wonder what made it so difficult despite the antiseize?
I wonder what made it so difficult despite the antiseize?
08-21-2010, 09:30 AM
#28
Rennlist Member
Just one question and a comment. Do the bell housing bolts thread in to steel inserts in the block or directly into aluminum? I ask because I notice the copper anti seize on the bolt threads. If that bolt is screwed into aluminum the copper/aluminum interface combined with a little moisture will make very nice corrosion and the bolt will become impossible to remove. The WSM only recommends copper based anti seize on steel to steel fastenings. All the AL/AL connections get nickel/graphite anti seize.
Good luck with the rest of the TT refresh.
Mike
Good luck with the rest of the TT refresh.
Mike
08-21-2010, 02:13 PM
#29
Under the Lift
Lifetime Rennlist
Member
Lifetime Rennlist
Member
Thread Starter
It's definitely steel into aluminum, so which antiseize is a matter of debate. I generally don't put antiseize on a bolt unless I find it there. This looks like copper. Zinc, nickel or metal-free are SAID to be more appropriate, with a lot of suggestion about galvanic corrosion. Aluminum alloys have some copper in them and I don't worry much about galvanic corrosion. I can't find any indication for antiseize on these bolts in the WSM. I may clean it off. The primary component of antiseize is grease. These bolts were still greasy and had no corrosion, and I think the grease does most of the work of preventing corrosion. Probably plain grease would do just as well as this is not a high temperature area.
08-21-2010, 02:39 PM
#30
Rennlist Member
Agreed that most of the benefit of anti-seize is in the grease and graphite that is part of most formulations. It's only at very high temps/torques that the copper/nickel/ZN comes in to play. The other key ingredient in the AL/CU corrosion equation is water. Not very likely on those fasteners as compared to suspension bolts.
Just an observation. Happy wrenching (which leads to happy motoring
Mike
Just an observation. Happy wrenching (which leads to happy motoring
Mike