

Help Please - Steering rack giving me the shaft!
 03-05-2009 | 01:54 AM
#64
Thread Starter
Rennlist Member
Joined: Nov 2005
Posts: 882
Likes: 1
From: Scottsdale, AZ
I love this forum!!! You guys are great! Thanks Jim for the step-by-step directions and photos. This is going to help many 928 owners, maybe even me 
I hope I don't actually have to use this, but it looks MUCH easier than pulling my air bag steering wheel to try and center things up. I was thinking this evening, I could "practice" on the steering rack core that I'll be sending back in to make sure I'm comfortable with the procedure.
I hope I don't actually have to use this, but it looks MUCH easier than pulling my air bag steering wheel to try and center things up. I was thinking this evening, I could "practice" on the steering rack core that I'll be sending back in to make sure I'm comfortable with the procedure.
03-05-2009 | 02:19 AM
#65
Rennlist Member
Joined: Jan 2008
Posts: 4,067
Likes: 323
From: Friday Harbor, WA
Thanks, everyone, for the kind words. Dwayne is an inspiration to us all!
Great plan! It's always nice to see how things work. The white rings around the control valve assembly are hydraulic seals which separate the four circuits-- from the pinion end they are the high-pressure inlet from the pump, the metal lines to each end of the rack, and the low-pressure return.

03-09-2009 | 01:17 AM
#66
Thread Starter
Rennlist Member
Joined: Nov 2005
Posts: 882
Likes: 1
From: Scottsdale, AZ
WOOHOO!!! Victory! Got the rebuilt rack pinion shaft adjusted and installed in the car. Just need to torque everything down, get the new boots streched out and should be ready to go. Thanks so much to everyone who had suggestions and tips, I could not have done it without you.
The biggest tip (besides Jim's explanation of reclocking the pinion shaft) was from Dr. Bob to remove the u-joint off the upper steering shaft completely, install it to the rack shaft out of the car, and then install the upper part of the u-joint on the steering shaft as you're reinstalling the rack in the car. There was NO WAY the lower part of the u-joint was going on the rack shaft with it installed in the car. Would HIGHLY recommend this step to everyone changing out the steering rack.
Couple of general observations:
1. Here's where I was stuck originally, rebuilt rack installed, u-joint not wanting to go on
2. Here's the old rack with the notch in the shaft correctly at 9 o'clock
3. Old rack upside down on bench to practice removing pinion shaft
4. Here's the cap on bottom of rack that Jim mentioned with spring underneath putting pressure on shaft
5. Showing the 13mm bolts and cap loose to relieve pressure on spring, you do not have to remove the cap completely
6. Here's the pinion shaft/control valve assembly coming out of the rack, took some wiggling persuasion with channel locks on the shaft covered by a rubber boot
7. Pinion shaft/contol valve out
8. Inside rack showing the openings for the four hydraulic circuits Jim mentioned in the contol valve
9. Old rack back together with notch at 9 o'clock after a couple of tries to get orientation correct
10. Here's new rack obviously not oriented correctly at 9 o'clock
11. Old and new rack now both oriented correctly at 9 o'clock
12. New rack with u-joint installed, took a little "persuasion", note hammer
13. Steering wheel in car set straight ahead
14. New rack centered with steering wheel straight... almost... close enough...
The biggest tip (besides Jim's explanation of reclocking the pinion shaft) was from Dr. Bob to remove the u-joint off the upper steering shaft completely, install it to the rack shaft out of the car, and then install the upper part of the u-joint on the steering shaft as you're reinstalling the rack in the car. There was NO WAY the lower part of the u-joint was going on the rack shaft with it installed in the car. Would HIGHLY recommend this step to everyone changing out the steering rack.
Couple of general observations:
- Take your time, paying attention to how things are oriented with the rack (and/or you) rightside up and upside down.
- All these comments are with the rack centered (i.e. dimple on rack centered in the viewing hole).
- The correct 9 o'clock orientation of the notch on the pinion shaft points generally towards the left side of the rack when the rack is upright (see photos).
- The arrow marking on the shaft cap with the (3) 10mm bolts should be facing the same way (i.e. towards the left side of the rack, same as the notch, see photo).
- If you need to reorient the shaft, you should start with the notch pointing at or just to the right of the upper right cap "ear hole" as you reinsert the pinion shaft/control valve assembly. The shaft should then rotate into the correct 9 o'clock position as the pinion gear engages the shaft. This orientaion is with the rack upside down on the workbench (see photo).
- Keep checking to make sure the rack remains centered during the process.
1. Here's where I was stuck originally, rebuilt rack installed, u-joint not wanting to go on
2. Here's the old rack with the notch in the shaft correctly at 9 o'clock
3. Old rack upside down on bench to practice removing pinion shaft
4. Here's the cap on bottom of rack that Jim mentioned with spring underneath putting pressure on shaft
5. Showing the 13mm bolts and cap loose to relieve pressure on spring, you do not have to remove the cap completely
6. Here's the pinion shaft/control valve assembly coming out of the rack, took some wiggling persuasion with channel locks on the shaft covered by a rubber boot
7. Pinion shaft/contol valve out
8. Inside rack showing the openings for the four hydraulic circuits Jim mentioned in the contol valve
9. Old rack back together with notch at 9 o'clock after a couple of tries to get orientation correct
10. Here's new rack obviously not oriented correctly at 9 o'clock
11. Old and new rack now both oriented correctly at 9 o'clock
12. New rack with u-joint installed, took a little "persuasion", note hammer
13. Steering wheel in car set straight ahead
14. New rack centered with steering wheel straight... almost... close enough...
03-09-2009 | 02:51 AM
#67
Rennlist Member
Joined: Jan 2004
Posts: 12,620
Likes: 6
From: Boulder Creek, CA
That is pretty close -- I wanted mine closer. It looks like you could move the steering wheel one spline and have it all line up, but I understand why you don't want to pull the wheel. 
Hammering the u-joint onto the shaft on is a hopefully no harm done.
Hammering the u-joint onto the shaft on is a
hopefully no harm done.
03-09-2009 | 11:51 AM
#69
Thread Starter
Rennlist Member
Joined: Nov 2005
Posts: 882
Likes: 1
From: Scottsdale, AZ
Maybe a better description would be "tapping", just a little assistance. The tapping was on the ears of the u-joint and done gently (really) with no stress put on the joint/bearings itself. Pretty sure no damage done to the splines either, although I wasn't going to take it apart again to make sure...
03-09-2009 | 02:24 PM
#70
Rennlist Member
Joined: Jan 2004
Posts: 12,620
Likes: 6
From: Boulder Creek, CA
Jim, in general, it's bad to hammer on anything with bearings, especially where the impact may be transmitted to the bearing/race interface. It can flat-spot the bearings or dent the race. While this may only be visible with a microscope, it reduces the life of the bearing.
Rick, it sounds like you were very careful, and you'll probably be OK. It should have slipped on, maybe with a little help from a screwdriver spreading the joint. If not, a small triangular file should be used to clean up any burrs.
Rick, it sounds like you were very careful, and you'll probably be OK. It should have slipped on, maybe with a little help from a screwdriver spreading the joint. If not, a small triangular file should be used to clean up any burrs.
03-09-2009 | 02:42 PM
#71

Chronic Tool Dropper
Lifetime Rennlist
Member
Lifetime Rennlist
Member
Joined: Oct 2001
Posts: 20,506
Likes: 549
From: Bend, Oregon
Rick, glad it all worked for you. Thanks for sharing the pics and descriptions. Jim Morton and Dave A., your descriptions and pictures are excellent, with good advice attached as always.
For those playing along at home, perhap the most important thing I try to remember to do is make match-marks on pieces that have a "wrong way" to be reassembled. Gives me a fighting chance. A fely marker on a clean metal surface is generally all it takes.
For those playing along at home, perhap the most important thing I try to remember to do is make match-marks on pieces that have a "wrong way" to be reassembled. Gives me a fighting chance. A fely marker on a clean metal surface is generally all it takes.
03-10-2009 | 01:39 AM
#72
Thread Starter
Rennlist Member
Joined: Nov 2005
Posts: 882
Likes: 1
From: Scottsdale, AZ
I thought I was done with the hard stuff... actually I know I am, BUT...
Does anyone have any tips on the "simple" job of installing the rack boots. Good grief, this should not be that difficult, or I'm just not too bright... or both. Having fun on both ends of the boot. Somebody used an improvised tool... lubrication of some sort... ???
Does anyone have any tips on the "simple" job of installing the rack boots. Good grief, this should not be that difficult, or I'm just not too bright... or both. Having fun on both ends of the boot. Somebody used an improvised tool... lubrication of some sort... ???
03-10-2009 | 02:03 AM
#73
Rennlist Member
Joined: Jan 2008
Posts: 4,067
Likes: 323
From: Friday Harbor, WA
I thought I was done with the hard stuff... actually I know I am, BUT...
Does anyone have any tips on the "simple" job of installing the rack boots. Good grief, this should not be that difficult, or I'm just not too bright... or both. Having fun on both ends of the boot. Somebody used an improvised tool... lubrication of some sort... ???
Does anyone have any tips on the "simple" job of installing the rack boots. Good grief, this should not be that difficult, or I'm just not too bright... or both. Having fun on both ends of the boot. Somebody used an improvised tool... lubrication of some sort... ???
What I did was cut up a plastic oil bottle (either Mobil-1 or Amsoil, both work
 ) to get a flat piece of plastic around 4 x 5" or thereabouts. Wrap it around the "nose" of the casting to make a "cone", oily side out. The wide end of the cone is around the casting, the narrow end wraps around the rack-rod and into the fat end of the boot. Grab the boot and with serious intent slide it up the outside of the cone and over the nose of the casting.
 Then grab a corner of the pastic with vice-grips and gently slide it out. Then slide the boot a bit further until it seats into the groove in the casting. After only a few practice attempts you will be able to get it on the first try

The plastic needs to be stiff for this to work, yet flexible enough to be able to pull it out once the boot is over the nose. And well-lubed with whatever you prefer...
03-10-2009 | 02:17 AM
#74
Thread Starter
Rennlist Member
Joined: Nov 2005
Posts: 882
Likes: 1
From: Scottsdale, AZ
Ingenius Jim! Thanks, I'll give it a try, although I may be in trouble... I only have Mobil-1 plastic to use. I'm sure it's not as "slick" and long-lasting as Amsoil  Mark, are you out there?
Anyone else with boot install tips?... anyone?... Bueller?...
Mark, are you out there?Anyone else with boot install tips?... anyone?... Bueller?...
03-10-2009 | 02:24 AM
#75
Rennlist Member
Joined: Jan 2004
Posts: 12,620
Likes: 6
From: Boulder Creek, CA
Interesting idea, Jim!
I cheated, I put the boots on before installing the rack:
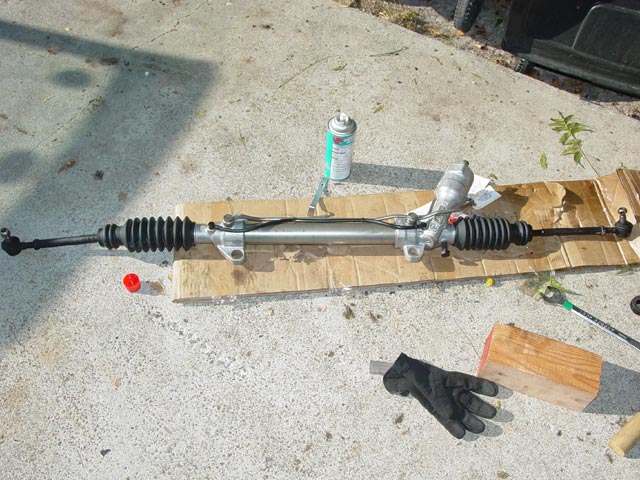
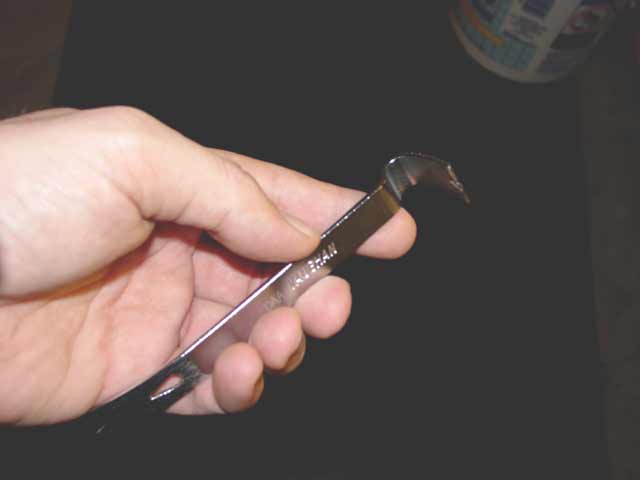
It was still a pain in the ***... actually the wide end was gravy. I sprayed some LPS-1 in the end of the boot and on the aluminum casting and they slid right in place. The small end was more of a pain. I used silicone on that too, but used the right-angle hook on a mini-flatbar to help pull it in place(also visible next to LPS-1 above):
I cheated, I put the boots on before installing the rack:
It was still a pain in the ***... actually the wide end was gravy. I sprayed some LPS-1 in the end of the boot and on the aluminum casting and they slid right in place. The small end was more of a pain. I used silicone on that too, but used the right-angle hook on a mini-flatbar to help pull it in place(also visible next to LPS-1 above):