

Got keyed Sat night
 01-29-2008 | 02:05 AM
#1
Thread Starter
Instructor
Joined: Nov 2006
Posts: 241
Likes: 0
From: Federal Way, WA
I'm pretty sure it happened Sat night. The car was out side in the driveway since I was rolling the fenders again.
The're pretty light. Whomever did this didn't have the strength get passed the paint and into the primer for the most part. There's three finger width scratches going from the top of the pillar down into the rear quarter. Then there's one horizontal 18" long key on the rear quarter and several deeper scratches by the door handle. I wanna puke and find the idiot who did this..
Pics didn't turn out too well cause I suck w/ my new D80. I think most of it can be buffed out. Going to take it to a body shop and see what they can do. Any ideas?
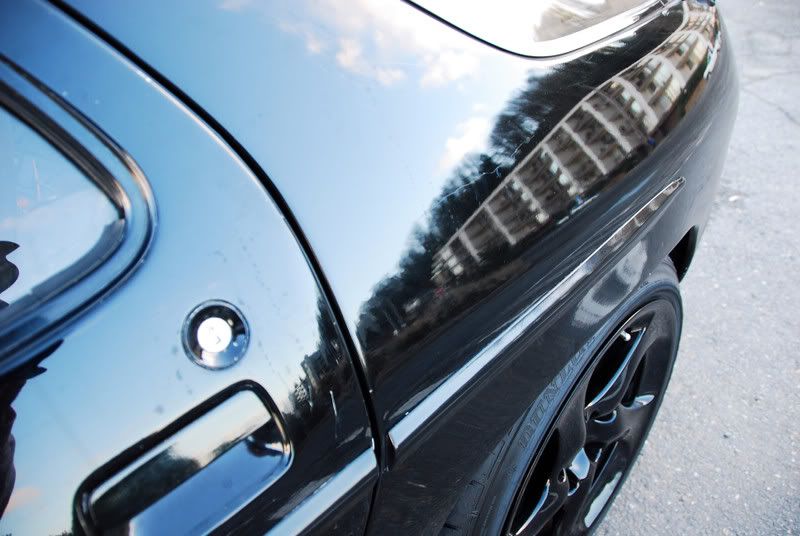
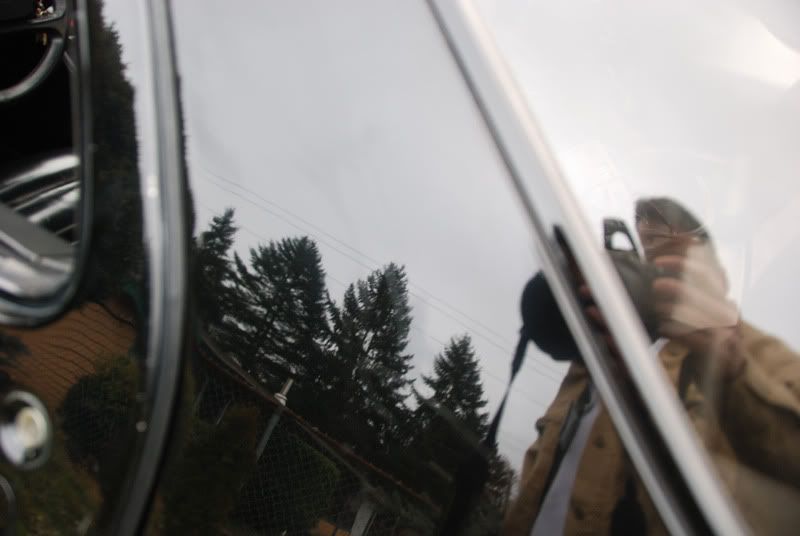
Can see them in the tree reflection:
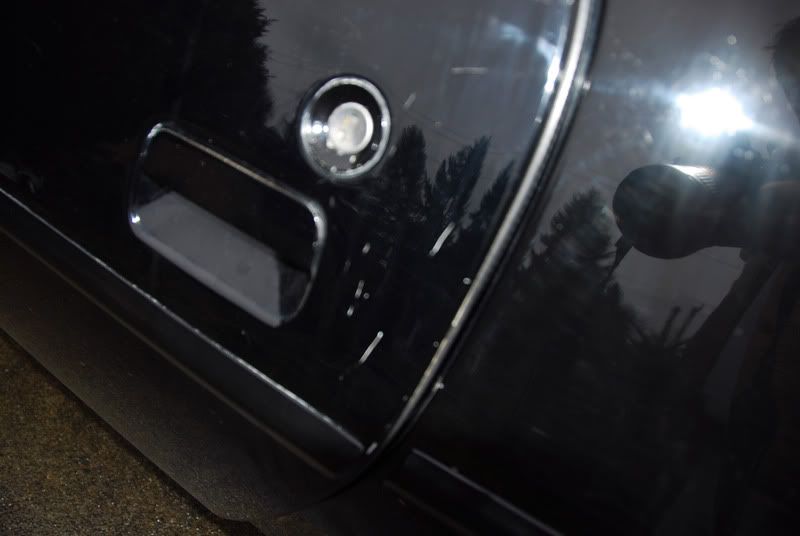
The're pretty light. Whomever did this didn't have the strength get passed the paint and into the primer for the most part. There's three finger width scratches going from the top of the pillar down into the rear quarter. Then there's one horizontal 18" long key on the rear quarter and several deeper scratches by the door handle. I wanna puke and find the idiot who did this..
Pics didn't turn out too well cause I suck w/ my new D80. I think most of it can be buffed out. Going to take it to a body shop and see what they can do. Any ideas?
Can see them in the tree reflection:
01-29-2008 | 02:13 AM
#2
Three Wheelin'
Joined: Sep 2007
Posts: 1,363
Likes: 149
From: Ridgecrest, California
Sorry to hear about this....after all the work we put into these cars and have something senseless like this happen for grins and giggles is sickening. I don't have any suggestions but am interested in what the body shop has to say. Good luck!
01-29-2008 | 02:15 AM
#3
Race Director
Joined: Sep 2004
Posts: 16,271
Likes: 75
From: Stockton, CA
the general rule on scratch repair is this....if you can catch your fingernail in the scratch....then its too deep to 100% remove...polishing might make it better, but it will still be there....
If you can't feel it with your fingernail, then it can be remove by a good polishing! Some top level detailers can even fill in scratches, then level them out with excellent results...
If you can't feel it with your fingernail, then it can be remove by a good polishing! Some top level detailers can even fill in scratches, then level them out with excellent results...
01-29-2008 | 04:43 AM
#6
Addict
Rennlist Member
Rennlist Member
Joined: Aug 2001
Posts: 4,172
Likes: 8
From: Portland, Oregon
That sucks Wade, I feel for you. HOWEVER, fear not! Scratches are EASILY fixed. There are a few threads on this and you can even go to Car Care online to get scratch fixing tips.
I have a method I use which produces fantastic results where you would be hard pressed to actually ever find the place where it was scratched.
Do not polish or buff. Simply clean the area well with alcohol. Get some touch up paint and use a tooth pick to paint the scratch as you just want to concentrate on building up the paint in the scratch. Depending on how deep it is, it may take a few applications. Don't try to fill it in one painting. Give it 24 hours or so for each coat to dry.You will find that you will fill the scratch and then the next day there is still an indentation. That is because the paint has cured and the liquids have evaporated. You need to build up the scratch just above the original paint surface. Don't worry too much about how neat you are, just keep it within reason. After the last coat, you will feel that the scratch you had filled in is now higher than the original paint surface.
Now you will want to get a fresh razor blade. Take the blade and some 600 grit or finer sand paper and draw the blade flat towards you in one direction only leaning the blade a few degrees. Do not go both ways. You just want to take about 4 or so swipes. You are basically turning the blade edge to one direction. If you looked at it under a microscope, it would look like an "L". Then take the blade and turn it over so that the side you created the edge on is facing down on the paint. Lightly draw the blade over the scratched area over the high spot of paint. You will immediately see the results of the blade shaving the high spot. Do not press hard and just take your time. You will see this won't take long to get it to the original surface as the shaved area will become wider as you get to the original paint. If you mess up, which you shouldn't, just add more paint. When you have achieved the flatness, you can run your finger over it and not feel any difference in the surface. Then take a high speed buffer and lightly hit the area not staying in one spot. This will only take a few seconds with a few runs over with the buffer. Rub some glaze on it and wax. You will be blown away at how the scratch disappeared as if it never existed. I have done this too all my cars for years. It truly works great!
Good luck!
Trending Topics
01-29-2008 | 10:10 AM
#8
Craic Head
Lifetime Rennlist
Member
Lifetime Rennlist
Member
Joined: Sep 2006
Posts: 8,795
Likes: 6
From: Jersey Shore, USA
Wade,
Really sorry to hear that man. I can't believe what negative people do just because they can't contribute anything. It's like they have to destroy beautiful stuff just because they can't make it. Do you have any idea who might have done this or was it just random? It sounds like Keith's tip will help though, good luck and keep us posted.
Keith,

That sounds amazing. So you're burnishing the end of the razor blade to get a hairline lip on it and then using it like the world's finest scraper, right?
I'm going to try this on Saturday (on the wife's Mustang ) and get my technique down before I go to town on mine.
Once again, this site has paid for itself in my eyes. Thanks Keith!!!
Really sorry to hear that man. I can't believe what negative people do just because they can't contribute anything. It's like they have to destroy beautiful stuff just because they can't make it. Do you have any idea who might have done this or was it just random? It sounds like Keith's tip will help though, good luck and keep us posted.
Keith,
That sounds amazing. So you're burnishing the end of the razor blade to get a hairline lip on it and then using it like the world's finest scraper, right?
I'm going to try this on Saturday (on the wife's Mustang
) and get my technique down before I go to town on mine.Once again, this site has paid for itself in my eyes. Thanks Keith!!!
01-29-2008 | 10:15 AM
#10
Rennlist Member
Joined: Aug 2005
Posts: 1,371
Likes: 2
From: Muncie, Indiana
The one addition I've done is to do the final buffing by hand with a thin layer of cloth wrapped around something stiff, I've used a 1x1in ceramic tile to make sure you are buffing a flat surface and not following the contours. It's a frustrating process, #@#$!@#!@#$@# at the fact that you have to do it, all the time you're doing it, but you can end up with a pretty good job.
Rod
Rod
01-29-2008 | 11:08 AM
#11
Rennlist Member
Joined: Apr 2007
Posts: 1,941
Likes: 37
From: Crofton, MD
Wade, that totally blows. Totally random? Blow someone away in a ricer who came to exact revenge? Good luck with the fix; it does look pretty minor, albeit totally frustrating.
Keith's procedure looks fantastic. I have way too many scratches to count that need this fix, and I just got an early birthday present... my Griot's Garage Car Polisher Kit so this will be the first order of business. Anywhere other than the stealership recommended for obtaining touch up paint?
Keith's procedure looks fantastic. I have way too many scratches to count that need this fix, and I just got an early birthday present... my Griot's Garage Car Polisher Kit
so this will be the first order of business. Anywhere other than the stealership recommended for obtaining touch up paint?
01-29-2008 | 11:46 AM
#12
The Lady's Man
Rennlist Member
Rennlist Member
Joined: Sep 2003
Posts: 10,444
Likes: 0
From: south O.C. california
Where does the 600 grit paper come into play? Wade, what about a color (clear coat) sand?
Those look more like unintentional scrapes, more like a kid on a bike that got to close or something. Anyone intentionally doing this would have had the strength to run a blade deep into the paint.
Those look more like unintentional scrapes, more like a kid on a bike that got to close or something. Anyone intentionally doing this would have had the strength to run a blade deep into the paint.
 01-29-2008 | 12:42 PM
#13
Craic Head
Lifetime Rennlist
Member
Lifetime Rennlist
Member
Joined: Sep 2006
Posts: 8,795
Likes: 6
From: Jersey Shore, USA
Where does the 600 grit paper come into play? Wade, what about a color (clear coat) sand?
Those look more like unintentional scrapes, more like a kid on a bike that got to close or something. Anyone intentionally doing this would have had the strength to run a blade deep into the paint.
Those look more like unintentional scrapes, more like a kid on a bike that got to close or something. Anyone intentionally doing this would have had the strength to run a blade deep into the paint.
01-29-2008 | 12:48 PM
#14
Pro
Joined: Nov 2003
Posts: 747
Likes: 0
From: Boston
Sorry man, that sux.
My old '83 shark got keyed and the rear glass got spayed with etching paint when I had it parked on the street in St. Louis. Makes you want to go mental on people, I swear. Hope you can fix it w/o a whole respray.
My old '83 shark got keyed and the rear glass got spayed with etching paint when I had it parked on the street in St. Louis. Makes you want to go mental on people, I swear. Hope you can fix it w/o a whole respray.
01-29-2008 | 12:56 PM
#15
Official Bay Area Patriot
Fuse 24 Assassin
Rennlist Member
Fuse 24 Assassin
Rennlist Member
Joined: Nov 2001
Posts: 31,653
Likes: 119
My 944 got keyed when I was in high school by some jealous jerk. After finding out who it was, I did 10 times the amount of damage he did to my car. Revenge is a dish best served cold.
I have no respect for people who vandalize property out of their own stupidity just to make themselves look good for others.
I have no respect for people who vandalize property out of their own stupidity just to make themselves look good for others.