
Aluminum to steel lower ball joint question
 01-08-2008, 06:54 PM
#1
Instructor
Thread Starter

Join Date: Mar 2007
Posts: 123
Likes: 0
Received 0 Likes
on
0 Posts
I am in the process of replaceing my lower ball jts on my 80 928S. I was fortunate and found a fellow 928 lover that was parting out his 928 which he had just replaced his lower ball jts on. He had a 84 I believe. I bought the ball jts and eccentrics from him and thought that would take care of the change over. However, I`ve become very confused as I go thru my Workshopmanual I got from 928 Int when I bought my 928. Do I or do I not have to replace the brackets. As I read it the early 928s(prior to 86) have the same bracket but after 86 the lower control arm is shorter causing strut mounting problems. As you can tell I`m very confused, to much info for my old brain to make sense of. So can someone not suffering brain lock help me out??? toofer
 01-08-2008, 06:57 PM
#2
Addict
Rennlist Member
Rennlist
Site Sponsor
Rennlist Member
Rennlist
Site Sponsor

It is NOT neccesary to change the bracket the threaded studs will be about 1/4 longer than needed but it makes no difference.
01-08-2008, 07:15 PM
#3
Drifting
thanks for clearing that up jim, i have some steel ball joints to go on my 79 along with the ecentrics and ive been wondering exactly the same thing about the brackets.
01-08-2008, 11:57 PM
#6
Rennlist Member
Join Date: Sep 2007
Location: Ridgecrest, California
Posts: 1,363
Likes: 0
Received 143 Likes
on
28 Posts
Toofer,
I also changed my lower ball joints and stayed with the old bracket. Like you, I read the manual and considered getting the new one. Jim at 928 Intl also gave me the same good advice that it was not necessary. Here's a picture of what mine look like afterward. I expect yours would look the same. As you can see, only a few additional threads exposed....No problem at all.
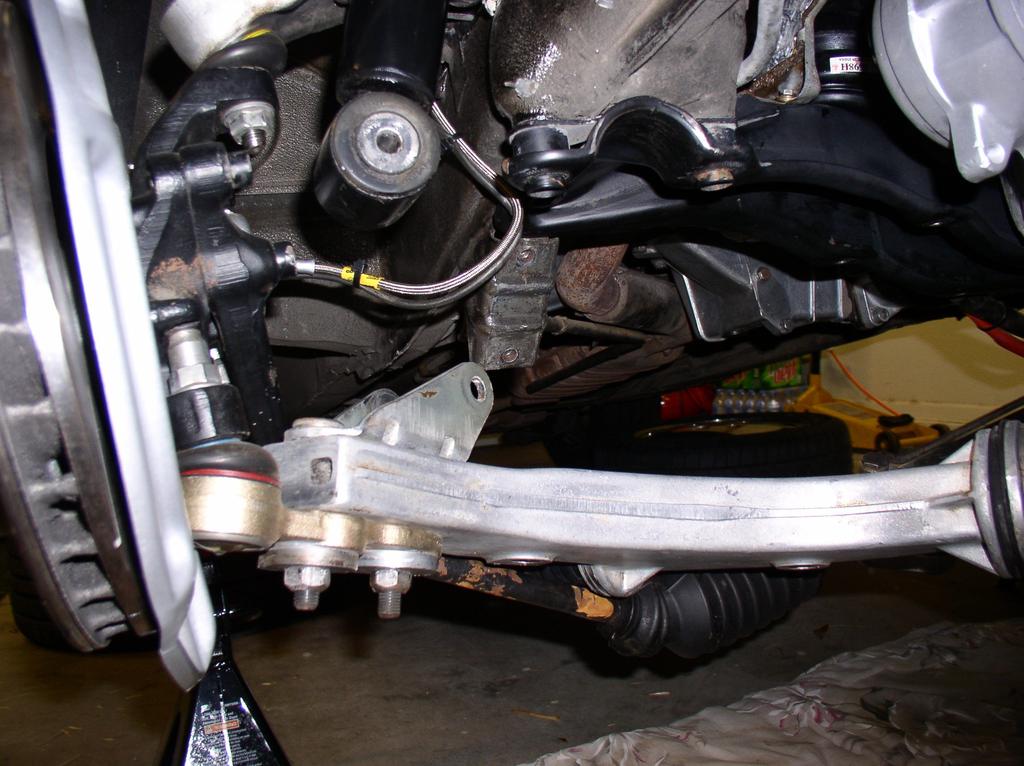
I also changed my lower ball joints and stayed with the old bracket. Like you, I read the manual and considered getting the new one. Jim at 928 Intl also gave me the same good advice that it was not necessary. Here's a picture of what mine look like afterward. I expect yours would look the same. As you can see, only a few additional threads exposed....No problem at all.
Trending Topics
01-09-2008, 12:40 AM
#8
Toofer,
I also changed my lower ball joints and stayed with the old bracket. Like you, I read the manual and considered getting the new one. Jim at 928 Intl also gave me the same good advice that it was not necessary. Here's a picture of what mine look like afterward. I expect yours would look the same. As you can see, only a few additional threads exposed....No problem at all.
Attachment 244950

 01-09-2008, 10:55 AM
#11
Rest in Peace
Rennlist Member
Rennlist Member
 01-09-2008, 11:08 AM
#12
Rennlist Member
Join Date: Sep 2007
Location: Ridgecrest, California
Posts: 1,363
Likes: 0
Received 143 Likes
on
28 Posts
If you're just changing lower ball joints, you can leave the shock attached. I was doing other work under there in that picture (replacing motor mounts) and needed to detach the lower control arm to make the job easier.
For replacing the lower ball joints, you should only have to dislodge the ball joint from the steering knuckle and remove the 2 eccentric nuts. When re-installing, the WSM recommends using Optimoly TA (Aluminum colored anti-seize) on the eccentric contact points to ease future adjustments. Finally, when I installed the ecentrics, I set them to mid-travel until I could get the car to an alignment shop for finer alignment/adjustment.
01-09-2008, 06:10 PM
#13
Three Wheelin'
Is this the thread for pictures of clean undersides that just had the steel ball joint upgrade bought from and advised by Jim B?

Dwayne, I admire your work so much I just couldn't resist posting this, it's almost as clean as your car!
One concern was that the new parts wouldn't allow alot of camber but that doesn't seem to be the case.
Dwayne, I admire your work so much I just couldn't resist posting this, it's almost as clean as your car!
One concern was that the new parts wouldn't allow alot of camber but that doesn't seem to be the case.
01-09-2008, 06:49 PM
#14
Addict
Rennlist Member
Rennlist
Site Sponsor
Rennlist Member
Rennlist
Site Sponsor
When in search of negative camber use the early lower a -arm and the late upper arm that allows soo much negative that you must shim out the upper (flat Y shims Chevy ??) to get it down to 3 1/2 negative....which is what the old very brown 1980 happens to have. Wears out the inside edge of the tires on the street but it sure goes around corners
01-09-2008, 07:16 PM
#15
Three Wheelin'
Jim, I hope I have enough camber. It looks more like 2-3 degrees on both sides is possible but we'll see. This car has no rubber bushes anywhere so hopefully it will like less camber.
You must drive like a man possesed to require that camber. 3.5 degrees, breaking ball joints, you da man!
You must drive like a man possesed to require that camber. 3.5 degrees, breaking ball joints, you da man!