
Air pump bearing removal?

 04-25-2003, 02:46 PM
#2
Burning Brakes
You are going to need to fab yourself a little puller to get that out.
If nobody else gets to this first, I will snap a pic of what I made and what I did to get that bearing out.
If nobody else gets to this first, I will snap a pic of what I made and what I did to get that bearing out.
04-26-2003, 01:26 PM
#3
Burning Brakes
OK,
I'm running on memory here - its been a year and I didn't write it down.
You have to disassemble the entire pump to get that bearing out!
The back cover of the pump is both bolted and dowelled together. Once the bolts are out, you will need to tap on the back cover in a cicular fashion to get it off. Lets assume you get that all done.
To get that front bearing out, you need to:
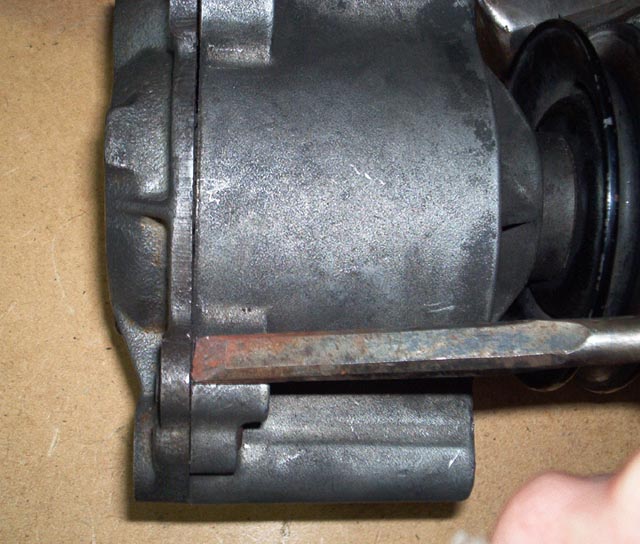
1) Remove the pulling (held on with 3 bolts)
2) To remove the pulley mount. Make a simple puller with a piece of metal plate. Drill three holes in it to correspond to the three holes in the mount. Use three longer bolts that are the same thread/pitch as the originals. What I would do is stack some small washers underneath the puller in the very center. Torque down the three bolts which are passing through the plate and the mount will start to slide up the shaft of the rotor. Once you have pulled as high as you can, stack more washers and continue. Keep this up until the mount slides off the shaft of the rotor.
3) With the mount off, you will need to remove the circlip. Pretty easy.
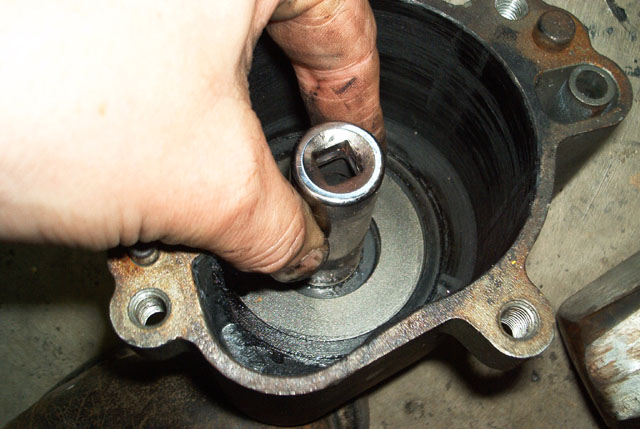
4) The rotor assembly can now be removed through the back of the pump, leaving you with an empty pump body.
5) Now find yourself a piece of pipe or solid round stock and a hammer to drive that bearing forward and out of the pump. No pipe? just use a wide flathead screwdriver and gently tap it forward using a circular tapping formation.
If you are going to do this, you might as well make it a complete job and replace / clean anything you may find wrong. As it turned out, my pump was shot. The rotor shaft was worn down and was not fixable.
Here is an easy fix. Buy a used or rebuilt pump. They aren't that expensive and its a hell of a lot easier. I just wanted to attempt it to satisfy my own curiousity.
Good Luck
Hope this makes sense......
I'm running on memory here - its been a year and I didn't write it down.
You have to disassemble the entire pump to get that bearing out!
The back cover of the pump is both bolted and dowelled together. Once the bolts are out, you will need to tap on the back cover in a cicular fashion to get it off. Lets assume you get that all done.
To get that front bearing out, you need to:
1) Remove the pulling (held on with 3 bolts)
2) To remove the pulley mount. Make a simple puller with a piece of metal plate. Drill three holes in it to correspond to the three holes in the mount. Use three longer bolts that are the same thread/pitch as the originals. What I would do is stack some small washers underneath the puller in the very center. Torque down the three bolts which are passing through the plate and the mount will start to slide up the shaft of the rotor. Once you have pulled as high as you can, stack more washers and continue. Keep this up until the mount slides off the shaft of the rotor.
3) With the mount off, you will need to remove the circlip. Pretty easy.
4) The rotor assembly can now be removed through the back of the pump, leaving you with an empty pump body.
5) Now find yourself a piece of pipe or solid round stock and a hammer to drive that bearing forward and out of the pump. No pipe? just use a wide flathead screwdriver and gently tap it forward using a circular tapping formation.
If you are going to do this, you might as well make it a complete job and replace / clean anything you may find wrong. As it turned out, my pump was shot. The rotor shaft was worn down and was not fixable.
Here is an easy fix. Buy a used or rebuilt pump. They aren't that expensive and its a hell of a lot easier. I just wanted to attempt it to satisfy my own curiousity.
Good Luck
Hope this makes sense......
04-26-2003, 04:25 PM
#4
Photoshop Bully
Rennlist Member
Rennlist Member
Thread Starter
Thanks Bernie, I just want to gut the pump and use it as an idler for equal belt tension on the crank and to keep the state inspectors happy that all is well w/ the emissions system.
Randy
Randy

The following users liked this post:
MCR 85 928 (01-31-2024)
04-27-2003, 03:53 AM
#7
Burning Brakes
Hey Greg,
Thats really funny, almost as though you did that job to illustrate what I said in text.
Maybe we can colaborate on childrens books? I'll write the little stories and you can add the little pictures....
Ahhhhhhhh

Thats really funny, almost as though you did that job to illustrate what I said in text.
Maybe we can colaborate on childrens books? I'll write the little stories and you can add the little pictures....
Ahhhhhhhh
Trending Topics
04-27-2003, 09:17 AM
#8
Three Wheelin'
Bernie, I have hundreds of pix from all the recent work I've done. So much of it is the same stuff you've been doing. I want to at least post the pix in an archive format for reference. Writing procedures is in my plans, but time restrictions play a part.
Pics include:
Motor mount/rod bearing/pan gasket/mystery plugs and locations often asked about on this forum.
HVAC vacuum actuator replacements
Dash and pod removal. Related to that, 3 pc dash and pod cover installation with the parts out of the car. Inst. cluster main lights reflective plastic panels (x3) R/R, strip/repaint with mirror finish for reflectivity of lamps.
tons of pics related to 86.5 intake and cam cover removal and mystery connectors and locations asked about on this forum.
A bunch of random pics covering stuff like seat heater element replacment, gauges, etc.
Greg
08-05-2018, 08:18 PM
#9
Rennlist Member
That was my thinking too Randy, even though I don't have to be concerned with state inspections, but after getting the pump apart there doesn't seem to be a way to really empty it out and just leave the spindle and the pulley. If the central spindle went all the way throught the pump, then maybe, but it doesn't so you end up having to keep everything or delete the whole thing. May as well rebuild it to working condition in my opinion.