
Metal heater valve and hoses - need advice!
 04-22-2007, 12:17 AM
#16
Cottage Industry Sponsor
Lifetime Rennlist
Member
Lifetime Rennlist
Member
Thread Starter

Great info, Dan!
I just finished replacing the lower front radiator hose, and realize I should do some serious body building before attempting such jobs. Holy smokes - this hose was hard to get on!!!
Now I wonder, if I should take a break until tomorrow, and make a trip to the Napa store before continuing my project. I have all the hoses here, ready to go, but maybe I'll get a silicone replacement for the short hose. After all, I'm in silicone valley... .)
Is there anything I shoudl know about removing the coolant reservoir? I see two bolts - one in front and one behind it - is that all that holds it in place?
 04-22-2007, 03:29 PM
#17
Under the Lift
Lifetime Rennlist
Member
Lifetime Rennlist
Member
It's Silicon Valley, but what the hey.
I didn't know there was silicone coolant hose. Great. Several of our hoses are molded and have different end diameters. I guess you buy something in-between.
Let me know what you find at NAPA, Nicole.
I didn't know there was silicone coolant hose. Great. Several of our hoses are molded and have different end diameters. I guess you buy something in-between.
Let me know what you find at NAPA, Nicole.
04-22-2007, 04:40 PM
#18
Addict
Rennlist Member
Rennlist Member
I've actually used the Audi 5000 valve in two Porsches, ordering the same valve at two different stores I got one like you did once, and another time I got one like the 928 Motorsport part. Both worked fine and are still working. I did have a problem with the vacuum line seeming to be oversized but it may have been that the end vacuum line was dried and stretched. I cut the end off and used a twist of saftey wire around it in any case. I believe the simpler one like you have that lacks the external bellcrank is what is on my 87 928S4. I do not recall having any trouble getting the hoses to fit.
I think the one that is a more direct fit is Factory Air Heater Control Valve Part Number 74671 (Checker, Parts America) and the one that is all metal is Redi Aire 5910 (Autozone)
I think the one that is a more direct fit is Factory Air Heater Control Valve Part Number 74671 (Checker, Parts America) and the one that is all metal is Redi Aire 5910 (Autozone)
04-30-2007, 07:22 AM
#20
Cottage Industry Sponsor
Lifetime Rennlist
Member
Lifetime Rennlist
Member
Thread Starter
So, I received my factory heater valve - and to my surprise the hose connections have the exact same diameters as the Audi valve.
After inspecting them in more detail, I kept going back and forth on which valve to install:
- The factory valve has the cooland go straight through when open. That looks efficient. In my 10 years of 928 ownership none of these ever failed on my naturally aspirated engines.
- Then there is the metal one. Looks very solid, indestructable. But the coolant would have to flow around a few corners. It would introduce additional metal to the coolant system - which, according to Mr. Merlin could support the unwanted process of electrolysis in the system.
So, in the end I decided to be conservative and do the plastic OEM valve. and pre-assembled it with the hoses to get it ready for installation.
But before I could do this, I still had to remove the old heater hoses. And boy, was that a pain. Literally. Because I'm all bruised and scraped up again on my underarms... The areas not covered by the gloves. I wish I would have had a helper here to remove the hood - that would have made things sooooooooooooooooo much easier!!!
I had already removed everything in the way on the passenger side, including the old coolant tank. Now I had to remove the hoses on the heater box side.
To get the upper heater hose out, I losened the clamp, cut the hose a bit, and was able to pull it off the nozzle on the heater box. Then I had to remove the clamp that holds the fuel cooler, and was able to slide out the whole hose.
The lower hose was a lot more tricky - I had to remove the wiper motor to get to the clamp screw, and to remove the wiper motor, the intensive washer tank had to come out first. The latter was easy, but getting the wiper motor out was a bear. Thanks to Bill for confirming the need to get it out, and Mr. Merlin for giving me the critical pointers just when I needed them!
Again, I had to cut the hose to get it out. Then I installed my assembly of heater valve with the two hoses already attached - it was a snap that way! Next was to put the wiper motor back on, before the upper heater hose would be in the way (one of Mr. Merlin's tricks). Getting that thing screwed-in again was more of a challenge than I expected, but after trying for a while I got it in.
And lastly, installation of the upper heater hose, which went relatively smooth. Now I just hope I got all clamps tight enough... some would take major disassembly to tighten again - even though I tried to align them in a way that would make them more accessible than before.
So, what's left?
- Coolant tank installation - I gave up tonight; need to figure out a trick to reconnect the bottom hose with the Y pipe
- Reattach some vacuum-thingies that I had to losen or remove to get the coolant tank out
- Fill with coolant and burp
- Install intake hoses, covers, etc.
- Test drive!!!! <can't wait>
Hopefully it'll be ready for Sharks in the Park...
04-30-2007, 09:07 AM
#21
Addict
Rennlist Member
Rennlist Member

Nicole,
It is not difficult to remove the hood yourself without help.
Remove hoses and wires.
Put a cardboard box about a foot square on the intake manifold.
Remove shocks and let hood rest on the box.
Remove Hinge bolts. The hood will sit on the box with some careful balancing.
The hood is aluminum so easily manhadnled or womanhandled and the box holds it up and away from scratching paint..
When replacing, remove the latch assembly from the front of the hood. Then realign without latch. After proper alignment reattach latch being careful to align so the latch is centered in the receiver hole.
04-30-2007, 09:12 AM
#22
Addict
Rennlist Member
Rennlist Member
Nicole,
I forgot to mention that I and others on the other coast use the all metal heater valve with success but I thought it was no longer available. I don't remember having a fittment problem.
I forgot to mention that I and others on the other coast use the all metal heater valve with success but I thought it was no longer available. I don't remember having a fittment problem.
04-30-2007, 10:02 AM
#23
Team Owner
Great Nicole, glad you got your hoses all in order, to put in the cooling tank first install the bottom hose to tank, orient the hose the right way and make sure the clamp screw faces down so it can be retightened from under the car. then put your tank in . As a side note now is a good time to replace the fill tube for the washer bottle resivour since it will be loose, . Also there is no need to BURP a 928 it has a self bleeding system the only thing that will need filling is the heater core and this is done by turning on the heated filling the system and driving the car for about 5 miles let things cool off, top off and your done
05-06-2007, 12:36 AM
#24
Cottage Industry Sponsor
Lifetime Rennlist
Member
Lifetime Rennlist
Member
Thread Starter
Today I finally got back into the garage, and I was able to reconnect the lower coolant tank hose with the Y connector. But I did not get very far after that...
I need to renistall the vacuum thingie I had removed at the very beginning to get access to the clamps at the Y connector. This iwas probably one of the most difficult things to remove, and I'm facing similar trouble reinstalling it. There is just no room!!!
I don't remember in detail how I managed to get it out in the end. I just remember that I was able to losen the clamp and slide it to the side, then pull out the vacuum thingie.
Now, trying to put it in, there is simply no room for it. Something must have changed in the process that leaves me no room! Can you guys please look at the pictures below and let me know, if I routed anything wrong in the vincity of this?
Note that the coolant tank is still lose, and there is still not enough wiggle room -let alone room for reasonable leverage!
I'm lost on how to proceed...
Thanks in advance for your help!
Last edited by Nicole; 05-06-2007 at 12:56 AM.
05-06-2007, 01:08 AM
#26
Cottage Industry Sponsor
Lifetime Rennlist
Member
Lifetime Rennlist
Member
Thread Starter
For reference, here is the tank ventillation chart. I need to connect the vacuum valve 40 with hose 7.
I have tried to pull hose 7 further in, so I'd have more room. However it doesn't move one bit.
I have tried to pull hose 7 further in, so I'd have more room. However it doesn't move one bit.
05-06-2007, 01:27 AM
#27
Cottage Industry Sponsor
Lifetime Rennlist
Member
Lifetime Rennlist
Member
Thread Starter
From the fender side (I don't have the wheel and fender liner off on my car right now), this would look as follows:
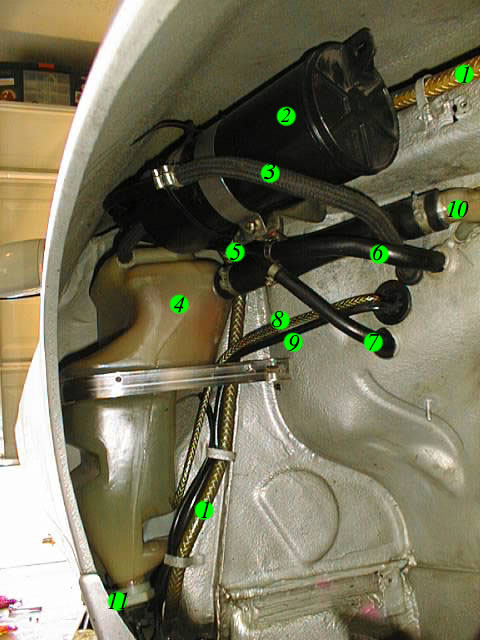
The hose I need to connect to must be #6.
On the above picture I can't see how it would be so rigidly attached to the wall, that it can't move in or out a bit.
The hose I need to connect to must be #6.
On the above picture I can't see how it would be so rigidly attached to the wall, that it can't move in or out a bit.
05-06-2007, 01:36 AM
#28
Under the Lift
Lifetime Rennlist
Member
Lifetime Rennlist
Member
Nicole: I can stop by your place after the DEVEK sale and we can take care of this. We'll have my car for comparison. That valve has never been off on my car.
05-06-2007, 01:45 AM
#29
Cottage Industry Sponsor
Lifetime Rennlist
Member
Lifetime Rennlist
Member
Thread Starter
Thanks, Bill!
Should I take my wheel and fender liner off? I've been reluctant to do this so far, as I thought it would not be necessary.
Should I take my wheel and fender liner off? I've been reluctant to do this so far, as I thought it would not be necessary.