
32V distributor cap thumbscrews
 04-07-2007, 01:25 AM
#1
Inventor
Rennlist Member
Rennlist Member
Thread Starter
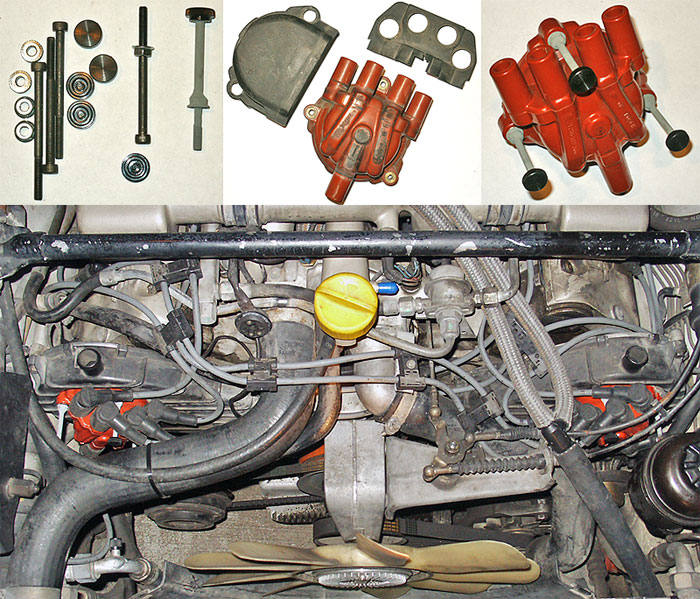
For faster timing belt or cam timing change access. Here's how I did it.
I was at the dyno the other week, trying out different cam timing settings, and I realized a lot of the considerable time to get at the 32V cam gears, especially the '85-'86, is all the junk to take off first! (About 2hrs to make a single cam timing change on both sides.) I vowed to think of some pit crew mods to speed it up.
The distributor caps, and timing belt covers are almost the slowest part, because you need a wobbly socket, and usually have to remove at least the center two plug wires to get a tool on the top screws. I saw these push on (really, hammer on) metric instant thumbscrews, which fit over socket head bolts, and I figured out a solution.
There must be an easier way, but since I don't have a lathe, I did it so:
Next: thumbscrew 6mm bolts for the timing belt covers.
I was at the dyno the other week, trying out different cam timing settings, and I realized a lot of the considerable time to get at the 32V cam gears, especially the '85-'86, is all the junk to take off first! (About 2hrs to make a single cam timing change on both sides.) I vowed to think of some pit crew mods to speed it up.
The distributor caps, and timing belt covers are almost the slowest part, because you need a wobbly socket, and usually have to remove at least the center two plug wires to get a tool on the top screws. I saw these push on (really, hammer on) metric instant thumbscrews, which fit over socket head bolts, and I figured out a solution.
There must be an easier way, but since I don't have a lathe, I did it so:
-Drilled out the flange nuts
-Filed off the threads on the 5mm x 70mm bolts, leaving about 10mm
-Spot welded the flange nuts onto the bolts
-Paint
-Hammered screws down into the caps (they are really on there!)
-Chased screw threads with die
-Removed distributor cap screws
-Removed decorative housings from distributor caps (they just slide off)
-Installed new screws
It would be better the screws were stainless steel, and the two side screws should be shorter, 60mm, IE. (1) 70mm, and (2) 60mm, each.-Filed off the threads on the 5mm x 70mm bolts, leaving about 10mm
-Spot welded the flange nuts onto the bolts
-Paint
-Hammered screws down into the caps (they are really on there!)
-Chased screw threads with die
-Removed distributor cap screws
-Removed decorative housings from distributor caps (they just slide off)
-Installed new screws
Next: thumbscrew 6mm bolts for the timing belt covers.
Last edited by PorKen; 04-07-2007 at 02:12 PM. Reason: typos
 04-07-2007, 02:09 AM
#2
Chronic Tool Dropper
Lifetime Rennlist
Member
Lifetime Rennlist
Member

Originally Posted by PorKen
....
Next: thumbscrew 6mm bolts for the timing belt covers.
Next: thumbscrew 6mm bolts for the timing belt covers.
There has to be a way to use Dzus fasteners, or maybe big aluminum magnets, maybe velcro...
Not that many people take thier distributor caps off regularly. I think I check the TB tension maybe once a year. You on the other hand probably R&R those puppies a few times a week. Few times an hour for tuning on the dyno too. Interesting idea!
04-07-2007, 08:07 AM
#3
Rennlist Member
Sounds like a 'wingnut' solution to me ...  ; I like it!! - did a similar stunt to secure the Delta tool box on my truck for quick removal. Mounted 4 big bolts on the bed, drilled & tapped their heads to accept 4 long bolts as you made - 5 min. removal ...
; I like it!! - did a similar stunt to secure the Delta tool box on my truck for quick removal. Mounted 4 big bolts on the bed, drilled & tapped their heads to accept 4 long bolts as you made - 5 min. removal ...
04-07-2007, 08:13 AM
#4
Craic Head
Lifetime Rennlist
Member
Lifetime Rennlist
Member
Ken, I'm with Bob, most of us just set it and forget it.
I can see the value in it though, it's a cool mod.
Still waiting for the TB cover with the 'window' in it for viewing... That would be cool.
I can see the value in it though, it's a cool mod.
Still waiting for the TB cover with the 'window' in it for viewing... That would be cool.
04-07-2007, 11:29 AM
#5
Captain Obvious
Super User
Super User
Cool invention!
WINDOW = HOLE SAW! 
Originally Posted by NJSharkFan
........Still waiting for the TB cover with the 'window' in it for viewing... That would be cool.
04-07-2007, 01:48 PM
#6
Inventor
Rennlist Member
Rennlist Member
Thread Starter
You don't really have to take off the cap covers with the 70mm screws, but they take up more space, and weigh at least a couple of ounces! They also color match with the '85-'86 balancer. 
The accelerator cable bracket is another piece that requires removal every time. I need a QR for that. If I delete the belt driven fan it would be much easier. I actually like the fan, it is a good way to cool the engine, especially with A/C, but it sure makes access difficult, and it's noisy at high rpms.
The timing belt cover bolts should be easier, as they don't need to have the threads ground off.
04-07-2007, 03:03 PM
#7
Rennlist Member

I think the 'decorative' cover is for noise suppression. The 'uncovered' version can be found on Volvos.
Trending Topics
04-07-2007, 03:49 PM
#8
Chronic Tool Dropper
Lifetime Rennlist
Member
Lifetime Rennlist
Member
The TB cover bolts are way easy-- Take longer bolts and put locknuts on them backwards with regular nuts jambed and loc-tite'd in place underneath. It gets the business end of the bolt in where it's supposed to be, and still lets you use the torque wrench on the heads. It's the cheap-n-easy solution. You of course would want some light-alloy bolts to maintain fightin' weight.
04-07-2007, 05:37 PM
#9
Inventor
Rennlist Member
Rennlist Member
Thread Starter
I was thinking the distributor caps covers might be carbon impregnated or something for noise. That would explain the star shaped big washers.
The caps have cast-in numbers for a four cylinder - 1324.
The caps have cast-in numbers for a four cylinder - 1324.