
Lower Hatch Receiver - Problems for all!
 01-10-2007, 09:46 PM
#1
Basic Sponsor
Rennlist
Site Sponsor
Rennlist
Site Sponsor
Thread Starter
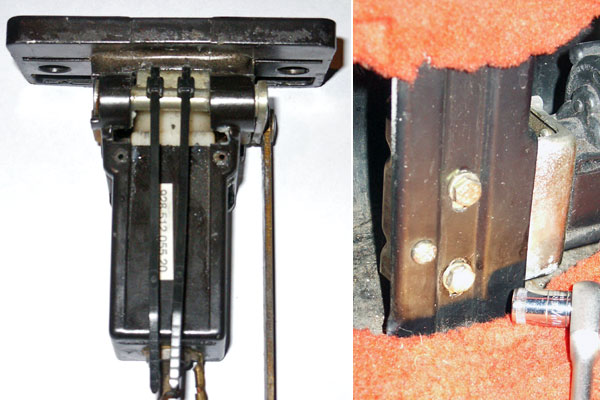
Working on a customers car and needed to replace the lower hatch receiver so as to rectify the non release of the hatch when activating the hatch pull switch.
New receiver from Porsche fitted to the car. Closed the hatch and the white plunger stays in the compressed position.
As the square portion of the plunger slides down the shaft against the spring it is jamming in the bottom half of the travel. So much so that it has deformed the casing. The casing is either the wrong dimension or the white plastic part is to large.
Had a couple more overnighted from Porsche, and guess what, they are exactly the same but worse in that they travel very little before becoming jammed.
Tried two more Porsche dealers here in town and one out of town who had them in stock. All were the same and no good.
Just wanted to share in case you are planning on doing this soon.
All are heading back to where they came from.
Roger
__________________

Does it have the "Do It Yourself" manual transmission, or the superior "Fully Equipped by Porsche" Automatic Transmission? George Layton March 2014
928 Owners are ".....a secret sect of quietly assured Porsche pragmatists who in near anonymity appreciate the prodigious, easy going prowess of the 928."
Does it have the "Do It Yourself" manual transmission, or the superior "Fully Equipped by Porsche" Automatic Transmission?
George Layton March 2014928 Owners are ".....a secret sect of quietly assured Porsche pragmatists who in near anonymity appreciate the prodigious, easy going prowess of the 928."
Last edited by ROG100; 02-27-2007 at 12:45 PM.

 01-10-2007, 09:56 PM
#3
Rennlist Member
Roger,
The plastic plunger is available as a seperate part (you need the rivet too). Maybe if you replace just the white plunger and use the old housing it will work. May be worth a try; unless the black plastic surround is cracked, then you need the whole assembly.
Jim Mayzurk
93 GTS 5-spd
The plastic plunger is available as a seperate part (you need the rivet too). Maybe if you replace just the white plunger and use the old housing it will work. May be worth a try; unless the black plastic surround is cracked, then you need the whole assembly.
Jim Mayzurk
93 GTS 5-spd
 01-10-2007, 10:25 PM
#6
Rennlist Member
You asked for it: 
The nylon actuator on the hatch should be centered. Is the hatch release hitting the nylon release completely? I used a magic marker to mark the nylon piece. I then actuated the release to visually check if the striker was hitting the release. Porsche used a plastic catch on the upper latch that�s designed to wear. It�s a replaceable, but be sure to get the pin with it. The upper hatch piece is cast and cracks, flexes and becomes inop. Check the sides of the upper latch, often the metal of the latch gets a hairline crack on the side and prevents the motor from releasing the catch. Shim about 1/16"between the rear side of the male part of the latch and the hatch. This moved the lower end toward the front of the car, so it works. Use carbon paper to see where it�s contacting. When the catch is moved aft, the latch releases and the spring in the lower piece lifts the hatch about �" above where the catch holds the hatch down. By moving the motor further down the release cam pushes the catch further in, allowing the release. A ribbed rubber insert in the lower half of the latch holds the tongue in position allowing the release. The rubber is soft, shrinks and wears with age. I inserted a 1"x1�" shim between the rubber insert in the lower piece and the rear of the lower housing. Loosen the motor mount bolts, and slide the motor up all the way. This relieves stress on the tongue and prevents cracks. On the lower part of the latch, push the rubber cup at the rear, forward into the latch area. Slide the shim between the rubber piece and the rear of the housing. This moves the tongue forward so the catch is moved into the tongue. Tighten the motor bolts at the top and test. Follow the manual by incrementally moving the motor down until the hatch starts working. With the hatch closed, move the motor down until the release cam just touches the catch. If the hatch fails to release with the motor adjusted to the bottom, start over. The sheet metal that the upper lock assembly bolts to gets bent so the black post is pointed toward the rear. Shim to adjust the angle of the upper hatch mechanism to point it farther back. This helps engage the lower mechanism and pop the hatch. When the rear hatch lock breaks internally, to open the hatch crawl into the rear, take the tool kit off, peel up the carpet at the center top section of the panel behind the tool kit. Drill a ��hole in the very center of the panel as high as possible still on the main body. Then insert a screwdriver to push back the white plastic latch on the black post. It helps if someone pushes down on the hatch to release the tension. The carpet covers the hole. The internal cast metal arm of the lock isn�t sold separately. Tried many adjustments without success, until I read this tip: tape a piece of paper over the receiver; put some grease on the tip of latch, and gently lower it until it makes a mark on the paper. Note how far off center, and in which direction, the mark is; then adjust the latch with shims until it comes down dead center.
Hatch release: The catch edge of the latch wears and prevents the hatch from closing completely. With the remote release a small metal flap driven by a motor pushes the catch back. The flap rotates 360� on each activation. This causes the catch to clear the metal catch on the lower latch and then the spring in the lower latch pushes the hatch up to clear the lower latch before the motor releases the upper plastic catch. If there isn�t enough clearance due to wear on the upper plastic catch it won�t release. Also if the latch or hatch is binding then the spring doesn�t have enough strength to push up the hatch. Eventually between the flap wearing into the plastic catch and the top edge wearing away the flap cannot push the catch far enough back to release the hatch. There are several fixes for this, but the best, easiest and most reliable way is to replace the plastic catch in the top latch. Check that the fasteners are tight on both the top and bottom part of the latch. There are two adjustments that may be necessary. Remove the tool panel. Loosen the two 10 mm bolts that hold the hatch release, and have an assistant trigger the release. Slide the release down until it begins to drag at the bottom of the cycle, and slide it up until it�s just free. If this doesn't cure the problem, loosen the fasteners holding the top latch to the hatch, and insert spacers under the outer edge so that the latch is tilted forward. Make sure that the alignment allows the latch to enter the receptacle cleanly. A used rear hatch rubber (plastic?) liner solved my hatch problem where the hatch lid was squirming around and squeaking like crazy. The liner deteriorates and cracks with age and eventually goes to pieces. With all the other hatch problems that develop with age, a new unit the makes the most sense. My symptom was the rear hatch not opening. I removed the lock cylinder from the assembly. There�s a small lock screw to remove, and then rotate the lock cylinder about 20�, then push. Once removed you can withdraw the white piece. Trying to spread the rivet head in the new pin is a problem. If you had some sort of press you could do it. I tried the hole-punch and hammer method; felt as though I would hurt something so stopped. I have left the pin floating in there. With the grease applied, it has not drifted at all.
Hatch motor won't park is usually the release motor is running so freely that it coasts over the cutout that should stop it. Possible cures: 1. Clean the cutout. Sometimes, there will be a build-up of copper on the disk that bridges the cutout, allowing just enough power flow to keep the motor running. 2. Pack the gearbox with grease, adding enough drag to slow the motor down so that it won't coast over the cutout. 3. I haven't tried it, but I would think that adding a power resistor in the run-on line before the motor might slow it down enough to solve the problem. Perhaps two ohms, 25 watt from Radio Shack? 4. Replace the unit!
Jim Mayzurk
93 GTS 5-spd
Trending Topics
01-10-2007, 11:07 PM
#8
Basic Sponsor
Rennlist
Site Sponsor
Rennlist
Site Sponsor
Thread Starter
Jim,
I know you can replace the top receiver plastic piece and river but not the lower IIRC.
Or did I miss something.
Roger
I know you can replace the top receiver plastic piece and river but not the lower IIRC.
Or did I miss something.
Roger
01-10-2007, 11:14 PM
#10
Basic Sponsor
Rennlist
Site Sponsor
Rennlist
Site Sponsor
Thread Starter
LarryGTS,
How did you modify it?
I see that there are two pins that could be removed and release the plunger.
Shave off some plastic and reassemble.
Roger
How did you modify it?
I see that there are two pins that could be removed and release the plunger.
Shave off some plastic and reassemble.
Roger
01-10-2007, 11:33 PM
#11
It's been a while, and I can't remember the exact specifics of what I did without looking at it again. I did disassemble the whole thing and remove the plunger, so more than likely I did remove some of the plastic somewhere to make it work.
01-10-2007, 11:35 PM
#12
Inventor
Rennlist Member
Rennlist Member
Originally Posted by classic_cars
Mine is broke too. How does this thing work? The motor runs and I see the arm move but it doesn't release the hatch.
A little bigger than the ones show here. I just now put in bigger ones as the little ones were moving, and the hatch stopped opening. It's working again, now.
01-10-2007, 11:50 PM
#13

Turn it into a race car and duzus the rear hatch down.
01-11-2007, 09:06 AM
#15
Burning Brakes

Join Date: Sep 2006
Location: Myrtle Beach, South Carolina
Posts: 1,203
Likes: 0
Received 0 Likes
on
0 Posts
Originally Posted by PorKen
Try zip ties over the release cam.
A little bigger than the ones show here. I just now put in bigger ones as the little ones were moving, and the hatch stopped opening. It's working again, now.
A little bigger than the ones show here. I just now put in bigger ones as the little ones were moving, and the hatch stopped opening. It's working again, now.
Is the function of the zip ties to make the cam bigger, to extend it's reach toward the catch and do you leave the excess tie dangling like in the photo?