
Lower Hatch Receiver - Problems for all!

 12-02-2007, 09:16 PM
#62
Basic Sponsor
Rennlist
Site Sponsor
Rennlist
Site Sponsor
Thread Starter
OK The penny just dropped - I will go back to sleep now 8>)
__________________

Does it have the "Do It Yourself" manual transmission, or the superior "Fully Equipped by Porsche" Automatic Transmission? George Layton March 2014
928 Owners are ".....a secret sect of quietly assured Porsche pragmatists who in near anonymity appreciate the prodigious, easy going prowess of the 928."
Does it have the "Do It Yourself" manual transmission, or the superior "Fully Equipped by Porsche" Automatic Transmission?
George Layton March 2014928 Owners are ".....a secret sect of quietly assured Porsche pragmatists who in near anonymity appreciate the prodigious, easy going prowess of the 928."
02-19-2008, 09:07 PM
#63
Nordschleife Master
I just noticed mine looked different, but i think its because its in the closed position. Now i ask how the hell do i release it?
Anyway, I also noted that my latch dosent appear to be bent as rogers were. Perhaps changes have been made now?
Anyway, I also noted that my latch dosent appear to be bent as rogers were. Perhaps changes have been made now?
Working on a customers car and needed to replace the lower hatch receiver so as to rectify the non release of the hatch when activating the hatch pull switch.
New receiver from Porsche fitted to the car. Closed the hatch and the white plunger stays in the compressed position.
As the square portion of the plunger slides down the shaft against the spring it is jamming in the bottom half of the travel. So much so that it has deformed the casing. The casing is either the wrong dimension or the white plastic part is to large.
Had a couple more overnighted from Porsche, and guess what, they are exactly the same but worse in that they travel very little before becoming jammed.
Tried two more Porsche dealers here in town and one out of town who had them in stock. All were the same and no good.
Just wanted to share in case you are planning on doing this soon.
All are heading back to where they came from.
Roger
02-19-2008, 10:37 PM
#64
Basic Sponsor
Rennlist
Site Sponsor
Rennlist
Site Sponsor
Thread Starter
Ryan,
Yours looks exactly the same as all of them.
The square block is stuck.
Drill out the bottom hole with 5/16 drill.
Roger
Yours looks exactly the same as all of them.
The square block is stuck.
Drill out the bottom hole with 5/16 drill.
Roger
02-19-2008, 11:14 PM
#65
Nordschleife Master
Roger
When you say stuck, do you mean the plastic block gets stuck and the plunger dosent return?
DUH! Dammit, I tried to get the old one to "stick" but it dosent, why, because its not supposed to! CRAP
5/16" drill, does this go through the hole thats threaded for the electronic leads for the rear door open lights? Is that where i drill through?
Thanks
I think i should read the thread, I know its in here. Sorry
02-20-2008, 12:18 AM
#67
Nordschleife Master
Maybe its my 5/16" but i would get contact on the threads doing that.
do i need to disassemble the thing to drill or can i leave the plunger in place?
do i need to disassemble the thing to drill or can i leave the plunger in place?
02-20-2008, 07:50 AM
#68
Basic Sponsor
Rennlist
Site Sponsor
Rennlist
Site Sponsor
Thread Starter
Ryan,
The drill should kiss the threads on the way through and no you do not need to disassemble the plunger.
The plunger needs to be released from the bottom if it is still stuck there.
If you had bought it from me I would have already taken care of it for you as part of my service

Use a drill that fits perfectly to the ID of the hole and try that.
Roger
The drill should kiss the threads on the way through and no you do not need to disassemble the plunger.
The plunger needs to be released from the bottom if it is still stuck there.
If you had bought it from me I would have already taken care of it for you as part of my service
Use a drill that fits perfectly to the ID of the hole and try that.
Roger
02-20-2008, 12:25 PM
#69
Nordschleife Master
Thanks Roger
I did it and its no longer stuck.
Yes if i had bought from you in the beginning you probably would have told me about the differences in the alarm and non alarm upper hatch lock as well.
Cheers
I did it and its no longer stuck.
Yes if i had bought from you in the beginning you probably would have told me about the differences in the alarm and non alarm upper hatch lock as well.
Cheers
12-29-2008, 12:23 AM
#70
Since this is a related topic, I'm posting my issue here as well. Mine is a little different than the others in this thread, but this past weekend, my rear hatch will not 'latch' down (lock). It does close all the way, but pops-up, so the latch isn't catching. The 'plunger' is working fine and the release has been working fine, but something broke (the nylon catch) but I don't have a detailed photo to compare to see exactly. I'm suspecting that there was a nylon catch that was across the front/top? Is this something I can replace or do I need to make an adjustment to the lower latch assembly?
See attached photo:
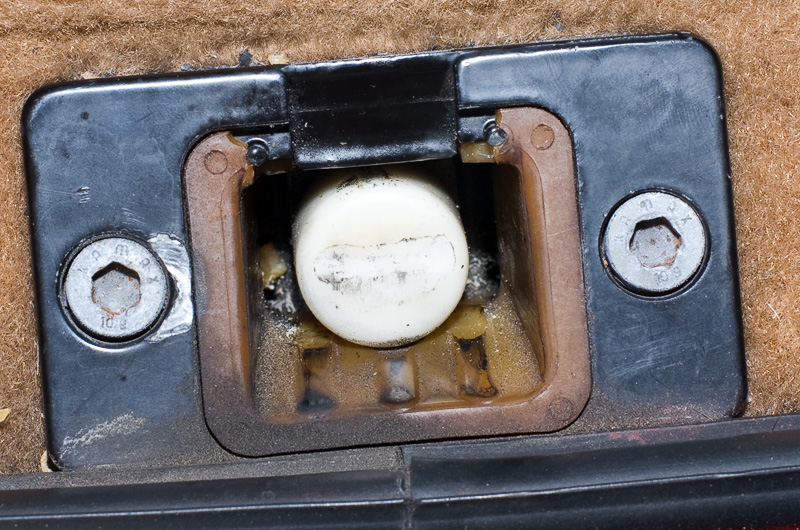
The marring around the left bolt is likely from the 2-hr drive home from Christmas - the hatch was likely bouncing and rubbing/scuffing that area.
See attached photo:
The marring around the left bolt is likely from the 2-hr drive home from Christmas - the hatch was likely bouncing and rubbing/scuffing that area.
12-29-2008, 01:17 AM
#71
Racer
Join Date: Oct 2008
Location: Northern Territory, Australia
Posts: 361
Likes: 0
Received 0 Likes
on
0 Posts
I am astounded with amazement that with several members saying they have access to computer aided milling and cutting machines that no one has come up with a replacement nylon/nolathane bush for the female side of this latching assembly. It appears to be the bain of many here on Rennlst...including myself. All of these shimming and adjusting methods appear worthless without the nylon bushing being in place. I have put many hours into the unit with no success and it appears that i am going to have to bite the bullet and order the lower assembly.
12-29-2008, 01:31 AM
#72
Rennlist Member
I took a thin piece of stiff rubber and cut a piece as a shim to replace what is missing in the picture. Not shimming the mounting points, replacing the plastic that is missing. Its like 1.5 inches square or thereabouts.
It changes the orientation of the white plunger piece slightly which, in-turn, allows the catch to lock.
As a temp fix, try a piece of cardboard or matchbook cover folded-up.
My semi-perm solution will be a series of flat pieces cut separately and afixed in place.
A 3d CNC piece of delrin would be better. Ditto, somebody should produce it and sell for $20 each.
12-29-2008, 07:18 AM
#74
Bumbling Neophyte
Rennlist Member
Rennlist Member

Join Date: Apr 2003
Location: IAX, FL
Posts: 269
Likes: 0
Received 0 Likes
on
0 Posts
I might have the correct "gear", a MAXNC10 CNC mill, but I'd need some help with the design of the fix. See www.maxnc.com to see what I have.
KK
KK
12-29-2008, 07:31 AM
#75
Bumbling Neophyte
Rennlist Member
Rennlist Member
Join Date: Apr 2003
Location: IAX, FL
Posts: 269
Likes: 0
Received 0 Likes
on
0 Posts
I might have the correct "gear", a MAXNC10 CNC mill, but I'd need some help with the design of the fix. See www.maxnc.com to see what I have.
KK
KK