
Over my head- crossmember proble m: MM alignment?
 08-21-2006, 04:25 PM
#16
Archive Gatekeeper
Rennlist Member
Rennlist Member
Thread Starter
Mike-
There is no pin on the top of the Indian Anchor mounts I got (from Carl), nor is there an upper pin on the factory mount. The anchor mount does have a pin on the bottom, which I dremeled off, since it is located closer to the central axis of the mount than the factory mount's pin, so it doesn't line up with either the hole in the plate the mount sits on, nor the hole in the crossmember.
Unless you're talking about the stud that sticks out of the top of the motor mount itself? That SEEMS to be aligned correctly in the mount housing, though the way that the upper metal plate of the anchor mount sits in the mount housing doesn't exactly inspire confidence. The rounded 'shoulders' of the top of the mount seem to bump against the rails of the mount housing, so when you tighten the M12 nut onto the upper MM stud, you don't get the feeling that the top of the mount is snug against the inside of the housing. Maybe it is, but it's tough to see. Other people noted issues with the mount rotating while torquing the upper MM nut to the housing- I had no trouble since the shoulders of the mount are keeping it from turning in the housing. Maybe this is the source of my problem?
By the way, what torque value do people use for tightening the the upper (mount to housing) and lower (mount to crossmember) M12 nuts? Default for an M12 bolt is 62 ft-lbs, but I'd hate to tear the studs right out of the mount......
I hope I'm not scaring anyone away from trying this, I'm probably missing something obvious. Plenty of other folks have installed the anchor mounts just fine, and I'm going to enlist some additional hands (and BTDT expertise) to get the beast back together..... It's not a daily driver, so no sweat there. I'm just waiting for the ticket from the Irvine police for having an old car up on block in the driveway.....")
There is no pin on the top of the Indian Anchor mounts I got (from Carl), nor is there an upper pin on the factory mount. The anchor mount does have a pin on the bottom, which I dremeled off, since it is located closer to the central axis of the mount than the factory mount's pin, so it doesn't line up with either the hole in the plate the mount sits on, nor the hole in the crossmember.
Unless you're talking about the stud that sticks out of the top of the motor mount itself? That SEEMS to be aligned correctly in the mount housing, though the way that the upper metal plate of the anchor mount sits in the mount housing doesn't exactly inspire confidence. The rounded 'shoulders' of the top of the mount seem to bump against the rails of the mount housing, so when you tighten the M12 nut onto the upper MM stud, you don't get the feeling that the top of the mount is snug against the inside of the housing. Maybe it is, but it's tough to see. Other people noted issues with the mount rotating while torquing the upper MM nut to the housing- I had no trouble since the shoulders of the mount are keeping it from turning in the housing. Maybe this is the source of my problem?
By the way, what torque value do people use for tightening the the upper (mount to housing) and lower (mount to crossmember) M12 nuts? Default for an M12 bolt is 62 ft-lbs, but I'd hate to tear the studs right out of the mount......
I hope I'm not scaring anyone away from trying this, I'm probably missing something obvious. Plenty of other folks have installed the anchor mounts just fine, and I'm going to enlist some additional hands (and BTDT expertise) to get the beast back together..... It's not a daily driver, so no sweat there. I'm just waiting for the ticket from the Irvine police for having an old car up on block in the driveway.....
 08-21-2006, 04:58 PM
#17
Supercharged
Rennlist Member
Rennlist Member
Join Date: May 2002
Location: Back in Michigan - Full time!
Posts: 18,925
Likes: 0
Received 60 Likes
on
34 Posts
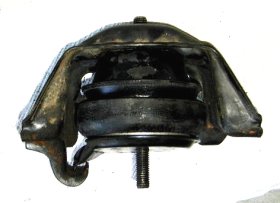
I think* (it's been almost a year since I did this, so I'm foggy on the details) your MM's are in upside down. That locator pin IIRC goes in the top. Some of the Anchor MM have had pins on both top and bottom - in which case you would want to trim off the bottom pin.
Now let's assume that you have them in correctly. Basically, I loosely put all the bolts in the middle of the cross member together. The 2 side bolts that go the frame were a reall bugger to get for me. I used a 3-foot cheater bar to push them into position and get the bolts started. Then I just tightened everything up.
Now let's assume that you have them in correctly. Basically, I loosely put all the bolts in the middle of the cross member together. The 2 side bolts that go the frame were a reall bugger to get for me. I used a 3-foot cheater bar to push them into position and get the bolts started. Then I just tightened everything up.
 08-21-2006, 05:15 PM
#19
Archive Gatekeeper
Rennlist Member
Rennlist Member
Thread Starter
Holy crap.
Where's the smilie symbol for 'I'm a major league idiot'? Yep, that picture is straight out of Pirtle's instructions. The thing is, I focused on the shot of Pirtle's comparing the height of the two mounts (see below), and didn't even notice that the metal plates are opposite ends of the mounts. Duh.
Ah well, at least I can contribute by helping idiot-proof the instructions....
Mike- Ignore my er, finer points about where the pins on the Anchor mounts are, I clearly have no clue what I'm talking about. I'd edit out that post for fear of confusing someone in the future, but hell, it adds to the hilarity...
Take home messages:
1) Study the instructions before embarking on this job
2) Resist the urge to do too many WYAIT's, or have enough time to do everything you want without time pressure. 30 hours under a 928 in one weekend is too much (for me, anyway)
3) The purchase price of a Rennlist subscription? Priceless!
Thanks, Andrew. I'll be going home now.....
(Work? what work?)
Where's the smilie symbol for 'I'm a major league idiot'? Yep, that picture is straight out of Pirtle's instructions.
The thing is, I focused on the shot of Pirtle's comparing the height of the two mounts (see below), and didn't even notice that the metal plates are opposite ends of the mounts. Duh. Ah well, at least I can contribute by helping idiot-proof the instructions....
Mike- Ignore my er, finer points about where the pins on the Anchor mounts are, I clearly have no clue what I'm talking about. I'd edit out that post for fear of confusing someone in the future, but hell, it adds to the hilarity...
Take home messages:
1) Study the instructions before embarking on this job
2) Resist the urge to do too many WYAIT's, or have enough time to do everything you want without time pressure. 30 hours under a 928 in one weekend is too much (for me, anyway)
3) The purchase price of a Rennlist subscription? Priceless!
Thanks, Andrew. I'll be going home now.....
(Work? what work?)
 08-21-2006, 05:40 PM
#21
Rennlist Member
Cool. Now I know which way they go in. Thanks Andrew. And thanks Rob for putting them in backwards so that I won't have to now. LOL.
Mike
1987 S4 Auto
Mike
1987 S4 Auto
08-21-2006, 06:33 PM
#22
Under the Lift
Lifetime Rennlist
Member
Lifetime Rennlist
Member
Good job, Andrew. I was going to offer sympathy and not much more than take another close look by putting an old mount back on the crossmember versus the new mount.
08-21-2006, 07:22 PM
#23
Archive Gatekeeper
Rennlist Member
Rennlist Member
Thread Starter
Well, amazing how it all fits together when the darn mounts are in right side up. After flipping them over, I had the crossmember up and loosely bolted in place in about 30 minutes. I have the pasenger side LCA bolted in but am still struggling with the other side. And I can see where that upper crossmember bolt is going to be a bear. It's close on the right side, no way on the left....
Bob is on his way, however, so hopefully he can save me from myself. At least if the chain on the support bar breaks, it'll land on the crossbar, not my head- so I can cross that off my list of irrational(?) worries......
Thanks again for the 'pointer', Andrew! Beer's on me if/when you make it to Sharktoberfest
08-21-2006, 07:43 PM
#24
Basic Sponsor
Rennlist
Site Sponsor
Rennlist
Site Sponsor
Andrew - nice catch!
Rob - should be plain sailing now.
Rob - should be plain sailing now.
__________________

Does it have the "Do It Yourself" manual transmission, or the superior "Fully Equipped by Porsche" Automatic Transmission? George Layton March 2014
928 Owners are ".....a secret sect of quietly assured Porsche pragmatists who in near anonymity appreciate the prodigious, easy going prowess of the 928."
Does it have the "Do It Yourself" manual transmission, or the superior "Fully Equipped by Porsche" Automatic Transmission?
George Layton March 2014928 Owners are ".....a secret sect of quietly assured Porsche pragmatists who in near anonymity appreciate the prodigious, easy going prowess of the 928."
08-21-2006, 09:01 PM
#25
Shameful Thread Killer
Rennlist Member
Rennlist Member
For those upper x member bolts, use a long punch to get them close, then you may need to use a bottle jack on the x member, or a pipe wrench on the flange to get the holes lined up. I used an air ratchet on the bolt while I jacked and twisted the x member and both went in after some gnashing.
I didn't have the photo of the MM to help by, and was on the road when you posted. I assumed(my bad) that you had the MM on the s member the right way.
Doc
I didn't have the photo of the MM to help by, and was on the road when you posted. I assumed(my bad) that you had the MM on the s member the right way.
Doc
08-21-2006, 09:17 PM
#26
Nordschleife Master

Join Date: Sep 2004
Location: Not close enough to VIR.
Posts: 9,429
Likes: 0
Received 2 Likes
on
2 Posts
Originally Posted by Andrew Olson
I think* (it's been almost a year since I did this, so I'm foggy on the details) your MM's are in upside down. That locator pin IIRC goes in the top. Some of the Anchor MM have had pins on both top and bottom - in which case you would want to trim off the bottom pin.
08-21-2006, 10:18 PM
#27
Rennlist Member
Rob, I had this errie sense of deja vu ( all over again .... says he  ) as you detailed the MM job - and my thoughts went back to the fun of installation .
It was best summed up in the line about the dog and the football .....
) as you detailed the MM job - and my thoughts went back to the fun of installation .It was best summed up in the line about the dog and the football .....
08-21-2006, 10:48 PM
#28
Rennlist Member
Excellent Andrew; never thought he'd have the pin upside down.
Rob, don't feel bad .................us who operate ourselves have many stories of 'oops' to tell. At least you can always say BTDT like most of us.
Rob, don't feel bad .................us who operate ourselves have many stories of 'oops' to tell. At least you can always say BTDT like most of us.
08-22-2006, 02:26 AM
#29
Archive Gatekeeper
Rennlist Member
Rennlist Member
Thread Starter
Whelp, it was the best of times and the worst of times (though hopefully nothing serious, more on that in a minute.)
On the best side, I finally got the mounts turned right side up, and got the crossmember up and sort of in place. I decided to pull the lower shock bolt on the passenger side, which dropped the LCA completely out of the way (support it so it's not hanging on the outer tie rod ball joint). This made it a lot easier to get the crossmember up.
The true best of times was when Bob showed up around 4 PM. He helped me (rather, I helped him, he's the surgeon, I'm the scrub nurse) button everything up. We replaced the steering rack bushings with Carl's solid ones -my old bushings had the peened collars, so we punched them out with one of the little wedge shaped punches from a 10 piece set I'd randomly picked up at HF about 2 years ago- came in handy! BTW, the bushings are REALLY tight on the M8 bolts, but they'll go in as you tighten the bolts down.
Next, we (and by 'we' I mean Bob) got the upper crossmember bolts in and then we lined up the driver side LCA and got the rack up on the steering shaft. We torqued all the bolts, reattached the starter harness, added coolant and oil, topped up the power steering fluid, put the wheels on, dropped her off the PorKen bars, connected the battery, and fired her up.
DARNED IF THE MOTOR DOESN'T ROCK WHEN YOU BLIP IT!!!!!!!

 (does that convey the feeling adequately?)
Bob headed out and I did a bunch of cleaning up, then got the oil and PS fluid out my hair and went for a brief spin around the neighborhood. We got the steering back on the right spline, the alignment seems to be intact, and smoooooooth engine!
So all was well for about a mile, then a slight engine-speed-dependent groan started coming from the steering, as it got worse when I turned the wheel. In fact, it got progressively worse as I drove the last half mile home (I never went over 25 mph), so I garaged her and there she sits, in one piece, at least. The groan is accompanied by a vibration transmitted up the steering column, so it's coming from the rack ( I think !?!)
Since I drained literally every last drop of PS fluid out of the rack, pump, and reservoir, I'm hoping that the noise is just some sort of cavitation/trapped air thing that will work itself out. The car's been sitting in the garage for 30 minutes and there's not a drop of fluid on the ground.
Do these symptoms sound familiar to anyone?
I can't post this without again thanking Bob Fuelleman for driving 100 miles round-trip TWICE this weekend (thru LA traffic in his beautiful '89 S4) and giving up literally two afternoons in order to save my naive butt with this project. Dr. Bob, you rock!
And thanks to John Pirtle and every guru on this board, without whom I never would have dared buy my dream car. (There, that sappy enough for ya )
On the best side, I finally got the mounts turned right side up, and got the crossmember up and sort of in place. I decided to pull the lower shock bolt on the passenger side, which dropped the LCA completely out of the way (support it so it's not hanging on the outer tie rod ball joint). This made it a lot easier to get the crossmember up.
The true best of times was when Bob showed up around 4 PM. He helped me (rather, I helped him, he's the surgeon, I'm the scrub nurse) button everything up. We replaced the steering rack bushings with Carl's solid ones -my old bushings had the peened collars, so we punched them out with one of the little wedge shaped punches from a 10 piece set I'd randomly picked up at HF about 2 years ago- came in handy! BTW, the bushings are REALLY tight on the M8 bolts, but they'll go in as you tighten the bolts down.
Next, we (and by 'we' I mean Bob) got the upper crossmember bolts in and then we lined up the driver side LCA and got the rack up on the steering shaft. We torqued all the bolts, reattached the starter harness, added coolant and oil, topped up the power steering fluid, put the wheels on, dropped her off the PorKen bars, connected the battery, and fired her up.
DARNED IF THE MOTOR DOESN'T ROCK WHEN YOU BLIP IT!!!!!!!
(does that convey the feeling adequately?)Bob headed out and I did a bunch of cleaning up, then got the oil and PS fluid out my hair and went for a brief spin around the neighborhood. We got the steering back on the right spline, the alignment seems to be intact, and smoooooooth engine!
So all was well for about a mile, then a slight engine-speed-dependent groan started coming from the steering, as it got worse when I turned the wheel. In fact, it got progressively worse as I drove the last half mile home (I never went over 25 mph), so I garaged her and there she sits, in one piece, at least. The groan is accompanied by a vibration transmitted up the steering column, so it's coming from the rack ( I think !?!)
Since I drained literally every last drop of PS fluid out of the rack, pump, and reservoir, I'm hoping that the noise is just some sort of cavitation/trapped air thing that will work itself out. The car's been sitting in the garage for 30 minutes and there's not a drop of fluid on the ground.
Do these symptoms sound familiar to anyone?
I can't post this without again thanking Bob Fuelleman for driving 100 miles round-trip TWICE this weekend (thru LA traffic in his beautiful '89 S4) and giving up literally two afternoons in order to save my naive butt with this project. Dr. Bob, you rock!
And thanks to John Pirtle and every guru on this board, without whom I never would have dared buy my dream car. (There, that sappy enough for ya
)
08-22-2006, 02:38 AM
#30
Under the Lift
Lifetime Rennlist
Member
Lifetime Rennlist
Member
Yes, you need to work the rack back and forth as you fill the reservoir. You will see lots of froth, but it should clear.
Congrats on competing the big, dirty job. And kudos to Dr. Bob again for pitching in whenever and wherever needed.
Congrats on competing the big, dirty job. And kudos to Dr. Bob again for pitching in whenever and wherever needed.