
Rear wing repair project started

 04-28-2012, 05:07 AM
#18
Advanced
Join Date: May 2005
Location: Stockholm, Sweden
Posts: 62
Likes: 0
Received 0 Likes
on
0 Posts
I tried a slightly different way to fix two broken studs on the wing on my '91 S4. I drilled a 10 mm diameter hole into the foam behind the stud. Then I filled the hole with epoxy and pressed a threaded steel insert into the epoxy. I used a nylon screw to keep the insert in place while the epoxy set. The nylon screw also kept the epoxy out of the threads inside the insert. There was a nylon bushing on the old stud that I used to center the nylon screw and the insert in the hole. The insert I used was one which was used to get steel threads in wood. It had large threads for wood on the outside, ensuring a good fix to the epoxy, and M6 treads on the inside.
The fix looks quite clean, and seems to keep the wing in place.
/Peter
The fix looks quite clean, and seems to keep the wing in place.
/Peter
07-29-2012, 02:26 AM
#19
Archive Gatekeeper
Rennlist Member
Rennlist Member
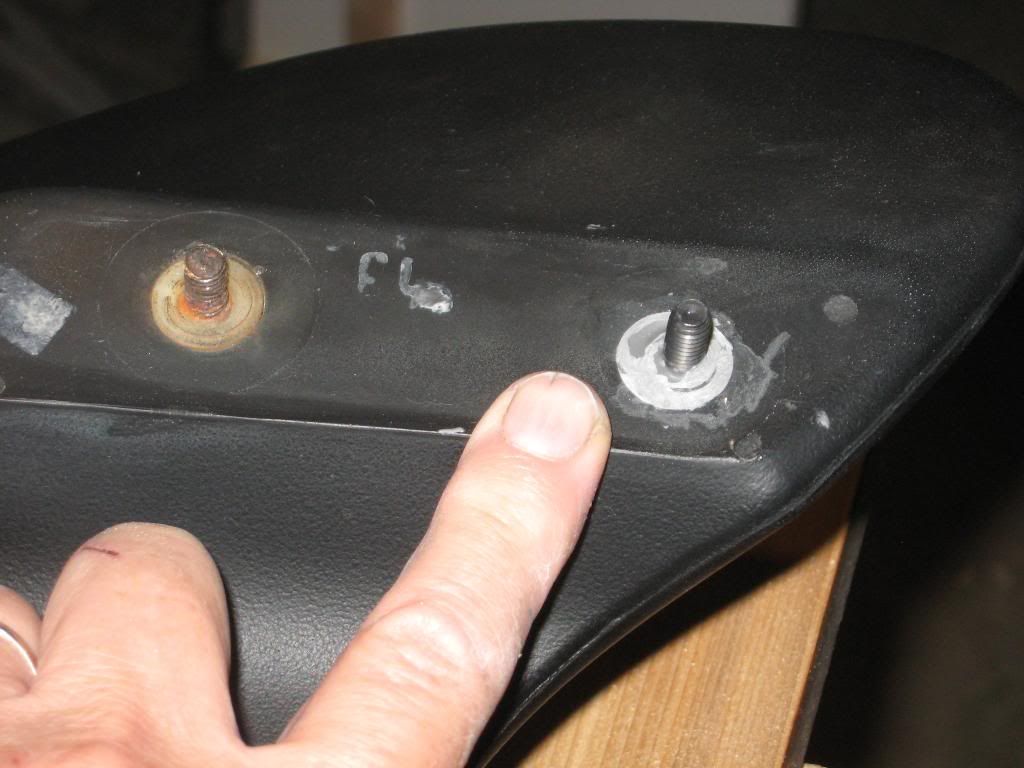
Started on this repair today- All four of my studs are pulling out of the wing, so I did two stud replacements today.
I cleaned out some of the schmutz around the hole, then drilled an 11/32" hole thru the remains of the steel plate.

Then I threaded it and inserted an M6 E-Z LOK into the hole:

Then inserted a 40 mm M6 stainless steel stud (McMaster 93805A326):

Then I put a nylon M6 nut on the stud to protect the threads from getting gooped, and then mixed up some Loctite 3500 epoxy:

And gooped it around the stud. Then made sure the spacing was correct with a 1x1 block drilled for the factory hole spacing:

Here's the final. Still debating as to whether to make up a pair of aluminum plates to cover these new studs, as in Roger's repair. I am tempted to mount this up on the car and see how stable it is, once it has cured for a few days.

I cleaned out some of the schmutz around the hole, then drilled an 11/32" hole thru the remains of the steel plate.
Then I threaded it and inserted an M6 E-Z LOK into the hole:
Then inserted a 40 mm M6 stainless steel stud (McMaster 93805A326):
Then I put a nylon M6 nut on the stud to protect the threads from getting gooped, and then mixed up some Loctite 3500 epoxy:
And gooped it around the stud. Then made sure the spacing was correct with a 1x1 block drilled for the factory hole spacing:
Here's the final. Still debating as to whether to make up a pair of aluminum plates to cover these new studs, as in Roger's repair. I am tempted to mount this up on the car and see how stable it is, once it has cured for a few days.
 07-29-2012, 04:09 AM
#20
Nordschleife Master
Rob, its probably redundant knowing your abilities with PET, but did you buy the teflon stickers which go between the base of the wing and the hatch?
If removing the wing, you can probably reuse the "desk pad"s, but new stickers are a good idea.
928 512 223 02 (Left)
928 512 224 02 (Right)
(at least, I assume they're teflon, based on them appearing to be the same material as the teflon stickers for the side of the hatch frame where it touches the rubber buffers on the body).
Edit: Here's a pic... from left to right:
2x 928 512 531 02 - teflon hatch stickers
"Adhesive film" for hatch surface under the wing, so the wing doesn't abrade the paint
928 512 223 02 (Left)
928 512 224 02 (Right)
2x 928 512 277 00 "Desk Pad" for levelling the surface under the hatch where the bolts (nuts on 88+ wings without hinges) go.
Last edited by Hilton; 07-29-2012 at 04:25 AM.
07-29-2012, 07:38 PM
#21
Archive Gatekeeper
Rennlist Member
Rennlist Member
Hi Hilton, yep, bought a couple of sets of each of those, some for me, some for Dan.
Finished off the other two posts today. Important to remember to tear out the old posts 1 at a time, so you have a reference to use the wooden 'gauge' for spacing...
Here's a dead post:

Finished off the other two posts today. Important to remember to tear out the old posts 1 at a time, so you have a reference to use the wooden 'gauge' for spacing...
Here's a dead post:
12-01-2014, 05:55 PM
#22
Pro
Join Date: May 2003
Location: Hamilton, Ontario, Canada
Posts: 700
Received 0 Likes
on
0 Posts
Is there any feedback on which of the two methods work best? They both look equally effective and I can go either way. I am looking for some long term results. I probably will not use the aluminum bracket as Roger did but I do like the idea of the Teflon sheets that will be a barrier between the wing and the painted finish.
I have the same threaded inserts (mine are brass) that Rob used which I use in my woodworking projects, but I couldn't locate any M6 hanger bolts as Peter used in the initial start of the thread so I sourced out 1/4" hanger bolts which are almost the same.
Another question is whether you glued in the plastic bushing or just left it off and let the epoxy create its own bushing. My gut feeling is that the epoxy bushing would be the strongest method but any feedback is appreciated.
12-01-2014, 06:23 PM
#23
Archive Gatekeeper
Rennlist Member
Rennlist Member
Mine is still solid after 2 years. I am, however, really careful not to slam the hatch closed- after replacing the plastic hatch insert a while back and doing this wing repair, I have re-trained myself to close the hatch as gently as possible- it doesn't take much to get it to latch.
12-01-2014, 10:40 PM
#24
Pro
Join Date: Dec 2010
Location: Palgrave, Ontario, Canada
Posts: 700
Likes: 0
Received 2 Likes
on
2 Posts
One stud on the wing my 90 had broken, but the base had not pulled out. So I removed the surrounding plastic. I noticed that one of my shorter hex head metric bolts was almost exactly the correct length, with the bolt head fully in the recess:
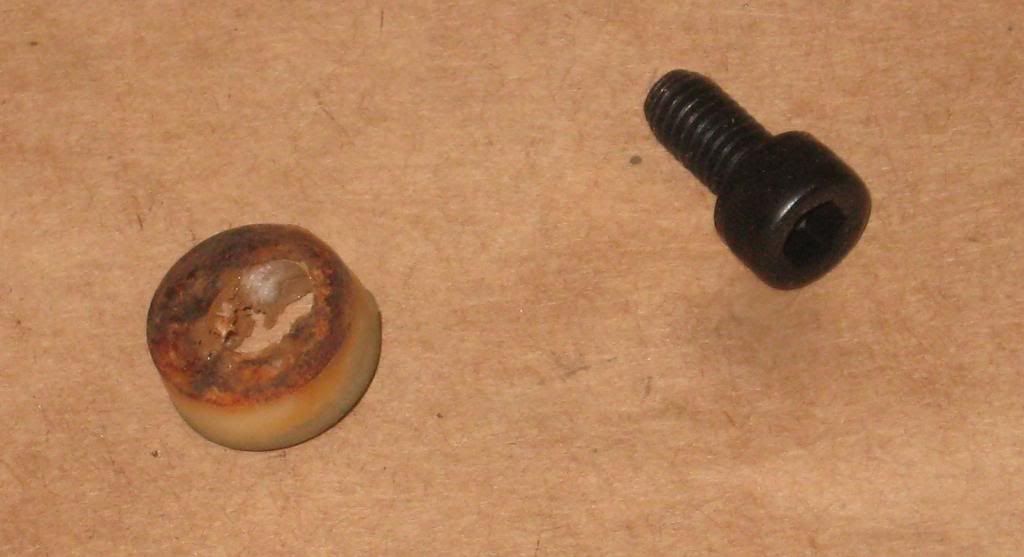
I drilled out the hex socket with a bit so that it actually fitted over the remaining stud stub. I then masked off the wing around the hole and filled the recess with JB Weld. I ensured that the bolt was aligned correctly using the aluminum backing plate that goes on the underside of the hatch between the two holes. The important point id that the epoxy was attaching the new bolt head over the old cut-off stud.
After curing overnight, I scored around the edges of the JB where it had flowed on the masking tape, then peeled off the tape and overlapping epoxy. After a little bit of grinding with my Dremel and a conical grind stone, here is the result:
So far it has held for over a year - but I close the hatch carefully.

I drilled out the hex socket with a bit so that it actually fitted over the remaining stud stub. I then masked off the wing around the hole and filled the recess with JB Weld. I ensured that the bolt was aligned correctly using the aluminum backing plate that goes on the underside of the hatch between the two holes. The important point id that the epoxy was attaching the new bolt head over the old cut-off stud.
After curing overnight, I scored around the edges of the JB where it had flowed on the masking tape, then peeled off the tape and overlapping epoxy. After a little bit of grinding with my Dremel and a conical grind stone, here is the result:

So far it has held for over a year - but I close the hatch carefully.
12-02-2014, 12:34 PM
#25
Rennlist Member
Join Date: Jul 2002
Location: Deep in the Heart of Texas!
Posts: 3,266
Likes: 0
Received 5 Likes
on
4 Posts
Great work! I think I have my New Year's resolution now ;-)
Martin, I think your method might work for me ... curious, how did you remove the surrounding plastic piece? It looks in the pic as if it came out intact, I would have thought it would have to be cut up to come out?
Martin, I think your method might work for me ... curious, how did you remove the surrounding plastic piece? It looks in the pic as if it came out intact, I would have thought it would have to be cut up to come out?
12-03-2014, 12:20 AM
#26
Pro
Join Date: Dec 2010
Location: Palgrave, Ontario, Canada
Posts: 700
Likes: 0
Received 2 Likes
on
2 Posts
Great work! I think I have my New Year's resolution now ;-)
Martin, I think your method might work for me ... curious, how did you remove the surrounding plastic piece? It looks in the pic as if it came out intact, I would have thought it would have to be cut up to come out?
Martin, I think your method might work for me ... curious, how did you remove the surrounding plastic piece? It looks in the pic as if it came out intact, I would have thought it would have to be cut up to come out?

If I were doing this on purpose, instead of by accident, I would likely separate the stud from the surrounding plastic with a small hole saw outside of the stud, and then turn the plastic to separate it from the wing foam in which it is embedded.
BTW, you may have to trim the length of the broken stud to so that the bolt head you put over it is fully recessed in the wing and the protruding bolt shaft is the correct length.
12-03-2014, 11:07 AM
#27
Rennlist Member
Join Date: Jul 2002
Location: Deep in the Heart of Texas!
Posts: 3,266
Likes: 0
Received 5 Likes
on
4 Posts
hole saw for the plastic, great, thanks. My bolts broke off flush with the spoiler/plastic, so likely will need to drill down the stud enough for the hex bolt head to sink flush into spoiler.
 07-04-2018, 10:02 AM
#29
Three Wheelin'
Mine is still solid after 2 years. I am, however, really careful not to slam the hatch closed- after replacing the plastic hatch insert a while back and doing this wing repair, I have re-trained myself to close the hatch as gently as possible- it doesn't take much to get it to latch.
Is your repair still holding ? I have to repair one of my wing and like your approach.
Cheers
Luc
07-24-2022, 09:05 PM
#30
Rennlist Member
Join Date: Jul 2002
Location: Deep in the Heart of Texas!
Posts: 3,266
Likes: 0
Received 5 Likes
on
4 Posts
Holy ancient thread revival! Just finished doing my two broken bolts this weekend. Used the martinss method with the upside-down drilled-out hex head bolt, size M6 x 10mm. Quite a bit of drilling, filing, etc. to get the new bolts to recess fully into the spoiler. I drilled several small holes around the bolt stubs and through the steel plate to give the JB Weld some additional hold.
Result is a very sturdy connection to the hatch and no signs of weakness in the repaired bolts.
Now, what's next ??
Result is a very sturdy connection to the hatch and no signs of weakness in the repaired bolts.
Now, what's next ??
Last edited by Tom in Austin; 07-24-2022 at 09:08 PM.