When you click on links to various merchants on this site and make a purchase, this can result in this site earning a commission. Affiliate programs and affiliations include, but are not limited to, the eBay Partner Network.
I used rubbing compound on the tail of my shark. Fortunatly in just one area. It left a dual mark. It would not buff out to a shine or wax out. I goofed up I guess using rubbing compound on the fiber glass tail section. How or what is the best way to repair this?
Thanks...My concern was after using it on the side of the car. I got a dull mark. But, It buffed out and waxed up nicely. Then I went to the tail and used the same process and got a dull mark and it would not buff out or wax out to a shine. I am blaming my self due to the fiberglass tail.
You might try using a plastic polish. 3M make a nice product that I used on clear convertible windows. Crest tooth past can also work. Remember rubbing compound should always be followed by a polish (or glaze), then a wax.
Depending on how much you polished, be carefull as you continue so you don't burn through the paint.
Rubbinbg compound is intended for use on new paint jobs to smooth out orangepeel and other defects. It's sometimes used on --extremely-- oxidized paint to remove the damaged layer. For most folks, rubbing compound, especially with a machine, is a short road to ruined paint. If you have a lot of paint left, your procedure to recovery is a series of less aggressive polishes. As another mentioned, the Fine Cut would be a suitable next step, followed by swirl marke remover, a cleaner/polish, a glaze, and finally a wax if you use that stuff. Using the progressively finer abrasives allows you to remove paint without making deeper scratches in what you have left.
If you are at all unsure of what you are doing, it's not a bad idea to consult with a professional detailer to do your recovery. The money spent for a pro to fix it will be a lot less than the cost of refinishing the plastic bumper cover.
The coment on the plastic polish: The bumper covers are plastic under the paint, but it's the paint that needs the attention. No need to spend extra $$ on the solvent-free plastic polish products for this.
I suggested plastic polish because of it's very fine abbrasive. It's really used to make "foggy" windows on convertible, clear again. You could also try - by hand - some glaze or polish ont he area and see how it comes out. If you do it by hand, you shouldn't be able to do any further harm.
I have some pics. But , I am new to the forum thing and when I figure it all out I will be happy to upload a few.
Thanks and thanks to all. I''ll give the polish a try.
I'm no detail guy, too say the least, but after wheeling my car with McGuires micro compound...I've been pulling my freak'n hair out trying to wax out the darn wheel marks. After three different waxes...no success...only more frustration.
I do a quick search...and...l find out about missing an important step...polishing.
Off to the parts store we go.
Also, just watched Motorweek and they showed the new 918...need one, want one, but can't afford one...
There's plenty of varied guidance on paint care. Least aggressive polish you can get away with, particularly with a machine. See my most #5 above.
My black car gets Meguiars 205 for only the worst defects. It's 25+ year old paint that stopped growing a while ago, so any damage done with chems is one step closer to death. I use two finer polishes after the 205, then glaze, then seal. For most seasonal care, generally no abrasives, just glaze and seal. That alone takes several hours, even with the d/a doing the grunt part. Then it gets some [pick your favorite brand] instant spray detail after each gentle wash. I've seen some impressive demo's of Griot's products that might get some attention too. Whichever flavor you choose, follow the mfr's guidance on what to use and in what order.
I read your thread about the two hours spent out on the lawn. Suggest you find shade and cool instead of out in the sun, in deference to keeping your chems from drying too fast. Hot paint gets softer and responds poorly too.
The paint is acrylic . If you want the best shine use an acrylic /plastic polish. The colour will be much deeper as well. If you use a polisher you can burn through too easy. The best result ,time consuming but the best, is to use nothing more coarse than Kleenex (and a lot of elbow grease) to polish to a finish you cannot match any other way. Try it in a small area. You will kick yoursel because now you must do the whole car to match that very shiny spot. This is not waxing but polishing down to 20 microns or finer smaller than the eye can discern.
I read your thread about the two hours spent out on the lawn.
Only the picture were taken on the lawn, I'd have been to dead too take pictures if I'd have done that outside...it was, 80 some degrees and humid as heck.
Done in the garage, with fans for cooling the whole operation.
For what it is worth...
I ended up using 3M products and was very happy with the results.
But actually, my paint is in pretty good shape I would say, car was garage kept by previous owner, and now me. The only spot that's in bad shape is the roof, crackling in the clearcoat (owner said he did leave it outside one summer...and learned his lesson). So, I was fortunate enough to have a good starting point...plus, after further review...I believe the right side of the car has been resprayed at some point in its life.
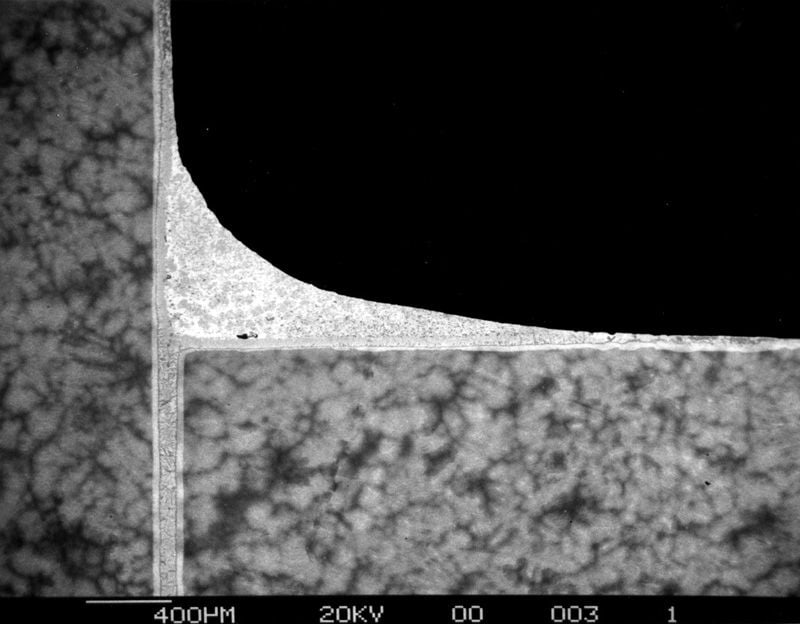
I don't think I've ever polished a car, but I need to polish my black 928 soon. All metallurgists are polishing experts - the microstructure of a bit of metal is examined by polishing a section and looking at it under a microscope. There must be no visible scratches, or damage from the polishing. it typically requires four grades of sandpaper, maybe four sizes of diamond polishing compound on a cloth wheel, and a final slurry of 0.06 micron alumina. Then a special etch to bring out the features you want to see. Beginners are wise to examine their samples after each step to see if all previous scratches are removed.
Since all 928 owners are fascinated by shiny things, and need some distraction from their electrical problems, I've attached a photo of a polished section of a braze joint.
Since I'm a beginner at polishing cars, I'd like to follow this general procedure (no sandpaper, I think). I'm considering getting a USB microscope. Are polishing compounds labelled with their particle size? Is anyone here able to say something like "start with 20 um, then 10, 3 and finish with [whatever]"?

 10-02-2005, 10:58 PM