
Ring and pinion gear contact pattern
 01-23-2005, 11:18 AM
#1
Addict
Rennlist Member
Rennlist Member
Thread Starter
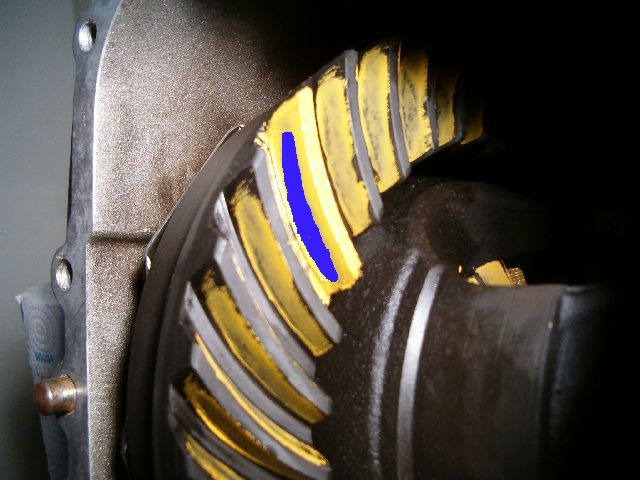
Before proceeding further at '85 and '92 5sp gearbox rebuilds we desided to try to find out with what kind of pattern ring and pinion gears touch each other. Used GM product made for the purpose and applied it to one ring teeth and rotated input shaft to let color spread to all gears. Area that touch to other gear marked blue on leading and trainling edge of one teeth to make it stand out on pictures.
'85 Euro S G28.10 with unknown mileage but certainly more than '92 has. Applied color to small gears as well just out of curiosity. Didn't see anything unexpected there.

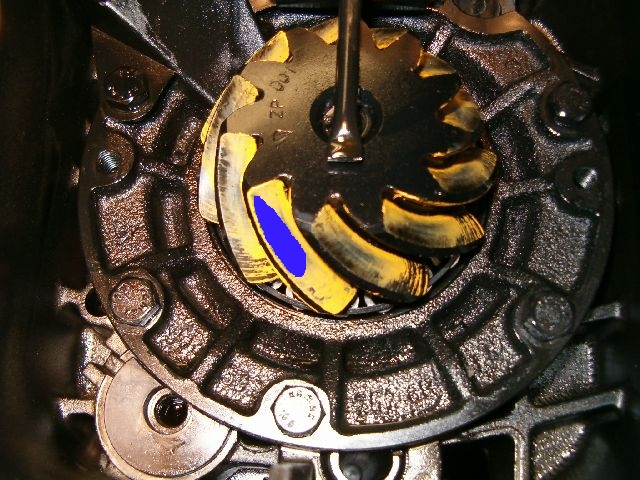
'92 G28.57 with 100K miles.
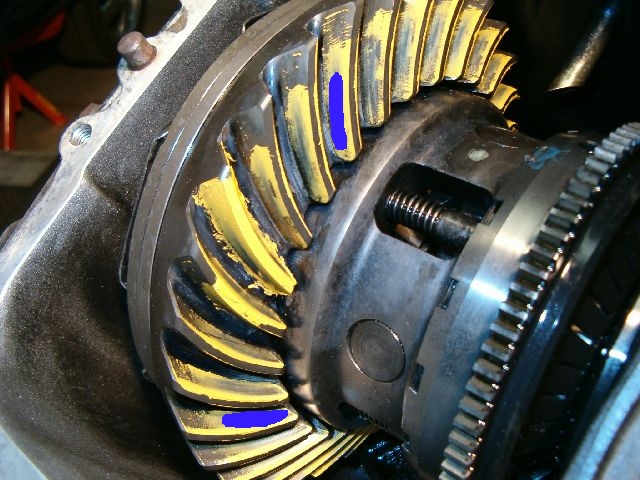
GTS do not seem to use outer part of teeths at all where as S has much larger contact area. I believe both were set like this at the factory and have never before been opened. Has anyone used same method on any 928 differential? Is different contact are result of more wear in older box or were these set up like this at the factory to make them run as quiet as possible? I believe reason for using special tools on fiting 928 gearboxes is to allow ring and pinion to be set to spot where they are silent. Will this result in different contact pattern in different boxes? I like S boxes shape better as it's clearly larger. Have to see how patterns change when boxes are back together and adjusted. We plan to use factory tools, if we can find them.
'85 Euro S G28.10 with unknown mileage but certainly more than '92 has. Applied color to small gears as well just out of curiosity. Didn't see anything unexpected there.
'92 G28.57 with 100K miles.
GTS do not seem to use outer part of teeths at all where as S has much larger contact area. I believe both were set like this at the factory and have never before been opened. Has anyone used same method on any 928 differential? Is different contact are result of more wear in older box or were these set up like this at the factory to make them run as quiet as possible? I believe reason for using special tools on fiting 928 gearboxes is to allow ring and pinion to be set to spot where they are silent. Will this result in different contact pattern in different boxes? I like S boxes shape better as it's clearly larger. Have to see how patterns change when boxes are back together and adjusted. We plan to use factory tools, if we can find them.
 01-23-2005, 01:25 PM
#2
Captain Obvious
Super User
Super User
It appears that the pinon gear depth is a bit on the deep side for the GTS diferetial. In conventional diferentials, the depth is usually controlled by a crush collar (a collapsable tube) and shim plates. Noise is usuall associated if the ring and pinon gears are not cut identically or if the back lash is not enough. The pinion depth usually does not make a gear set make any noise.
The S pattern is alot better but the GTS is not too bad either.
If you move the gear set from one case to another, all the parapmeters have to be checked and adjusted. Each diferetcial is machined slightly different. And since the tolerances are measured in the thousands of an milimeter, any minute difference in machining of the dif. cases will certainly show up when the gears are installed.
Basicly, all you really need to have the gears adjusted is a good dial indicar with a multiple jointed base and the pattern compound. The rest should be just regular tools.
I hope this helps!
01-23-2005, 01:36 PM
#3
Drifting

I adjusted the backlash on mine while still in the car. You don't need the factory tools for the backlash adjustment, as the measurements can be obtained directly from the ring tooth surface.
It's difficult for me to see the wear pattern with your yellow grease, but it looks wider than your blue anotation of the photo.
The ring and pinion are a matched set. The manufacture runs them together on a machine that varies the gear mesh to determine the quietest operation. They then stamp/etch the results on the gears (see WSM for details of the stamping).
The gears should be set by the specs prescribed by the manufacturer, so you'll be using a dial gage at the ring gear for the backlash (otherwise, using the special tool shown in the WSM), and not be adjusting to get a wear pattern. The dial gage should be orientated, such that it is perpendicular to the gear surface. The shim packs make up the adjustments. The other setting, is the pinion placement, which requires other measurements and removal of the transmission from the car.
01-23-2005, 05:59 PM
#4
Addict
Rennlist Member
Rennlist Member
Thread Starter
Thanks guys. Blue area is where other teeth had clearly made it's mark on yellow stuff. GTS had much smaller area and it was more towards center. Read WSM pages again few times and it seems it's possible to do all adjustments with normal dial gauge if I understood correctly how it's done. Not quite sure about backlash. Pinion gear is held moving by pulling it from behind with self made lever (WSM page 39-227) and ring gear is moved by hand? Is backlash the measure what ring moves up/down or left/right (viewed from rear)?
01-23-2005, 08:58 PM
#5
Captain Obvious
Super User
Super User
BACKLASH = FREEPLAY
Too little will wear out the gear set and too much can cause the teeth to crack or break off over time. It's always better to have some backlash than none.
Aslo, ther is no need to cover every tooth with the marking compund. Just cover a few ( maybe 4 ).
Too little will wear out the gear set and too much can cause the teeth to crack or break off over time. It's always better to have some backlash than none.
Aslo, ther is no need to cover every tooth with the marking compund. Just cover a few ( maybe 4 ).
01-24-2005, 02:44 AM
#6
Addict
Rennlist Member
Rennlist Member
Thread Starter
Ok, thanks. We only did cover one on ring gear. It spread to all others from there. On four small gears had to cover five I think to get so yellow to all of them.
01-24-2005, 02:19 PM
#7
Captain Obvious
Super User
Super User
"We only did cover one on ring gear. It spread to all others from there." If this is the case, then you are putting way too much compund on it. In my experinece, it was only required to lightly cover the surface on the ring gear's teeth and not to fill it. The idea behind this process is to see where the pinon gear will remove the conpound.
If you don't have access to the manuals, I would suggest to just read one for a doemestic RWD vehicle. After all, the procedure for obtainining the contact pattern is the same.
I hope this clears up the procedure a bit.
If you don't have access to the manuals, I would suggest to just read one for a doemestic RWD vehicle. After all, the procedure for obtainining the contact pattern is the same.
I hope this clears up the procedure a bit.
Trending Topics
01-24-2005, 03:06 PM
#8
Shameful Thread Killer
Rennlist Member
Rennlist Member
I'VE NEVER DONE A 928 BACKLASH/DEPTH SETUP! Now that I've shouted that, I agree that the pinion depth on the third photo is too deep. I have done a bunch of other cars, and the process is the same. Here's what sometimes happens; Franz inserts the pinion to the case with a 'standard' load of shims on the pinion shaft, and between the gear collar and bearing. He then inserts the ring set, torques it all up and dials in the backlash per WSM. Now, Franz realizes that the pinion is a bit too deep or to shallow, and either decides it's a do-over from the beginning or that it's good enough as is.
If he is too far out, the whole process starts over with fewer shims(too deep). This will have an affect on the ring shims too, becasue the pinion is a tapered and beveled gear. So, Franz chose to, let er go and do the next box.
What you may want to do(ugh): Start over with the trans on the bench. Set the pinion gear with fewer shims(back away from the spider set). Load the ring with the original set of shims and check lash. It will be too high, but you can view the contact patch and check the depth. Now, set the gear lash, and recheck the contact patch. It should be very similar in location, because the ring is beveled but not tapered as much, as it's about twice(2.2, or 2.54, or 2.73 times) as large in diameter as the pinion. It's possible that the patch may have moved too far, and you will have to redo the pinion depth again.
To help speed the process, alway torque the pinion carrier bolts, and side cover bolts that hold the ring gear before making any dial gauge mesurements. If you don't believe me, set up the dial gauge on the ring, and THEN tighten the carrier and side cover bolts. Watch the magic. Next, that squirt bottle of compound is just for the tooth, you don't want bunches of it in the case when you're done. Finally, have clean shims before adding them to the carrier stack. Even a small amount of cosmoline or junk can make a difference.
01-24-2005, 05:57 PM
#9
Addict
Rennlist Member
Rennlist Member
Thread Starter
AFAIK normal way to set up differential is that trial and error type procedure of watching what pattern gears make and changing someting in hopes for better result. Thought Porsche had eliminated this whole thing by finding out perfect spot by running ring and pinion on bench, marking results to ring gear and providing instructions to WSM how to find it no matter what parts are changed in gearbox. And this done simply by calculating all four shim thicnessess as described in manual. If Franz did his job when he measured those numbers engraved to the ring it should lead to good contact pattern after just one set of measurements. Then again if Franz had bad monday on the production line I'm in trouble and have to use common educated quess method without know how to do that. Using color before destroying both boxes was just safeguard and done to get baseline pictures. Please do not say this is wrong idea. 
 05-01-2006, 06:26 PM
#11
Addict
Rennlist Member
Rennlist Member
Thread Starter
Finally after more than year we have '85 gearbox back together enough to proceed with post installation measurement. In between box was totally torn down and all six syncros and many bearings were changed. Before applying GM yellow grease to diff gear again we measured backslash same way as before taking box apart. Using same shims at same sides as before result was same 0.18mm as before we started. This time it was bit harder to get constant results with dial indicator but all should be just like ring gear says they must be set.
While same shims are used resulting patterns at gears are little different than top two pics in first post. Probably nothing to worry about as all measurements check out and all should be ok.

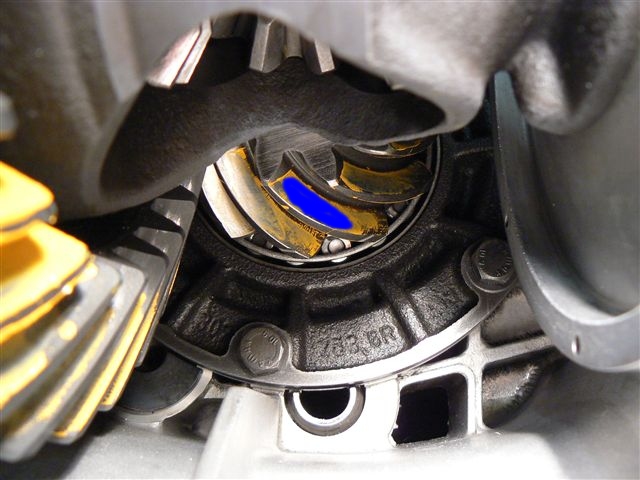
Pinion gear pattern doesn't look too bad either.
While same shims are used resulting patterns at gears are little different than top two pics in first post. Probably nothing to worry about as all measurements check out and all should be ok.
Pinion gear pattern doesn't look too bad either.