
View Poll Results: Interested?


Voters: 29. You may not vote on this poll
32V Cam Timing Tool & 16V/32V Conv 'Group Buy' #2


 01-28-2005, 01:42 PM
#18
Inventor
Rennlist Member
Rennlist Member
Thread Starter
Thanks Shane, Heinrich.
...
Matt,
I've thought about it, but you have to rotate the engine a few times to verify the setting, so it would be a pain to R&R the pointer each time.
...
But then again, the alternative would be a two piece design, with a degree wheel and a head mounted arm that would have to be bolted on.
How about a separate 'over the top' version for just the right side?
What'd y'all think?
...
Matt,
I've thought about it, but you have to rotate the engine a few times to verify the setting, so it would be a pain to R&R the pointer each time.
...
But then again, the alternative would be a two piece design, with a degree wheel and a head mounted arm that would have to be bolted on.
How about a separate 'over the top' version for just the right side?
What'd y'all think?
01-29-2005, 12:01 AM
#19
Inventor
Rennlist Member
Rennlist Member
Thread Starter
Here's the offending wheel:
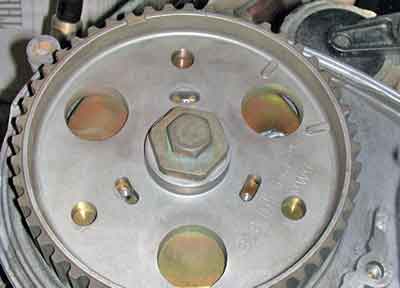
Thanks to E. Gillstrom for sending this pic.
I'm going to start designing an external pointer. Hopefully I can get a prototype cut this week.
After some thought, I don't think it would be too much hassle to unbolt the tool to spin the engine round a few times to double check. I reckon I'll make all the pointers external.
One plus, there will be no need to check the alignment, as the arm will be centered on the key.
 01-29-2005, 08:50 PM
#21
Inventor
Rennlist Member
Rennlist Member
Thread Starter
Here's a left cam install on Jim_H's 90GT, it appears to be ~1/2 degree advanced.
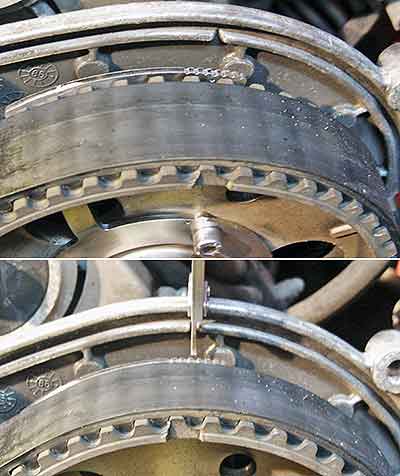
My thanks to Jim_H for letting me take pics of his car.
Jim said has never had the WSM adjustment done, while he has owned the car, so I still don't know if the advance is an adjustment issue, or the factory advance.
I have enough info now to draw up the prototype 'over the top' pointer...
My thanks to Jim_H for letting me take pics of his car.
Jim said has never had the WSM adjustment done, while he has owned the car, so I still don't know if the advance is an adjustment issue, or the factory advance.
I have enough info now to draw up the prototype 'over the top' pointer...
01-31-2005, 02:27 AM
#22
Inventor
Rennlist Member
Rennlist Member
Thread Starter
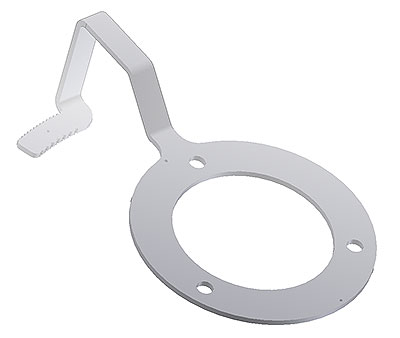
It's difficult to see because of the 3D view angle, but there are 13 notches (1 degree) for the 32V on the outer edge, and 7 notches (2 degrees) for the 16V on the inner.
02-01-2005, 03:49 PM
#23
Drifting
How do I get a set with instructions to install. I'm in the midst of TB/WP and would possibly like to roll up on this. Of course I'm doing it this weekend so time is of the essence.
02-01-2005, 04:05 PM
#24
Inventor
Rennlist Member
Rennlist Member
Thread Starter
Curt,
I'm pacing around the house, waiting for a call from the shop. I only made two of the newest version to test. (Gunshy)
I hope I can get hold of Jim_H today, so I can mount them up on his car to verify the design.
If Earl Gillstrom has made some measurements, it might be useful to you. IE. I still don't have any data correllating the WSM measurements and degree settings.
02-01-2005, 04:17 PM
#25
Drifting
I can always go back and reset the timing later, right? Are the cam sprockets already slotted? How exactly do you set the timing on them? Line everything up at 45 and go at it?
02-01-2005, 04:42 PM
#27
Inventor
Rennlist Member
Rennlist Member
Thread Starter
Curt,
You can record the setting you have now, and then go back to it if you want. The best method would be to use the WSM method, using a dial pointer, but you have to take the cam covers off to do that.
The cam sprockets are slotted, you set the timing at TDC #1 to check/adjust. The bolts included with my tool keeps the cams in the slot range while you loosen the cam bolt and then adjust them.
You might do well to wait until you retension your new belt to do this adjustment.
I'm hoping to make a table of the different years factory advance or retard, if any. This way all you would have to do is set the cams to the degree value, instead of the dial pointer method.
...
Terry,
I will be sending you a new set. The ones I sent out can't be used on the passenger side, because there is a sensor plate in the way.
You can use the old ones for an apple peeler!
02-01-2005, 04:51 PM
#28
Drifting
Cool man. Let me know when you get there. I plan on putting more then 1000 miles on the belt so I can retension it before my first track day Memorial Day weekend.
02-02-2005, 05:58 AM
#30
Inventor
Rennlist Member
Rennlist Member
Thread Starter
Anyone tired of this? I am. 
There was another unforseen dimensional problem, and the single degree marks were too hard to line up with the 32V recessed 'V' mark. They did give me an idea, however, for yet another design.
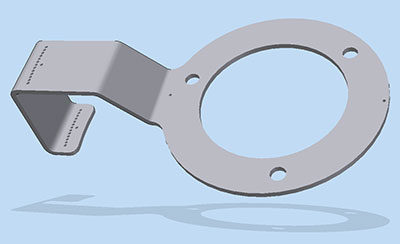
A long needle, such as a hat pin, will go through the two sets of holes, and into the recessed mark on the 32V engines.
I have been trying to combine the 16V conversion and the native 32V pointers, but alas, there will have to be two. I will use the sickle pointer which I shipped, for the conversion kits. (So, indeed, I will ask for those back, please. )
There was another unforseen dimensional problem, and the single degree marks were too hard to line up with the 32V recessed 'V' mark. They did give me an idea, however, for yet another design.
A long needle, such as a hat pin, will go through the two sets of holes, and into the recessed mark on the 32V engines.
I have been trying to combine the 16V conversion and the native 32V pointers, but alas, there will have to be two. I will use the sickle pointer which I shipped, for the conversion kits. (So, indeed, I will ask for those back, please.
)